

The railing went up on a Saturday and looked finished. Cables snug, posts plumb, handrail dead level. Four weeks later the end post leans inward, the top cable has gone soft, and the handrail rocks when someone puts a hand on it. The cable isn't the problem. The problem sits at the base, where a mounting bracket clamp ties the post to the deck.
That joint has four working parts. There's the bracket plate fixed to the structure, the clamp body that grips the post or tube, the fasteners that pull the two together, and the washers or isolating sleeve between them. Each one carries a share of the load, and any one of them can let go first.
Think of a tightrope. The wire can hold a person, but only because both ends are tied to something that won't move. Cable railing works the same way. Every tensioned cable pulls its post inward, and the clamp has to hold position, resist rotation, and push that force into framing rather than into deck boards.
The cable sets the span. The clamp decides whether the span survives the first hot week and the first person who leans on the handrail.
Failures follow three paths, and they arrive in this order:
- The clamp slips on the post. Grip depends on friction, and friction depends on bolt preload and clean contact surfaces.
- The bracket rotates on the structure. The plate stays bolted but the assembly pivots, so the post leans and the cables lose tension.
- The structure itself gives way. Blocking is too thin, fasteners pull out of soft lumber, or the bolts sit too close to an edge.
Before you inspect cable, fittings or finish, look at the clamp, the fasteners and the surface behind them. Those three decide whether the railing stays where you put it.
Table of Contents
- Bracket Types and Where Each One Fits
- How Load Travails From the Cable Into the Post
- Mixed Metals and Corrosion in Outdoor Clamps
- How to Install and Check Each Clamp
- Matching a Clamp to Your Project and Guard Rules
- Record Your Bracket Specification Before Ordering
Bracket Types and Where Each One Fits
A bracket choice fails when the connection is asked to do a job the surface cannot support. Start at the deck framing, then work back to the post style and run layout. The table below is the one I would keep open while ordering.
| Bracket type | Where it attaches | Backing required | Best fit |
|---|---|---|---|
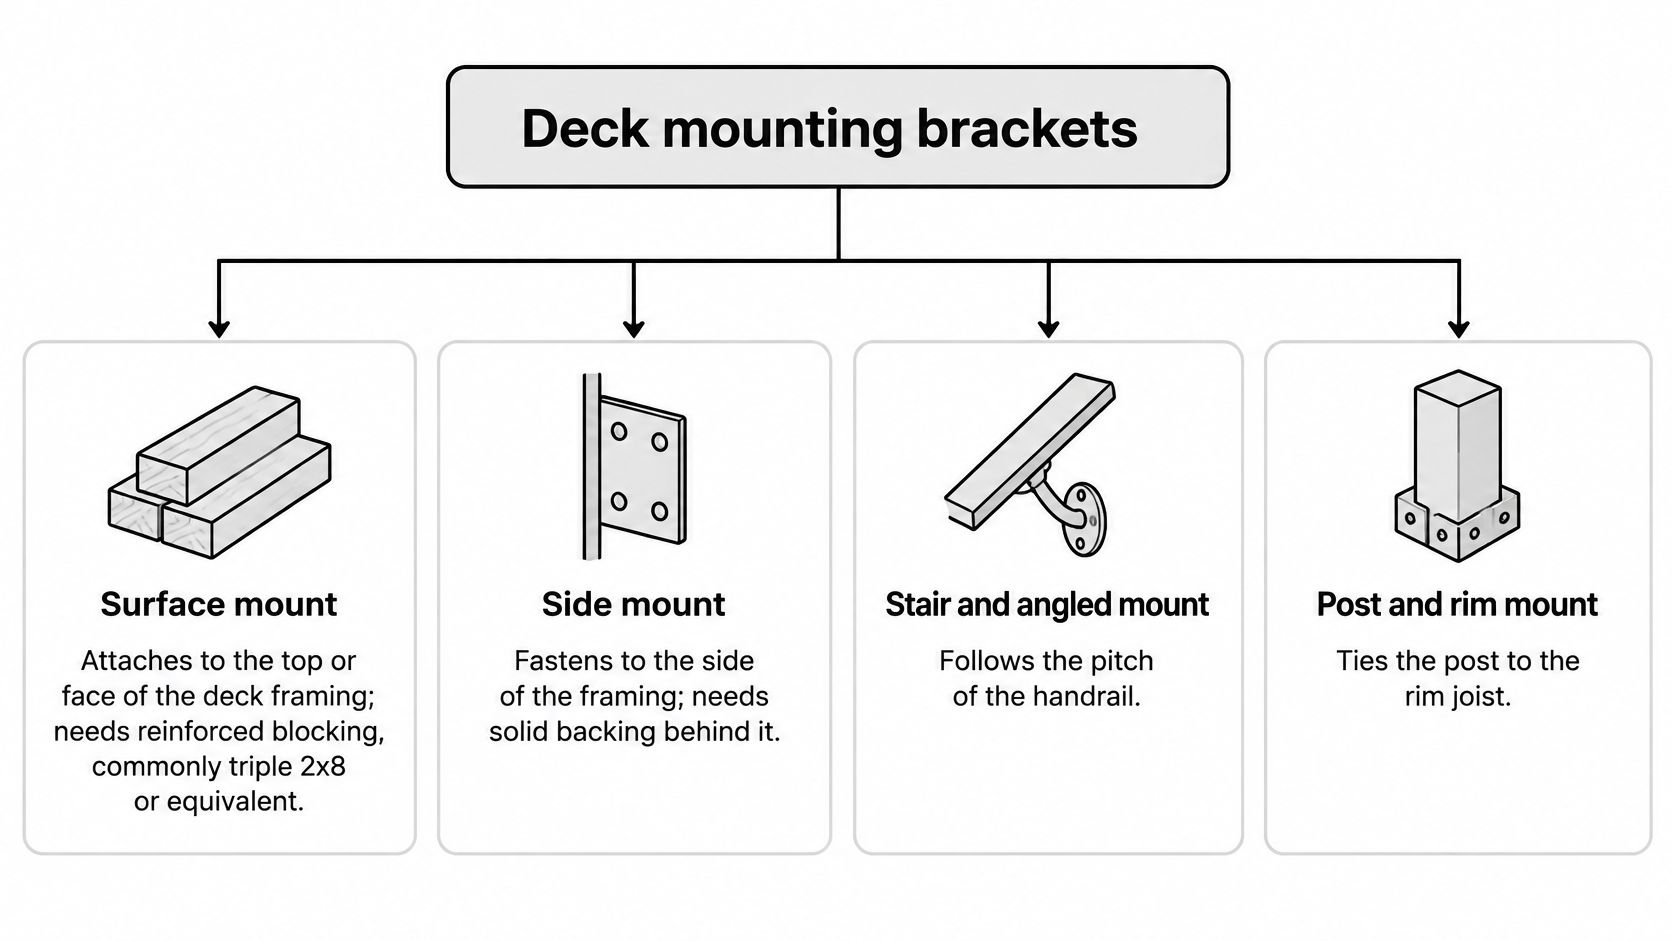
| Surface mount | Top or face of the deck framing | Reinforced blocking, commonly triple 2x8 or equivalent | Posts set on the deck surface |
| Side mount | Edge of the rim joist or fascia | Solid backing, commonly double 2x8 or equivalent | Edge-mounted posts with a clean outer face |
| Round post clamp | Round or tube post, clamped around its circumference | Solid post section sized to the clamp range | Round posts and tube stanchions |
| Corner bracket | The corner where two runs meet and cable changes direction | Solid framing at both run directions, commonly double 2x8 or equivalent | Inside and outside corners on L-shaped layouts |
| Stair or rake bracket | Angled handrail on a sloped post | Solid framing at the sloped post location, commonly double 2x8 or equivalent | Stair runs and rake transitions |
Surface mount is the standard choice for a deck-level run. The plate sits on the framing, so the load goes down into blocking. Reinforced blocking is required for surface mount railings, commonly triple 2x8 or equivalent. A single joist spreads point load poorly and gives the bracket a short lever arm to work against.
Side mount fastens to the edge of the rim joist or fascia. It keeps the post off the deck surface and leaves a cleaner outer face, but it loads fasteners in withdrawal rather than direct bearing. Solid backing is required for side mount railings, commonly double 2x8 or equivalent. Thin fascia over unsupported framing is a poor substitute.
Round post clamps wrap the post around its full circumference, which gives better contact than a flat plate pressing into a curved surface. Sizing is where these go wrong. The RAM Tough-Claw clamp is offered in three sizes covering compatible pipe diameters from 15.8 mm to 55.8 mm, according to ValoStore's 2026 product listing. A clamp forced over a post will not sit square, and a loose clamp will never develop the grip the run needs.
Corner brackets handle the point where two runs meet and take load from two directions at once. Backing should be solid in both run directions, commonly double 2x8 or equivalent. Stair or rake brackets hold an angled handrail on a sloped post. At that location, the framing behind the sloped post should be solid, commonly double 2x8 or equivalent, so the bracket does not pivot as the handrail changes direction.
For deck-mounted work, the practical split is simple. Surface mount puts the post on top of the deck and needs reinforced blocking below. Side mount puts the post at the edge and needs solid backing behind the rim or fascia. Round post clamps need the right post diameter and a clean contact surface. Corner and stair locations need framing that can take load from more than one direction.
The surface behind the bracket decides
A clamp is only as good as the wood or steel behind it. A machined stainless bracket can still rotate when it is bolted through 5/4 decking with nothing underneath. Four checks, in this order:
- Identify the post style first, round or square, surface or side.
- Measure the available surface at the mounting point, including fascia thickness.
- Confirm backing thickness against the selected bracket type, not against what is left in the scrap pile.
- Choose the type that keeps the post plumb with the least modification to the deck.
Match the bracket to the surface before you order. Returning hardware costs a week; rebuilding a rim joist costs a weekend.
How Load Travails From the Cable Into the Post
Follow the force. Cable tension pulls each post inward. That pull enters the clamp body, crosses the clamped interface as friction plus bolt bearing, moves into the bracket plate, and then into the framing. Break any link and the whole chain moves. The bracket-to-structure connection carries the load, so the substrate and backing matter as much as the metal hardware you can see.
A bracket gets loaded three ways, and they rarely arrive alone:
- Pull-out tries to withdraw the fastener from the substrate, which is why edge distance and blocking depth matter more than bolt diameter.
- Shear slides the plate sideways along the framing, typically from cable tension at an angle or a corner.
- Bending levers the assembly, which is what you see as a leaning post.
For deck-mounted work, guidance on footings for posts belongs in the planning stage because the load has to end up in something capable of resisting it. Surface mount railings need reinforced blocking, commonly triple 2x8 or equivalent, while side mount railings need solid backing, commonly double 2x8 or equivalent. Fasteners into a thin board with no backing behind it may hold the bracket in place until the first real load comes through, then the plate rotates or pulls loose.
Published clamp ratings show the scale involved. A representative MSS SP-58 Type 4 pipe clamp submittal lists recommended loads from 500 pounds for nominal pipe sizes of 1/2 inch through 1 inch, rising through 1,040 pounds for sizes around 1-1/2 to 6 inches, to 3,060 pounds for 18-inch and 20-inch pipe.
| Pipe size | Recommended load |
|---|---|
| 1/2 to 1 inch pipe | 500 lb |
| 1-1/4 inch pipe | 800 lb |
| About 1-1/2 to 6 inch pipe | 1,040 lb |
| 8 inch pipe | 1,615 lb |
| 10 and 12 inch pipe | 2,490 lb |
| 18 and 20 inch pipe | 3,060 lb |
Those are pipe-clamp figures under MSS SP-58 and SP-69, not railing bracket ratings, so read them for scale only. A small clamp can be rated in the hundreds of pounds while a large industrial support reaches into the thousands. Capacity follows geometry, bolt dimensions, material and how load enters the structure, not how stout the clamp looks in your hand.
Design load is also not failure load. One support-system catalog states that its design-load data generally use a safety factor of 5.0, defined as the ratio of ultimate load to design load, so a 500-pound design load sits against an ultimate benchmark near 2,500 pounds (USESI support-system catalog). Other catalogs may use a different ultimate-failure safety factor. Those numbers are not interchangeable, and mixing them across two product lines is how a connection ends up under-designed.
Ask before you buy: which load rating applies to my substrate, which fasteners does it assume, and does that rating account for vibration and corrosion exposure?
If the supplier can't answer all three, you're buying appearance, not capacity.
Mixed Metals and Corrosion in Outdoor Clamps
Here's the assumption worth challenging. Specifying a stainless clamp does not give you a stainless connection. A 316L clamp body bolted directly to galvanized steel or aluminum creates a corrosion cell, and the smaller, less noble part gets eaten.
Galvanic corrosion needs three things at once: dissimilar conductive metals, electrical contact between them, and an electrolyte such as rainwater, condensation or seawater. Remove any one and the cell stops. Where all three exist, the less noble metal becomes the anode and corrodes preferentially, often in the tight crevice under a washer where you'll never see it.
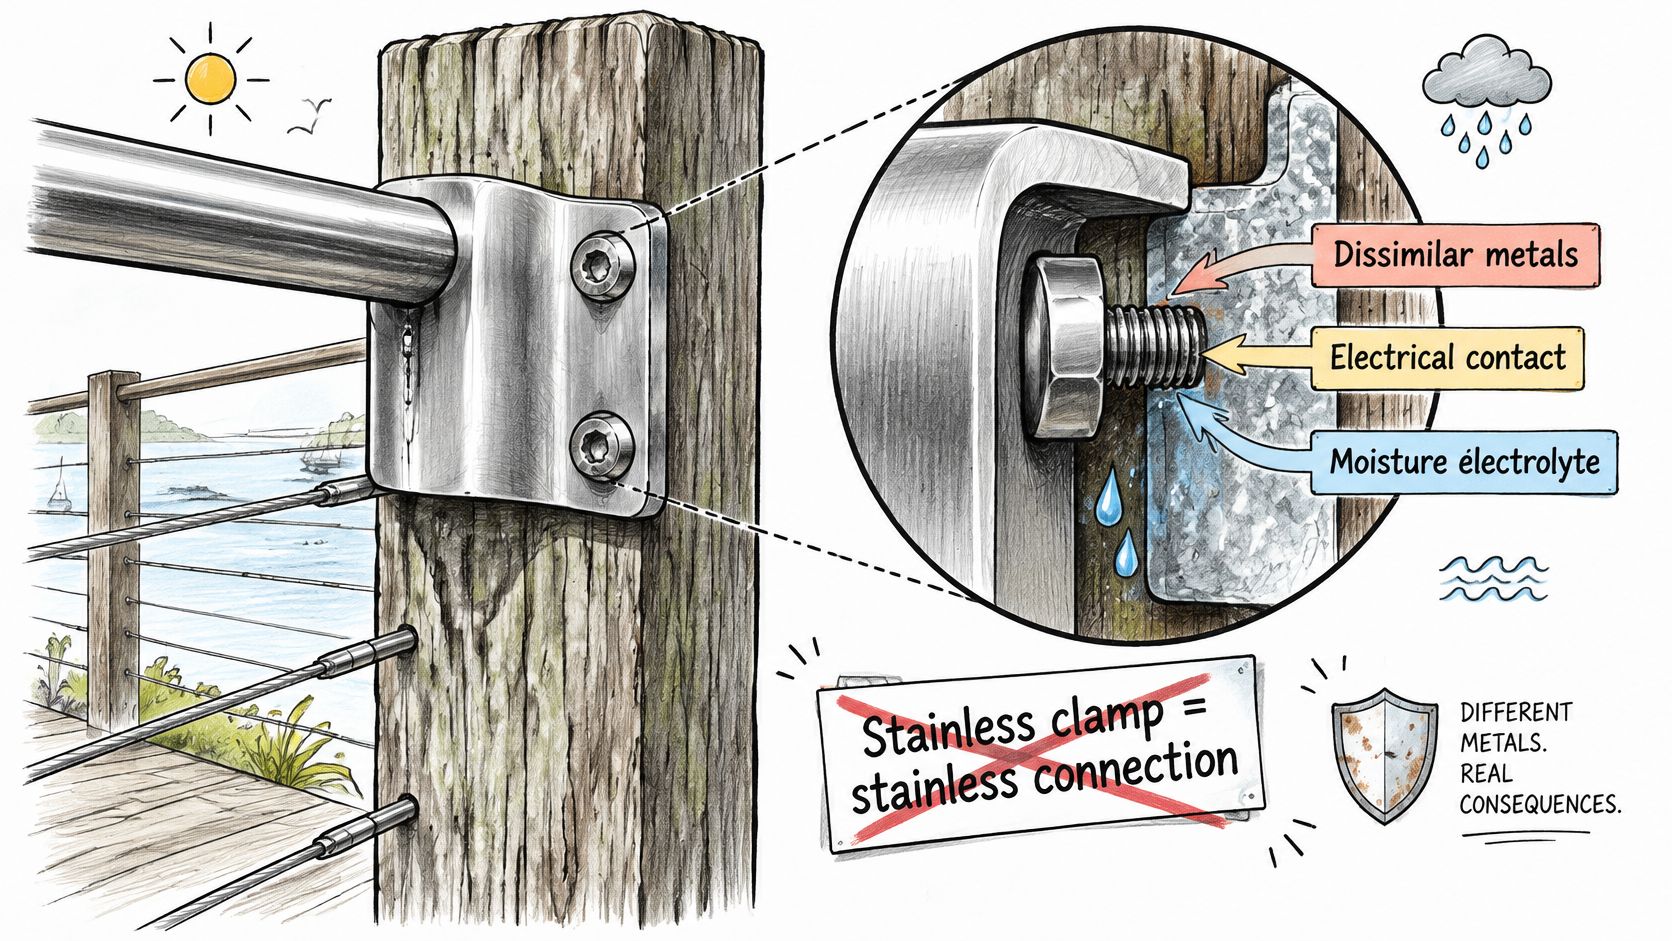
Weique's pipe clamp corrosion protection guide spells out the control hierarchy: match metals where you can, electrically isolate dissimilar parts with a durable polymer sleeve or washer, keep water from pooling, and pick a grade suited to the exposure. The same guidance names 316L clamp bodies with A4-80 stainless fasteners as a compatible pairing for demanding outdoor and coastal service, and warns that zinc fasteners against 316L stainless carry high galvanic risk.
Treat the joint as one system
Specify the clamp, screws, washers, post and any spacer together. Stainless hardware against bare or plated carbon steel is a problem waiting for the first wet season unless the isolation and coating durability are documented. Isolating the contact does two jobs: it slows section loss at the bolt holes and it preserves preload, so the clamp keeps gripping instead of loosening as metal disappears under it.
| Exposure | Hardware to specify |
|---|---|
| Dry interior | Standard 304 stainless hardware with matched fasteners |
| Ordinary outdoor deck or balcony | 304 stainless with matched fasteners and sealed bolt holes |
| Poolside or chlorinated area | 316 stainless clamp body and fasteners with isolating washers |
| Coastal or salt spray | 316L clamp body with A4-80 stainless fasteners |
| Commercial washdown | 316L with isolating sleeves and washers on every dissimilar contact |
For a backgrounder on how the two families behave together, stainless steel and steel corrosion in railing assemblies is worth ten minutes before you finalize a pool or coastal package.
Before you accept a bracket for a balcony, pool deck or coastal site, look at the whole joint rather than the visible finish. The hidden interface is the one that fails.
How to Install and Check Each Clamp
The routine below is the order that avoids rework. Each step has a reason, and each has a familiar slip.
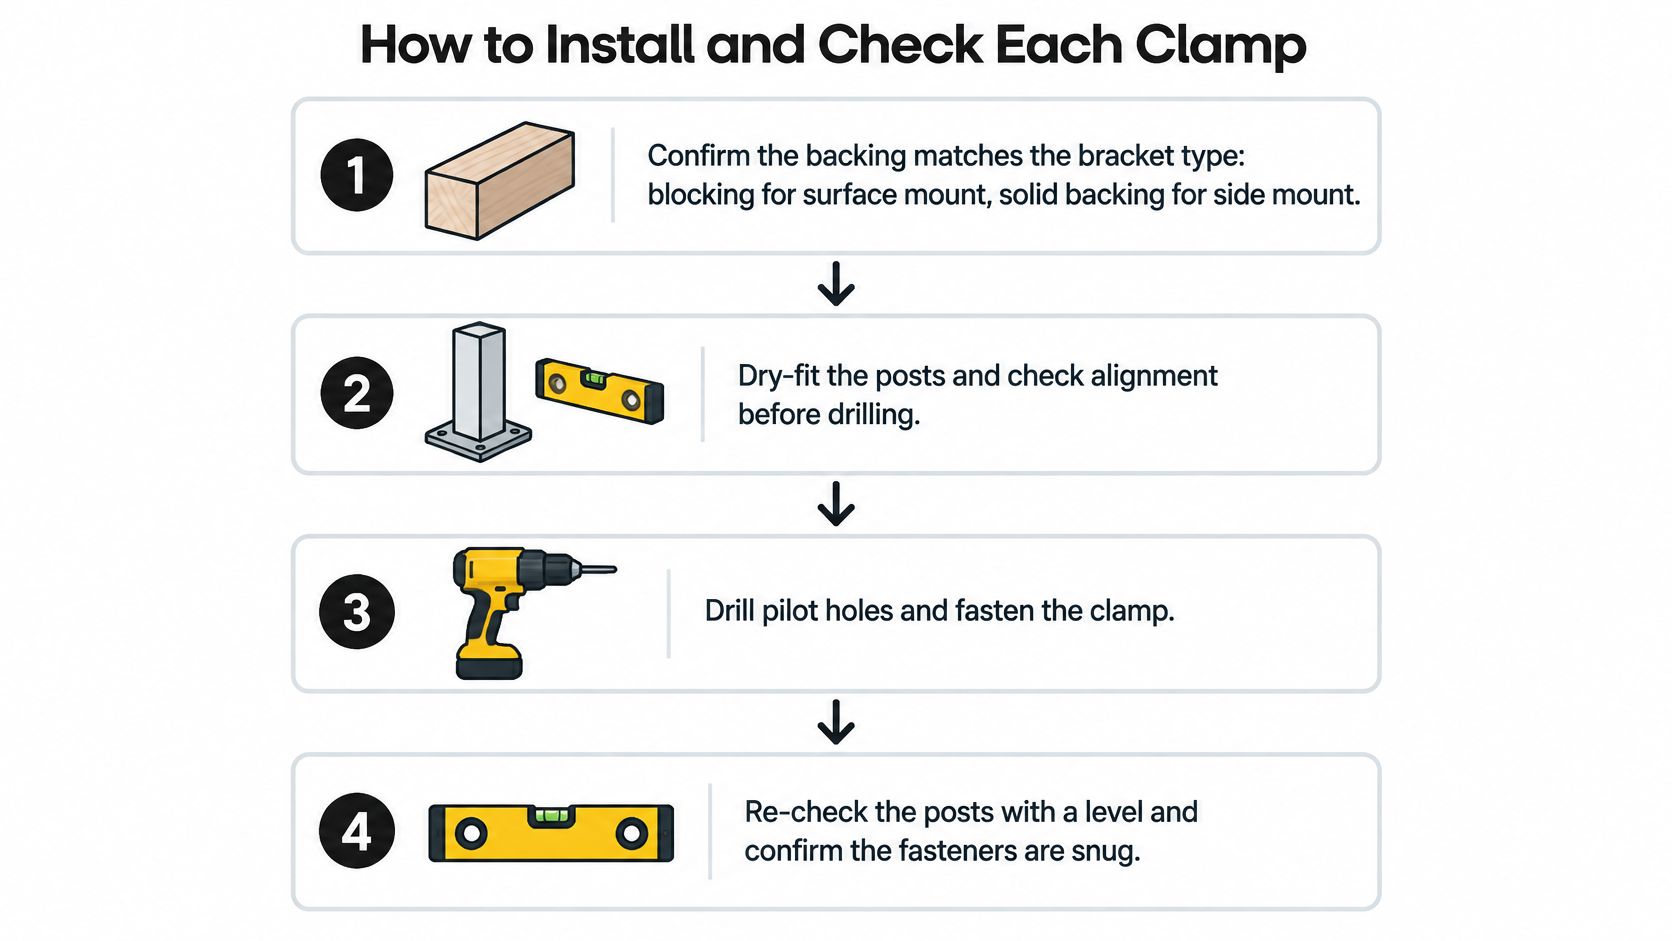
- Confirm the backing matches the bracket type. Blocking for surface mount, solid backing for side mount, checked against the specification before a single hole is drilled. Opening up a finished deck to add blocking later is the expensive version of this job.
- Dry-fit the posts and check alignment. Posts must be aligned, and the check happens before drilling, not after. Clamp a straightedge across the run, sight down the line, and confirm the post spacing matches the cable layout.
- Pre-drill stainless at slow speed with a cobalt bit. Stainless work-hardens under heat, so high speed and heavy pressure make the next hole harder than the last. Slow rpm, steady feed, and a few drops of cutting fluid keep the bit alive.
- Apply anti-seize to the threads before insertion. Use a nickel-based or molybdenum-based anti-seize. Don't use grease or WD-40, which change the torque-to-preload relationship and attract grit.
- Fit the specified washers and fasteners, then torque to the manufacturer's value. Not to a number you like, and not to "snug plus a quarter turn."
- Check rotation and plumb, then re-check torque after the first loading cycle. Cable tension, thermal movement and the first few weeks of use all settle the joint.
Why the same torque gives two different grips
A mounting bracket clamp holds by friction at the clamped interface, so the torque you apply sets how much slip resistance you get. But torque is a proxy for bolt preload, not a measurement of it. NASA's fastener design guidance identifies thread friction, under-head or nut friction, coatings and lubricants as the variables that control the relationship between applied torque and preload.
That has a practical consequence: identical torque values do not guarantee identical clamping force once finishes, lubrication or surface condition change. Under-torque and the bracket moves, the cables redistribute, and fittings loosen. Over-torque and you strip threads, crush thin-wall posts, or exceed what the substrate will take.
Torque specs are product-specific for a reason. A number borrowed from a different bracket, or from a forum, is a guess with a wrench on it.
Where a clamp grips a smooth tube, surface prep and contact geometry matter too, because friction force scales with clamping force and the friction coefficient. On commercial work with vibration and repeated handrail loading, verify torque rather than assuming it held.
When something looks wrong after install, diagnose it before tightening everything in sight.
| Symptom | Likely cause | Fix |
|---|---|---|
| Cable sags days after install | Under-torqued clamp or lost bolt preload | Re-torque to the manufacturer's value using the specified washers |
| Bracket rotates under handrail load | Low interface friction from lubricant or dirty contact surfaces | Clean the contact surfaces, use the specified anti-seize, then re-torque |
| Threads strip or post cracks | Over-torque or thin-wall substrate | Replace the damaged fastener, confirm substrate thickness and tighten to spec |
| Rust bleeding from clamp or bolt holes | Galvanic contact between dissimilar metals with trapped water | Fit a matched grade, add an isolating washer and seal the joint |
| Post wobbles at the base | Backing thinner than specified | Add blocking to the specified 2x8 count or change the mount type |
A clamp that passes all six checks is ready for the handrail and the cable pull. Do them in order and the tensioning stage becomes uneventful.
Matching a Clamp to Your Project and Guard Rules
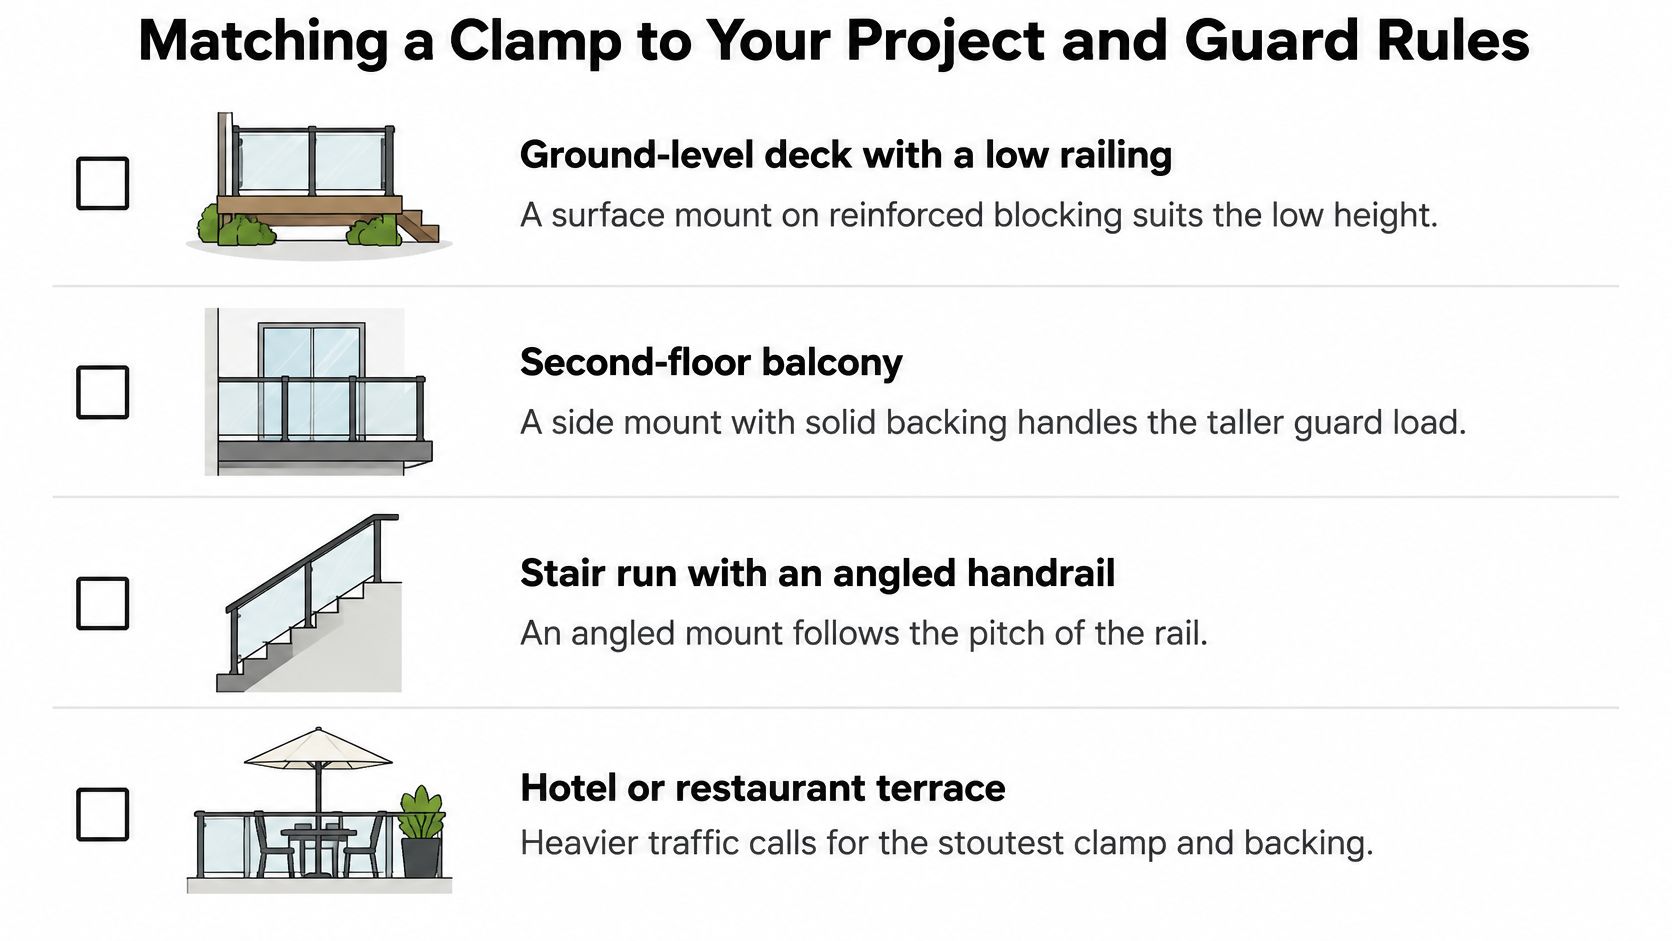
A bracket choice starts with the job site. A low ground-level deck can use surface mount on reinforced blocking, where the failure point is usually a baseplate bolted through decking with no structure beneath it. Fix the framing first, then select the hardware. A second-floor balcony pushes the decision toward side mount with solid backing, with withdrawal at the rim joist and water behind the fascia as the practical concerns. A stair run needs a rake bracket that follows the handrail pitch, so the post stays aligned instead of twisting to suit the fitting. A busy hotel or restaurant terrace calls for the stoutest clamp and backing in the range, plus a documented torque check, because repeated hand loading works a marginal connection loose.
Where the 30-inch line changes the job
A current municipal deck and guardrail checklist states that guards are required along open sides of decks, porches, landings and stairs more than 30 inches above the adjacent floor or grade, measured within 36 inches horizontally (Paradise, California deck and guardrail checklist). Cross that threshold and a bracket stops being a finish decision. It becomes part of a fall-protection assembly.
Four questions to answer before drilling:
- What substrate can receive the clamp, and is it structural or just a surface?
- Does the bracket transfer load into framing or only into decking?
- How is edge distance verified at rim joists and corners?
- What changes on hollow metal, masonry or composite posts, where the fastener has nothing solid to bite?
Height deserves its own line. Confirm final railing height by measuring from the mounting surface to the top of the handrail, not just the post. The bracket adds height that a post measurement misses. Get that wrong and the run can fail inspection after the cable is already cut. In the 42-inch railing system, the post is 39.5 inches, the adjustable handrail bracket is 1.5 inches, and the handrail is 1 inch, for a total installed height of 42 inches. In the 36-inch system, the post is 33.5 inches, the adjustable handrail bracket is 1.5 inches, and the handrail is 1 inch, for a total installed height of 36 inches.
A visually rigid clamp can still be unsafe when the supporting member, not the clamp body, is the weak link.
Where the bracket forms part of a guard system, have an engineer or the local authority review it. That is the practical way to learn that a rim joist is short before the deck is finished. Check local guard railing requirements for height and infill rules before locking the layout.
Record Your Bracket Specification Before Ordering
Write six entries down before the order goes in, and keep them with the project paperwork. The list is short, but it settles the details that are hard to correct once posts are drilled and cable is cut.
- Bracket type and mounting surface, wood or concrete. Mounting type is required so the right base hardware is included with the kit.
- Backing count or thickness, confirmed against the manufacturer's specification rather than an assumption about what is under the deck.
- Metal grade for clamp body, fasteners and washers, along with the exposure it was chosen for.
- Rated load and the substrate it applies to, quoted from the manufacturer, not inferred from a similar-looking product.
- Torque value, washer spec and lubricant condition used at installation. For stainless steel, record the cobalt bit, slow drilling speed and anti-seize choice, since grease and WD-40 do not belong on those threads.
- Guard height, edge distance, and whether an engineer or authority reviewed the connection. Measure final height from the mounting surface to the top of the handrail, not just the post.
Then use the record as a field check, not a filing exercise. Confirm that the brackets on site match the listed type and that base hardware matches the chosen mounting surface. Check torque after the first loading period, once the cables are tensioned and the deck has seen a warm afternoon. Put a visual check on a regular schedule: rust bleeding at bolt holes, a wobbling post, a cable that has lost its snap, a bracket that has rotated off square.
Those symptoms rarely announce themselves. You find them at the base of the post, where the clamp meets the structure, with the same attention you gave the cable layout.
Ultra Modern Rails supplies factory-direct cable railing systems with 100% stainless steel cable and hardware. Each handrail is sold as a complete set with brackets and hardware, and each kit includes a hydraulic tensioning tool, wire cutters, lag bolts, base plates, fasteners and fittings. Customers choose a mounting type, wood or concrete, along with height, cable finish, handrail, length, run shape and mounting when building a kit, and the price appears instantly. Send your deck or balcony dimensions to Ultra Modern Rails and lay out the mounting style and backing requirements before ordering.