

You lean on the top rail to shout something to a neighbor, and the corner post moves. Not far. Maybe an eighth of an inch, then it settles back. Nothing looks broken. The cable is still straight, the posts are still plumb, the finish hasn't changed. What flexed is the assembly, and the part doing the flexing is almost always the piece you can't see, which is the connection between the post base and the deck framing underneath it.
That small movement is why the parts of a deck railing system make more sense in load order than in catalog order. Your hand finds the top rail first, but the top rail is the last link in a chain that starts down at the joists. Get the chain right and the visible pieces stay where you put them.
Each component below gets a job, a usual material, and the one requirement that decides whether it holds.
Table of Contents
- Parts of a Deck Railing System at a Glance
- How Loads Travel From the Rail Into the Deck Frame
- Posts, Anchors and Mounting Types Compared
- Infill Options and the 4-Inch Opening Rule
- Cable Tension, Terminal Posts and Corrosion Control
- Guards Versus Handrails and Accessibility Rules
- Match the Parts List to the Framing Before You Order
Parts of a Deck Railing System at a Glance
A modern railing has seven working parts, and they sit on a deck in a fixed order: posts at the edges and corners, the top rail or handrail that runs across them, the bottom rail that closes the space just above the deck boards, the infill (cable, balusters, panels, mesh or glass) that stops a person or a small child from passing through, the fittings and terminals that finish and tension a cable run, the anchors and brackets that fasten posts to framing, and the mounting style that determines where those anchors land.
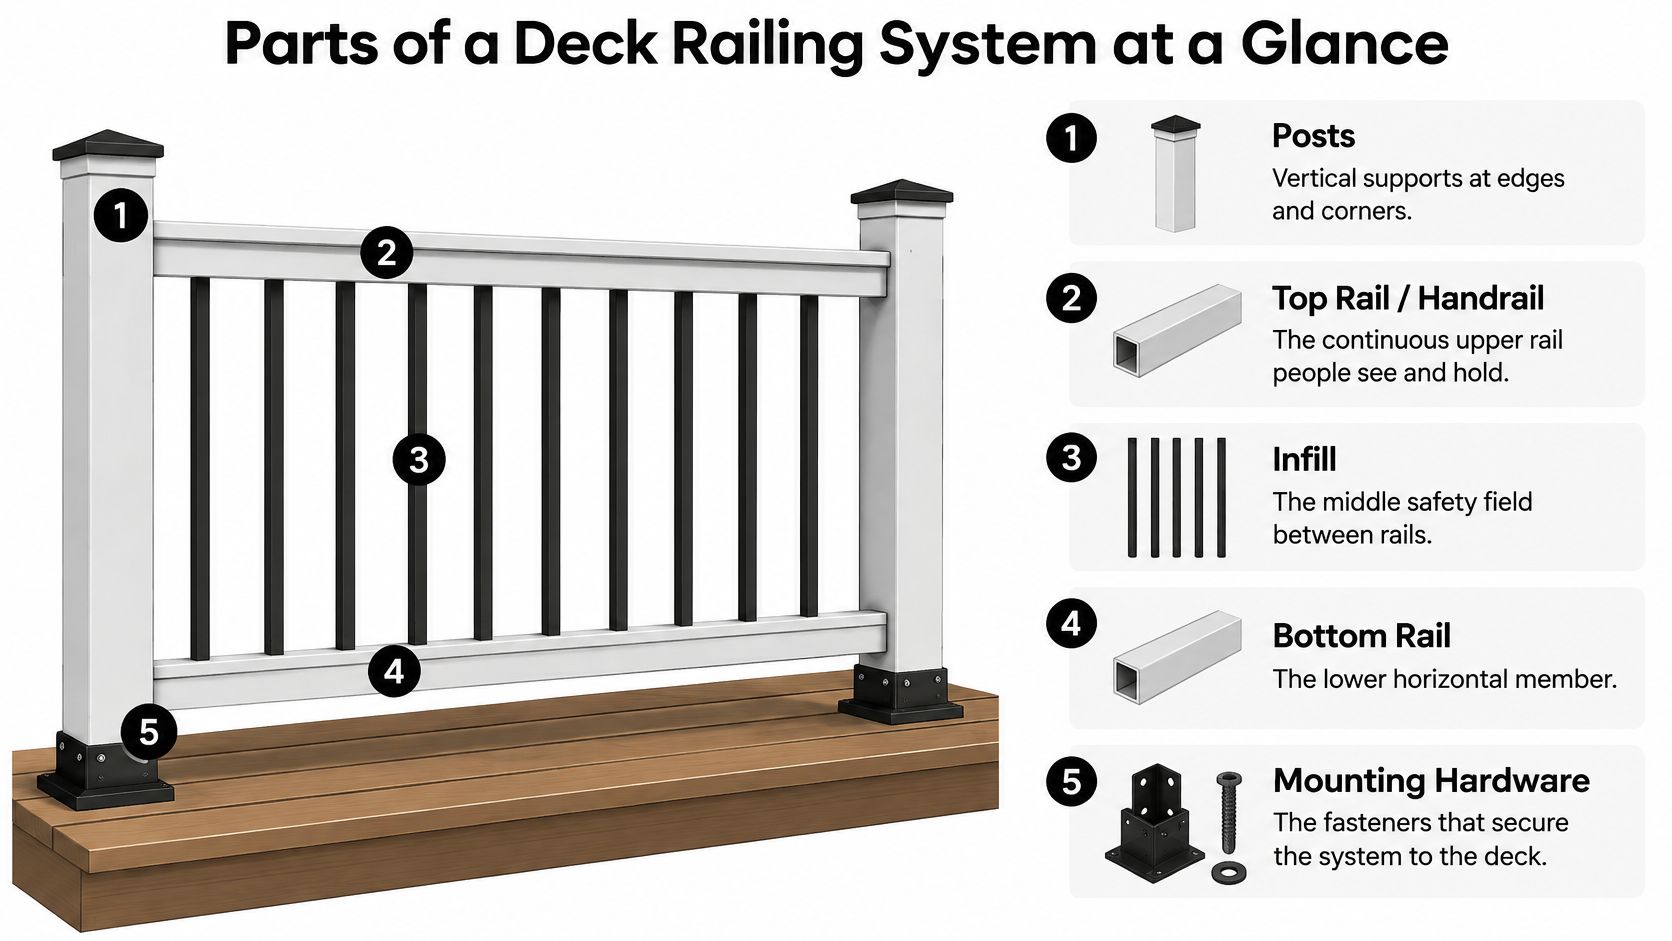
Those seven parts split into two groups with different jobs. Posts, anchors and the framing they reach carry load. The top rail and infill provide continuous fall protection and spread a push across several posts so no single fastener takes the whole force.
| Part | Function | Common materials | Key requirement |
|---|---|---|---|
| Posts | Carry loads from the rail into the deck frame | Stainless steel (304 or 316), wood, powder-coated steel | Anchored into framing or reinforced blocking |
| Top rail or handrail | Continuous top edge that receives the load | Stainless steel, wood, black steel | Continuous and rigid between posts |
| Bottom rail or gap control | Keeps the opening above the deck surface closed | Stainless steel, wood, aluminum | No gap wide enough to pass the test sphere |
| Infill (cable, balusters, panels) | Stops passage and resists push loads | 316 stainless cable, steel or wood balusters, glass or mesh panels | Resists the infill design load the code sets |
| Fittings and terminals | Finish cable ends and hold tension | 316 stainless, swaged or threaded terminals | Calibrated tension and rigid terminal posts |
| Anchors and brackets | Join posts to the deck structure | Stainless or hot-dip galvanized bolts and lag screws | Rated for the load and compatible with adjacent metals |
| Mounting style | Sets how the post attaches | Surface, fascia (side) or through-post | Matches the framing and blocking you can verify |
Read that table as a checklist rather than a catalog. A railing is only as strong as its weakest listed part, and the weakest part is rarely the one with the finish on it.
The uncomfortable pattern: a beautifully specified cable run on posts bolted into deck boards alone is less safe than a plain wood railing on posts that reach solid framing.
If you're auditing an existing railing, start at the bottom of that list and work up. The parts near the deck boards decide what the pretty parts up top are allowed to do.
How Loads Travel From the Rail Into the Deck Frame
Picture the railing as a chain laid on its side. A push on the top rail enters the first link and moves down the line: rail to post, post to base plate, base to bolts, bolts to rim joist and blocking, blocking to joists, joists to the beam or the ledger at the house. Every link receives the load and hands it on. Nothing in that chain is decorative, and no link can be skipped.
That chain isn't a metaphor invented by builders. The code treats a guard as a structural system. Under the 2021 International Residential Code, a guard at an open-sided walking surface such as a deck, porch, balcony or landing must be at least 36 inches (914 mm) high, measured vertically from the adjacent walking surface, and guards are generally required where a deck sits more than 30 inches above grade or a lower surface.
The same provisions set the force targets. A guard must resist a concentrated load of 200 pounds, and infill components including balusters, panels and comparable cable elements must resist a horizontal 50-pound load applied over a 1-square-foot area. Those numbers explain why a spec that stops at "rigid top rail" proves nothing. Post size, post spacing, cable attachment, blocking, rim-joist strength and fastener capacity all decide whether the load reaches the deck structure.
Where the chain breaks first
Load meets the weak points in a predictable order, so check them in that order:
- The bolt into the rim joist. Wood shrinks and swells through the seasons, and a bolt that was tight in spring can be a quarter turn loose by winter. Every bit of that play becomes visible movement at the top rail.
- A post base fixed to deck boards. Decking is a wear surface, not structure. A base screwed to 5/4 boards with air underneath has nothing to pull against.
- A fastener pulling through soft wood. Lag screws near the edge of a wet rim joist tear out under load rather than holding.
- Blocking that was never installed. Joists twist under a concentrated push unless something between them keeps them straight.
Stair runs need their own geometry check, because a sloped walking surface changes where guard height is measured and how the posts are loaded.
The test that ends the argument: point at each post and say out loud what it bolts into. If the answer is "the deck" or "the boards," the load path isn't specified yet.
Posts, Anchors and Mounting Types Compared
Take a 16-foot run along the edge of a deck with four posts. Bolt those posts to the outside face of the rim joist and the load travels into a member that already collects the joist ends. Fasten the same four posts to the deck boards with surface bases and the load has to pass through the decking, into whatever blocking sits below, and only then into structure. Same rail, same cable, same spacing, two different buildings. The difference works like a shelf bracket: anchored into a stud it carries weight, anchored into drywall it pulls free.
That's why the mounting style decides which framing has to be right.
| Mounting style | Where the post attaches | Framing needed | Typical use |
|---|---|---|---|
| Surface mount | Top of the deck boards, bolted down | Reinforced blocking or framing below the boards | Existing decks and retrofits |
| Fascia (side) mount | Outside face of the rim joist or fascia | Solid rim joist with bolts through the framing | Clean-lined new builds |
| Through-post | Post runs through the deck boards to a joist or beam | Clear joist layout under the post | Heavy posts and custom framing |
| Stair stringer mount | Sloped stringer or sloped framing | A post layout that follows the stair pitch | Stair runs |
Surface mounting is the style most often done badly, because the requirement hides under the boards where nobody looks. For surface-mounted railings, reinforced blocking is required, commonly triple 2x8 or equivalent, and it has to go in while the framing is still open, before the decking covers it. If you're planning that detail, our guide to mounting railing posts to a deck walks through the sequence from blocking to bolt.
Post spacing and bolted attachment come from code, so no kit can assume them. The 2024 North Carolina Residential Code sets maximum post spacing and requires bolted attachment to the outer girder and joist bands for deck guards. Your jurisdiction may word it differently, but the principle holds everywhere: a post is only as good as what it bites into.
Materials matter less than the detail
Stainless posts resist corrosion and hold their finish, which matters near salt water and pool decks. Wood posts cost less and match a deck easily, though the end grain sitting near a wet surface is where rot starts. Powder-coated steel gives you slim profiles and long spans. Whichever material you pick, the connection is the part that gives way first.
For a stair run where the post angle and rail pitch already complicate the layout, a matching section such as our Cable Railing - Stainless Steel With Dark Wood Top 8' Deck Mounted Stair Section starts from $725.00.
Decision rule: choose the mounting style your framing can verify. If you can't see the blocking or the joists, open the deck up before you commit.
Infill Options and the 4-Inch Opening Rule
Every infill choice answers to one measurement. The 2021 IRC limits openings in required residential guards so that a 4-inch sphere cannot pass through the guard assembly. That limit covers the spaces between balusters, between panels, and between cables, and it also covers the gap between the deck surface and the bottom rail. Four inches is a dimension you can verify with a tape on the finished rail.
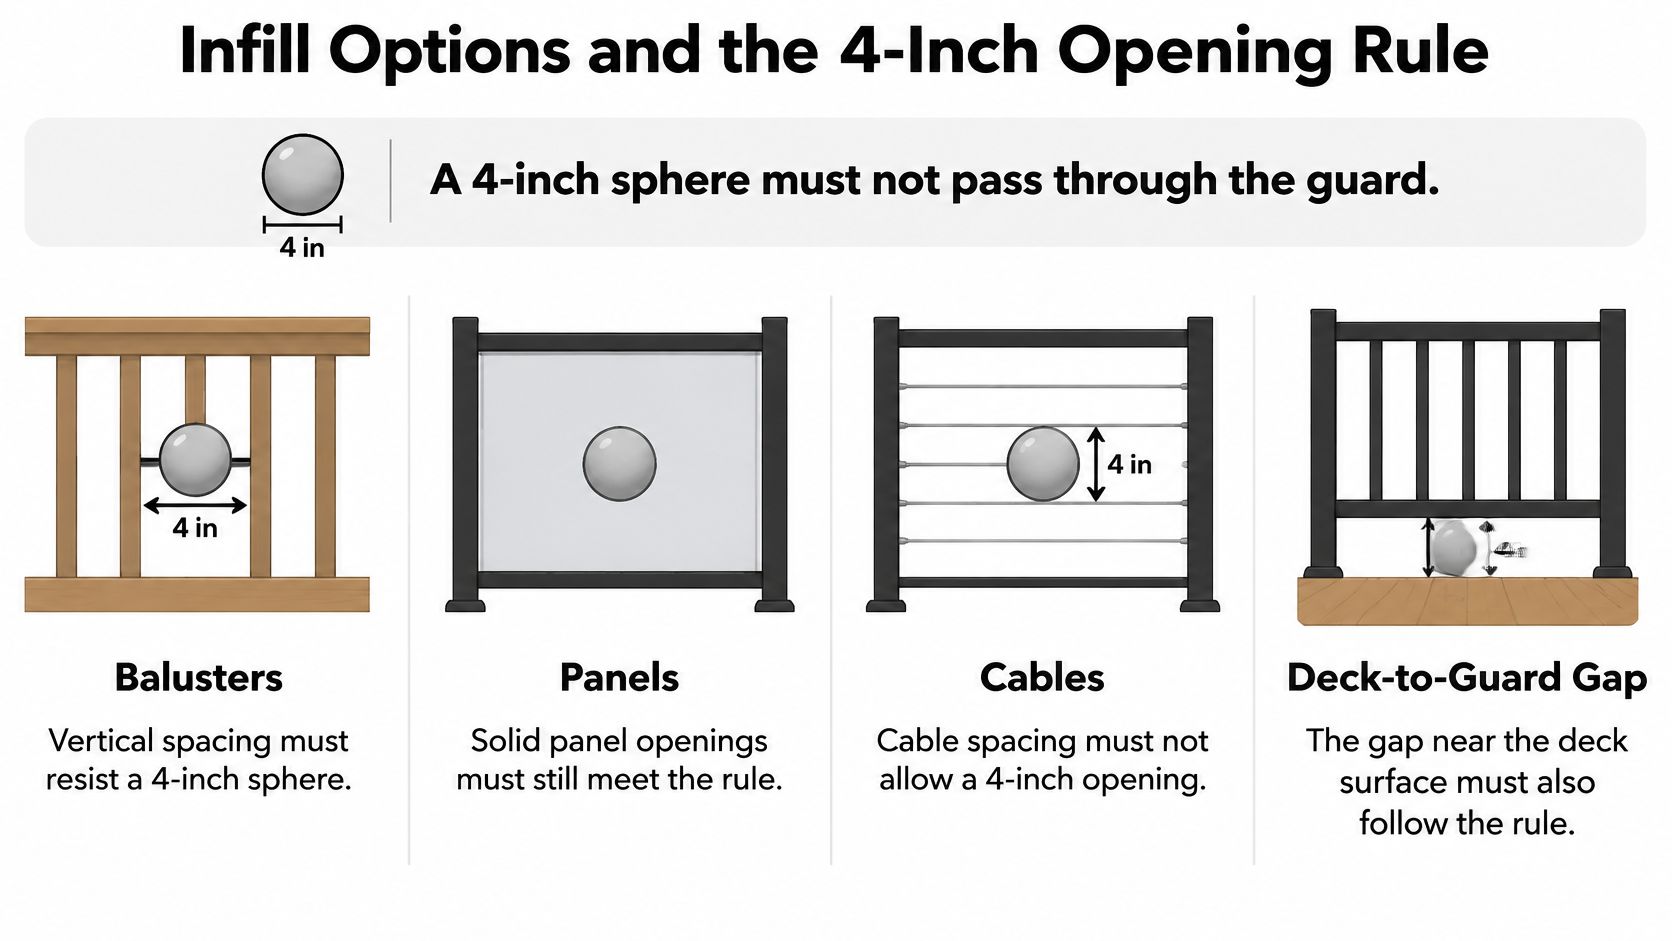
Rigid infill holds its geometry when someone pushes on it. Cable behaves differently. A cable bay works like a guitar string: the tighter it is strung and the closer its supports sit, the less it gives when you press the middle. A knee or a shoulder against the bay still bends the cables outward and widens the opening at that spot, and that push travels straight into the end posts and whatever they are bolted to. Spacing, pretension, intermediate supports and end fittings have to work as one system rather than four separate purchases.
A push changes the number that matters
A bay that measures right on a calm afternoon can measure wrong under a body. That is the reasoning behind checking an opening while it is loaded, because load is when a cable opening is at its widest. It is also why cable spacing that looks generous in a photo can fail in a hallway conversation with a building inspector.
| Infill type | How it controls the opening | Upkeep | Best fit |
|---|---|---|---|
| Horizontal or vertical cable | Spacing and tension set the opening; cable can deflect under push | Re-tension and inspect fittings periodically | Open views and a modern look |
| Balusters (vertical bars) | Bar spacing sets the opening directly | Low; clean and refinish as needed | Traditional or wood decks |
| Solid glass or metal panels | No opening when fully infilled; glass edge fixings matter | Clean glass edges and check fixings | Wind-exposed decks and privacy |
| Mesh or wire panels | Mesh aperture must stay under the sphere limit | Low to moderate | Homes with pets or small children |
Balusters are the most forgiving because the geometry is fixed by the spacing jig and stays put. Panels eliminate openings but move the risk to their fixings, which have to hold the panel rigid in a gust. Mesh handles pets and toddlers well as long as the aperture itself stays under the sphere limit. Cable wins on sight lines and asks the most in return, which is why the cable railing code requirements that matter on inspection day are mostly about spacing and tension rather than appearance.
Here is the check to run the day the railing is finished. Take a rigid 4-inch ball or a cut template and press it into every opening, including the widest cable bay at its midspan and the gap where the bottom rail meets the deck boards. Press firmly, because an opening that resists only a gentle touch will still fail a real inspection. Anywhere the ball passes, you need closer spacing, an added intermediate support, or another pass of tension.
Cable Tension, Terminal Posts and Corrosion Control
Cable spacing has a load consequence that surprises people. When cables sit close enough to satisfy the opening limit, at least three of them typically share a push applied over one square foot, which puts roughly 16.67 pounds on each cable at the critical center of its span, as a Pierce County cable guard bulletin explains. The same bulletin describes a field test in which the test sphere is pushed or pulled at midspan with 5 pounds of force, enough to expose a bay that only looks tight.
Terminal posts matter more than the cable itself. A cable run works like a guitar string stretched between two pegs: the string only stays in tune because the pegs refuse to move. Longer spans deflect more, and the bending demand lands on the end posts, which is exactly where a post base is weakest. Closer intermediate supports cut the sag and cut the force the terminals have to absorb.
Tensioning in five steps
- Set the terminal posts first. They carry the pull of the whole run, so anchor them into framing or reinforced blocking, commonly triple 2x8 or equivalent on a surface mount, before anything is strung.
- Thread the cable and fit the ends. Swaged or threaded terminals both work; the fitting has to match the cable diameter and the cut end has to be clean and square.
- Tension in stages with a calibrated tool. A hand can't read pounds. Bring the run up in increments, working from one end, and let the assembly settle between passes. Our guide to proper tensioning in cable railing systems shows how each pass tightens the bay without overloading the terminals.
- Re-test the opening at midspan. Push the sphere into the widest bay after tensioning, since that finished state is the condition the railing will be judged on.
- Inspect after the first season. Cable stretch, wood movement, thermal cycling and hardware settling all widen openings after commissioning, and the first heating and cooling cycle is when most of it shows up.
Corrosion and metal-to-metal contact
Salt air and deicing salt are hard on hardware, so coastal and roadside decks generally call for 316-grade stainless steel. Where stainless fittings meet aluminum or carbon steel, direct contact between the dissimilar metals can produce galvanic corrosion, so builders isolate the joint with a nylon washer or a non-metallic shim. Treat that isolation as part of the build from the start.
The preference shows up in the market too. In 2025, stainless steel accounted for 58.4% of the global cable-railing-system market by material type, according to Dataintelo's cable railing market report.
For a deck, balcony or pool edge where the run needs to hold tension for years, our Cable Railing - Stainless Steel Railing For Decks and Balconies uses 316 stainless cable and hardware and starts at $600.00.
Keep a simple schedule for the life of the railing: check tension and openings at commissioning, again after the first full season, then once a year and after any storm that sends something against the rail. A tension gauge and a 4-inch template cost less than one replaced panel.
Guards Versus Handrails and Accessibility Rules
A guard works like the fence at a scenic overlook: it keeps a body from going over the edge. A handrail works like the grab bar in a shower: it gives a hand something to close around before balance is gone. The metal along the top of a deck is often asked to do both jobs, and most railing guides only describe one of them.
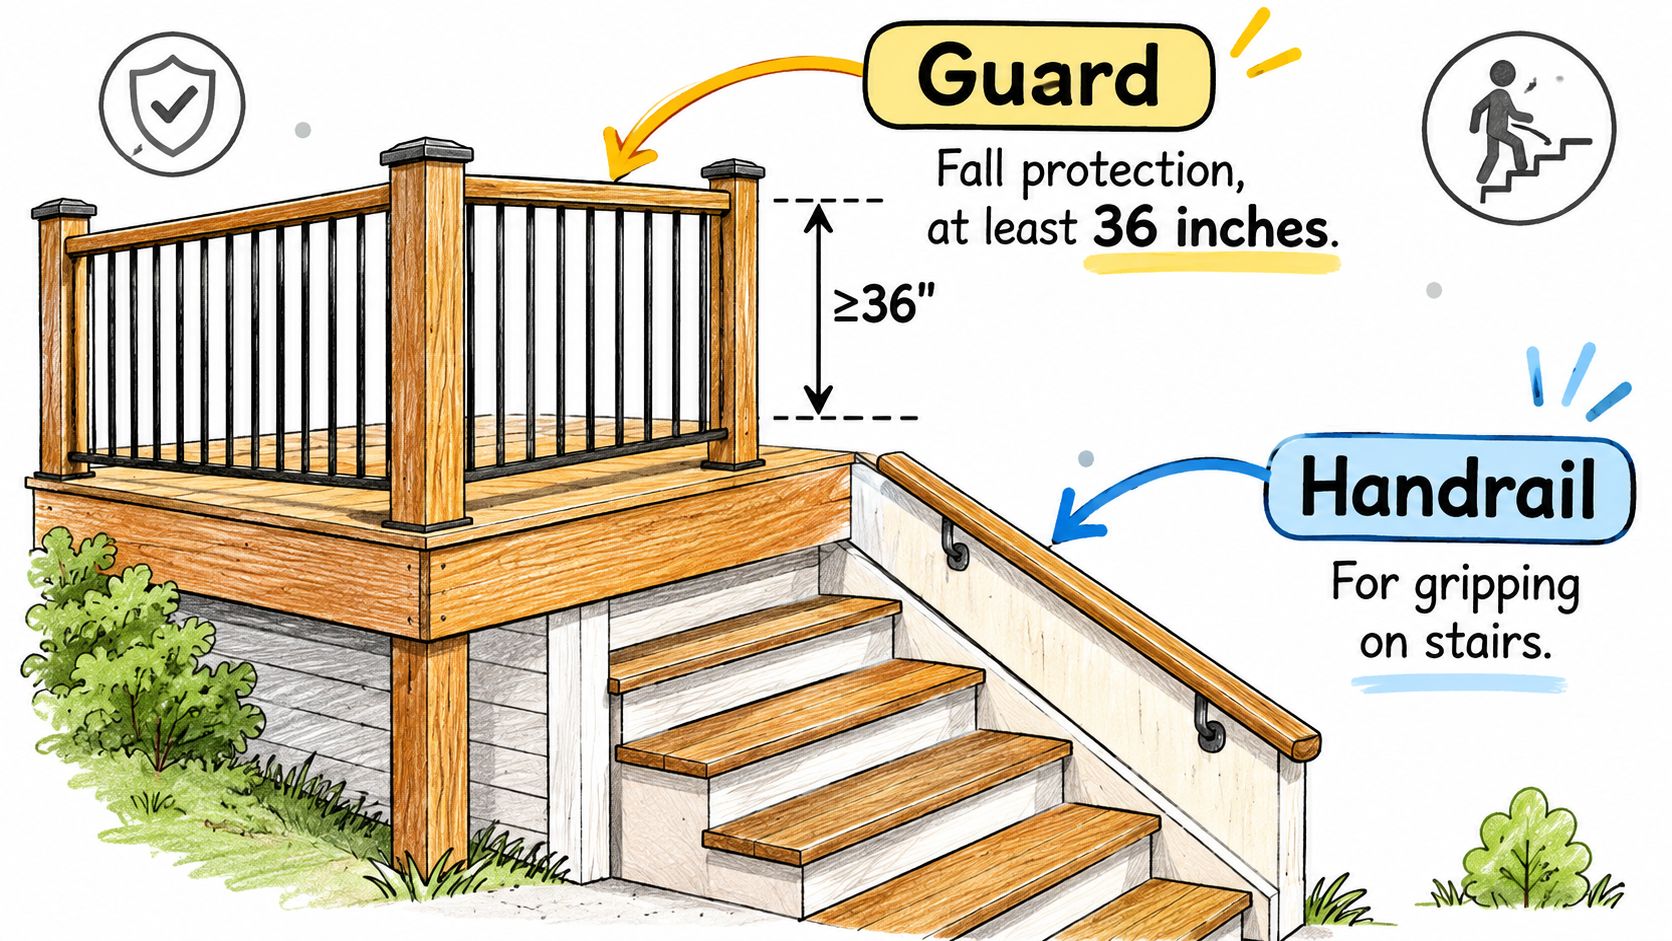
A guard keeps people from falling off an edge. On most home decks the target is a 36-inch guard, the IRC standard for residential work, while raised decks and commercial applications commonly call for 42 inches. A handrail answers a different question: when someone stumbles, can they close a hand around it and let it carry weight? On a flat run, one top rail can sometimes serve both purposes. On a stair, the two heights disagree, and that disagreement is where inspections fail.
The U.S. Access Board's ADA standards put handrail gripping surfaces generally 34 to 38 inches above walking surfaces, stairs and ramps, and circular grips must measure 0.95 to 1.55 inches in outside diameter. A grip that's too fat or too thin isn't graspable, no matter how solid it feels under a shoulder.
A graspable rail also has to stay put when a lunging adult hangs on it, so the grip shape is only half the answer. The brackets, the fasteners, and the post or wall behind them all have to carry that load together, the same way a chain link matters less than the anchor it's bolted to. That's the mismatch rarely mentioned. A top rail sized and finished for fall protection can be too wide, too flat, or too slick to hold comfortably on a staircase, and a continuous cable guard protects the edge without offering a grip at all.
Four questions to ask about the top of your railing
- Which part is the handrail? If the answer is "the top rail," confirm that it's graspable rather than just present.
- Can you hold it with a full hand? Wrap your fingers around it on a cold morning with the finish you specified.
- Does it run unbroken on the stairs? A rail that stops at a newel and restarts after it leaves a gap where a hand needs continuity.
- What clearance does it need? Grips set too close to a wall or a wide post force your knuckles into the obstruction.
Stairs trip up even experienced installers because the guard height there is measured from the line connecting the tread nosings rather than from a single level surface. The prescriptive residential wood deck construction guide notes a 34-inch minimum exception on stairs while flagging that commercial occupancy categories can carry additional requirements.
Where a deck serves a hotel, restaurant, pool or multifamily building, treat the edge as its own code question. Accessibility rules and local amendments diverge from residential deck rules, and accessible platforms can require part of the railing to sit lower than the rest so a seated person can see over it or take part in what's happening there. A single top rail height rarely settles a commercial job.
Add a second, graspable rail when the guard can't be gripped, when the stair run is long, or when the space serves the public. It costs less than the argument that follows an inspection.
Match the Parts List to the Framing Before You Order
By the time you're ready to buy, the remaining work is clerical, and it's where projects lose the safety they paid for. Write the order as a list of parts with a named destination for each one.
- Write the full parts list. Posts, top rail, bottom rail or gap filler, infill, terminals and fittings, anchors, and a separate graspable handrail wherever the stairs need one.
- Name the member behind every post. Surface mount, fascia mount, through-post or stair stringer, plus the blocking, rim joist or beam it bolts into. Blank cells here become wobbling posts later.
- Ask for the numbers that hold the opening. Post spacing, cable diameter and terminal type should come back as a package that keeps the test sphere out after a midspan push, not as three separate answers.
- Specify the metal for the site. 316 stainless where salt or deicer is present, plus isolators wherever stainless meets aluminum or carbon steel.
- Request written confirmation on the code targets. Ask the supplier to state that the assembly is intended for the guard and infill loads your jurisdiction enforces and for the guard height your deck requires at its height above grade.
- Count the boxes before installation day. Posts, rail sections, cable, fittings, brackets and bolts should all match the list, because a missing terminal turns a weekend into a week.
Every handrail we sell ships as a complete set with brackets and hardware, and our railing kits are IRC and IBC compliant for residential and commercial work. If the framing questions are still open, our design team can work through the layout with you before anything is ordered.
Ultra Modern Rails supplies factory-direct cable railing systems in 304 and 316 stainless steel for decks, balconies, stairs, pools and hospitality spaces, with 36-inch and 42-inch systems, straight and stair sections, and wood or metal handrail tops. Send your measurements and the mounting style your framing supports, and our design team will return a free quote and drawing within 24 hours. Visit Ultra Modern Rails to see the sections, finishes and handrail options.