

Search for advice on quarter inch stainless steel cable and the confident answer that comes back is usually wrong. It's the heavy-duty size, the story goes, rated at six or seven thousand pounds, so it will hold anything a deck can throw at it and you never have to think about it again. The number is real. The confidence around it isn't. That 6,000-pound figure describes one construction at one diameter, measured in a destruction test, before any fitting was crimped onto the end. A different build of the same nominal size lists a minimum breaking load of 5,696 pounds, another lists 7,298, and none of them is a load you're permitted to hang on a guardrail.
Two conclusions follow. What the label sells is a size category, not a specification, and the core work of choosing cable happens in the fields the label leaves blank: construction, grade, finish, breaking-force documentation and the termination that decides how much of the rope's strength survives. Stainless steel also doesn't retire the maintenance question. It changes the task from lubrication to cleaning, inspecting and replacing on time.
Table of Contents
- Quarter Inch Stainless Cable Specs at a Glance
- What the 1/4 Inch Size Label Covers
- Grade, Finish and Corrosion by Exposure
- Fittings and Terminations That Keep Cable Rated
- How to Install Runs Without Losing Tension
- Cleaning and Maintenance Routine
- Code Limits, Working Loads and Inspection Triggers
- Confirm the Spec Before You Order
Quarter Inch Stainless Cable Specs at a Glance
Most buyers arrive with one question: what will a quarter inch cable hold? The answer is a range, because the way wires are arranged inside the rope changes the number, and three constructions cover almost all architectural work.
| Construction | Minimum breaking strength (lb) | Flexibility | Typical use |
|---|---|---|---|
| 1x19 | 7,298 lb (B) | Stiff; fewer, larger wires | Straight, tensioned architectural runs |
| 7x7 | 6,000 lb (A); 5,696 lb (B) | Flexible; multi-strand | Runs with bends or frequent handling |
| 7x19 | 6,700 lb (A); 5,696 lb (B) | Flexible; multi-strand with finer wires | Balustrade and railing runs that need flex |
Figures marked (A) come from the Tyler Madison wire rope breaking strength table, where the 7x19 construction's listed minimum breaking load sits 700 pounds, or about 11.7%, above the 7x7 value at the same 1/4-inch diameter: 6,700 pounds against 6,000. Figures marked (B) come from the Hayn stainless wire rope listing, which reports 7,298 lb (about 32.46 kN) for 1x19 at 6.35 mm and 5,696 lb (about 25.34 kN) for 7x7 and 7x19 at that nominal diameter.
The two schedules disagree, and that disagreement is the first useful thing here. The same nominal size is a different product in each supplier's hands, so averaging the columns produces a figure that belongs to no cable you can buy. Compare like construction to like construction, and ask for the certificate covering the exact rope in the quote.
Three rules for reading these ratings
- A listed minimum breaking load is a test result, not a permission slip. Both schedules say so in different words; the Tyler Madison table states outright that minimum breaking strength is not a working load and that an appropriate safety factor has to be applied. A 6,000-pound figure never becomes a 6,000-pound railing load.
- Construction moves the number further than most buyers expect. Set the stiffest build against the most flexible one and the gap at this single diameter is over 1,600 pounds, roughly 28% on arithmetic from the two rows above.
- The assembly carries the load, not the rope alone. An undersized sleeve, a bad seat or a mismatched stud can pull far below the rope's straight-line strength.
Construction also decides how the cable behaves in your hands. The 1x19 build packs fewer, larger wires into one strand, which makes it rigid and low in stretch, and puts it at home on straight tensioned runs where nothing has to turn. It's unforgiving around a tight bend, and forcing it around one costs the capacity you paid for. The 7x7 and 7x19 builds spread their wires across several strands, so they bend more readily and shrug off repeated handling, though the flexibility shows up as a lower published figure and more stretch under tension.
Before you accept a quotation, match it against all three rows. A supplier who can't tell you which construction you're buying hasn't quoted you a cable.
What the 1/4 Inch Size Label Covers
Strip away the marketing and 1/4 inch is a size category. It marks the entry point of a range, not a description of the product inside that range.
ASTM A492, the ASTM International specification for stainless-steel rope wire and wire-rope products, covers wire ropes from 1/4 inch through 3 1/2 inches in diameter, roughly 6 to 89 mm, which places quarter inch cable at the smallest boundary of the principal rope-size range (ASTM A492). The standard's technical requirements run well past nominal diameter: rope breaking force, spinning-loss factor, stretch, wire torsion, tensile strength, tensile grade and quality level all sit inside it. Two cables measuring the same 1/4-inch outside diameter can therefore perform differently depending on construction, wire grade and manufacturing detail.
The same specification separates rope products from the smaller cord products, which range from 1/32 inch to 3/8 inch. Keep the categories apart when you compare prices or fittings, because a cord listing and a rope listing don't describe interchangeable goods even when the numbers look adjacent.
The five fields that replace the label
A purchase order a supplier can fill out names all five:
- Nominal diameter, written as 1/4 inch or 6.35 mm so nothing is ambiguous at the shipping desk.
- Strand construction, one of 1x19, 7x7 or 7x19, chosen for the bends and the tension the run needs.
- Stainless grade, 304 or 316, chosen for the exposure the cable will live in.
- Finish, whether natural brushed or coated.
- Breaking-load documentation, the certified minimum breaking force for that exact rope.
Unit conventions trip up international orders. ASTM treats inch-pound values as standard in this specification, while related stainless-wire standards may show inch-pound and SI values side by side. Convert in both directions when you compare a North American quote against a metric one, and check that the converted figure matches the construction instead of drifting toward the nearest round number.
Buyer's rule: a quote naming only quarter inch stainless cable has given you a size, not a specification. Ask for the other four fields before you discuss price.
Grade, Finish and Corrosion by Exposure
Stainless steel resists corrosion. Somewhere between the mill and the deck that sentence gets shortened to "stainless doesn't rust," and the shortening is where owners lose money. A U.S. Defense Technical Information Center report on marine exposure documented protected stainless-steel rope with no visible general corrosion after 29 weeks under one specific test condition (DTIC marine corrosion report). That's evidence for one environment under one set of conditions. It isn't a promise about a salt-sprayed balcony eight years from now.
304 or 316
304 handles inland exposure well and costs less. 316 adds molybdenum to the alloy, which raises resistance to chlorides, and it's the grade to specify within sight of salt water, beside a chlorinated pool, or anywhere de-icing salt lands. The common error is ordering a heavier cable in 304 to solve a corrosion problem. Diameter buys strength. Grade buys time. They're separate purchases, and one can't cover for the other.
Finishes and the upkeep they carry
Natural brushed silver leaves the alloy's own surface on show and hides minor scratches in its grain, and it asks for nothing beyond cleaning. Black powder coat delivers a uniform dark line that suits modern railing designs, but a chip exposes base metal, and that spot needs touch-up before it becomes a rust bloom. Neither finish changes the rated strength of the rope, so pick finish on appearance and on how much touching up you're willing to do.
Four pressures do the damage: chloride from sea air, pool chemicals, de-icing salt, and contact with dissimilar metals. They rarely attack evenly. Corrosion localizes at fittings, swaged sleeves, cut ends and the crevices where water sits and dries slowly, which means a run can look immaculate along its length while its terminals are already failing.
| Exposure setting | Corrosion pressure | Minimum grade to specify | Maintenance focus |
|---|---|---|---|
| Inland, dry residential deck | Low | 304 stainless | Annual visual check of cable and fittings |
| Coastal or marine air | High | 316 stainless | Rinse salt deposits on a regular schedule |
| Chlorinated pool deck | High | 316 stainless | Rinse chemical residue; keep fittings clean |
| De-icing salt climate | High | 316 stainless | Rinse after winter; inspect terminals each spring |
| Commercial or hospitality exterior | Medium to high | 316 stainless with checked fittings | Scheduled cleaning and documented inspection |
The rule the table implies: choose grade by exposure first, then finish by appearance and upkeep tolerance. Galvanic attack between dissimilar metals is its own problem, and how stainless steel and steel corrode in contact explains why the fitting matters as much as the rope.
Match cable, fittings, posts and fasteners in grade where you can. Every junction between two different metals in a wet environment is a small battery, and the less noble metal discharges itself to protect the other. A 316 cable in a 304 fitting outdoors is a compromise. A 316 cable in a zinc-plated fitting is a mistake. Durability belongs to an environment and a maintenance schedule, not to the word stainless printed on a box.
Fittings and Terminations That Keep Cable Rated
The end fitting decides how much of the rope's rated strength reaches your railing. That isn't a small caveat. A swaged sleeve, threaded stud or tensioner must match the cable's diameter and construction and be installed with the specified tooling and procedure, because a defective crimp, a misaligned seat or a loose thread leaves the assembly far below the rope's straight-line breaking strength.
Crimping is the moment a rated assembly becomes real or stays theoretical.
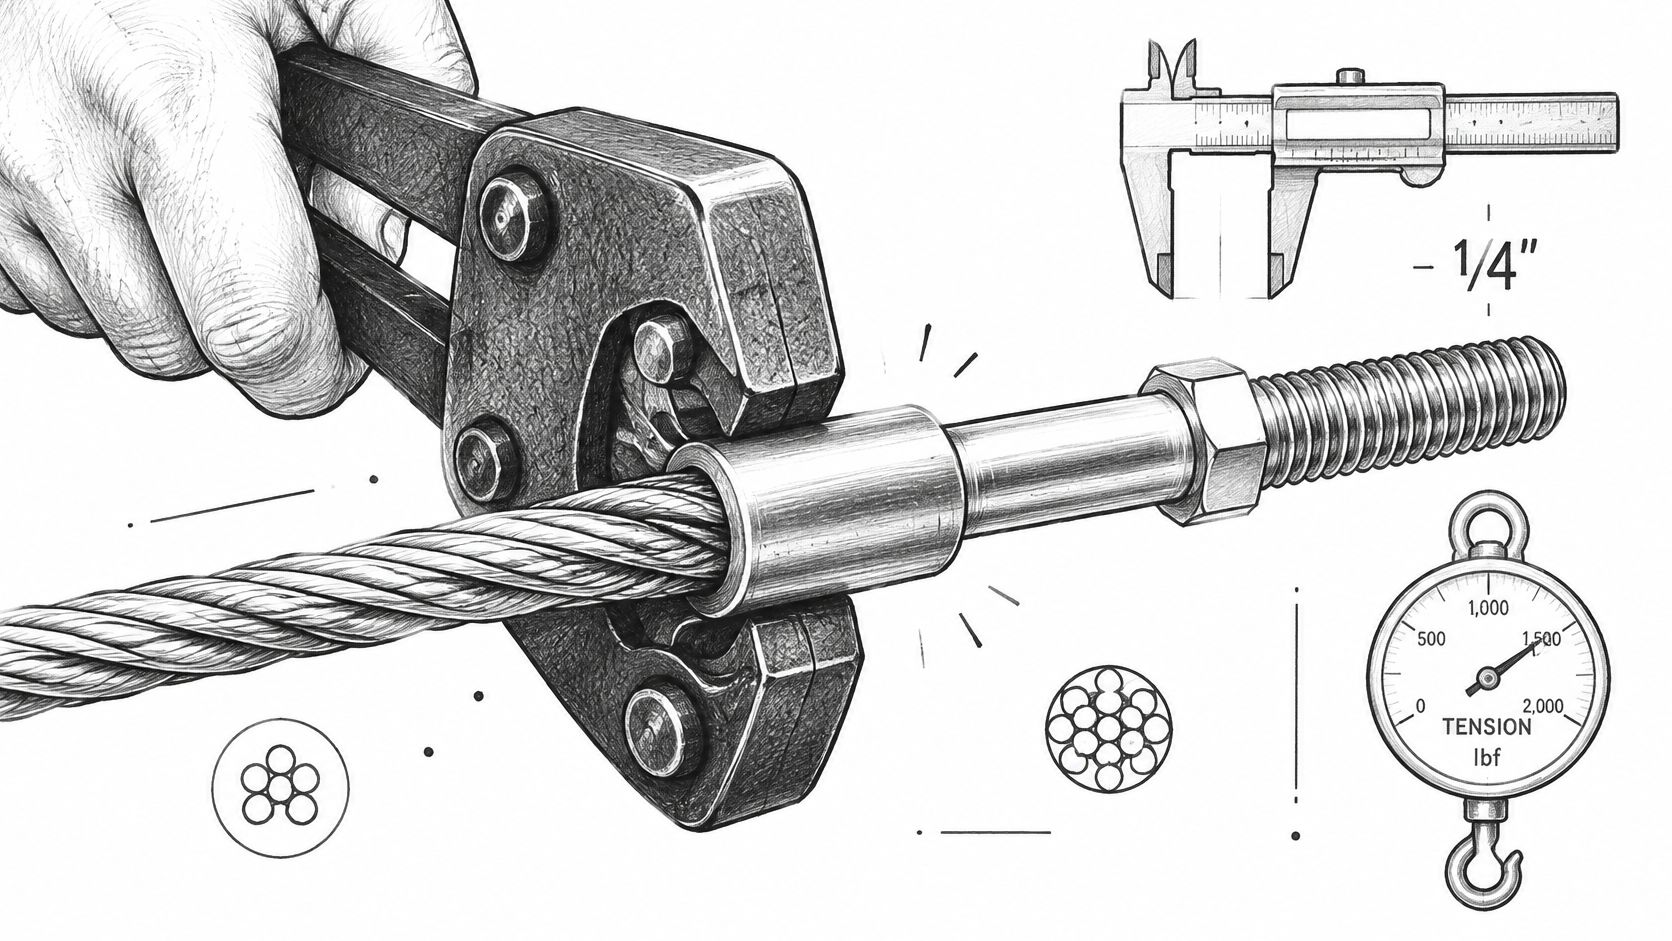
ASME's rope-safety guidance treats rope selection, minimum breaking force and design factors as separate requirements rather than one catalog number (ASME B30.30 rope safety). The practical translation is that someone has to write down the working-load limit the system is designed to before anything is ordered, instead of dividing a breaking strength informally at the bench.
Checks before you tension
- Fitting rated for the diameter and the construction. A sleeve made for 1x19's larger outer wires doesn't necessarily compress a 7x19 rope evenly.
- Stainless fittings matched to the cable grade. 316 hardware on 316 cable, not plated steel on stainless.
- Swage marks and full seating. Confirm the cable is inserted to full depth, not just that a mark landed on the sleeve.
- Threaded studs fully engaged, with the cable seated to the stop before any tension goes on.
- No sharp bend at the fitting. Open the run out with a protector or a terminated corner rather than forcing the turn.
Where installers get caught is buying hardware by diameter alone. Stainless steel cable railing hardware has to match the rope's construction as well as its size, and a mismatched terminal fails under load.
Preparing stainless posts and fasteners
- Pre-drill stainless with a cobalt drill bit at slow speed. Heat work-hardens the alloy and dulls ordinary bits, which is where most of the frustration in stainless drilling starts.
- Apply nickel-based or molybdenum-based anti-seize to the screw threads before inserting. It prevents galling and seizing in the joint.
- Leave grease and WD-40 out of the process entirely. They aren't substitutes, and they leave a film that collects grit.
Shop rule: dry-fit every termination before you tension the run. A fitting that won't seat at hand tightness won't seat under load either.
How to Install Runs Without Losing Tension
Order of work matters more than the tooling. Tension applied in the wrong sequence pulls posts out of plumb and leaves the run fighting itself for the rest of its life.
Here's the sequence that keeps the load spread across the posts instead of concentrating it in one fitting.
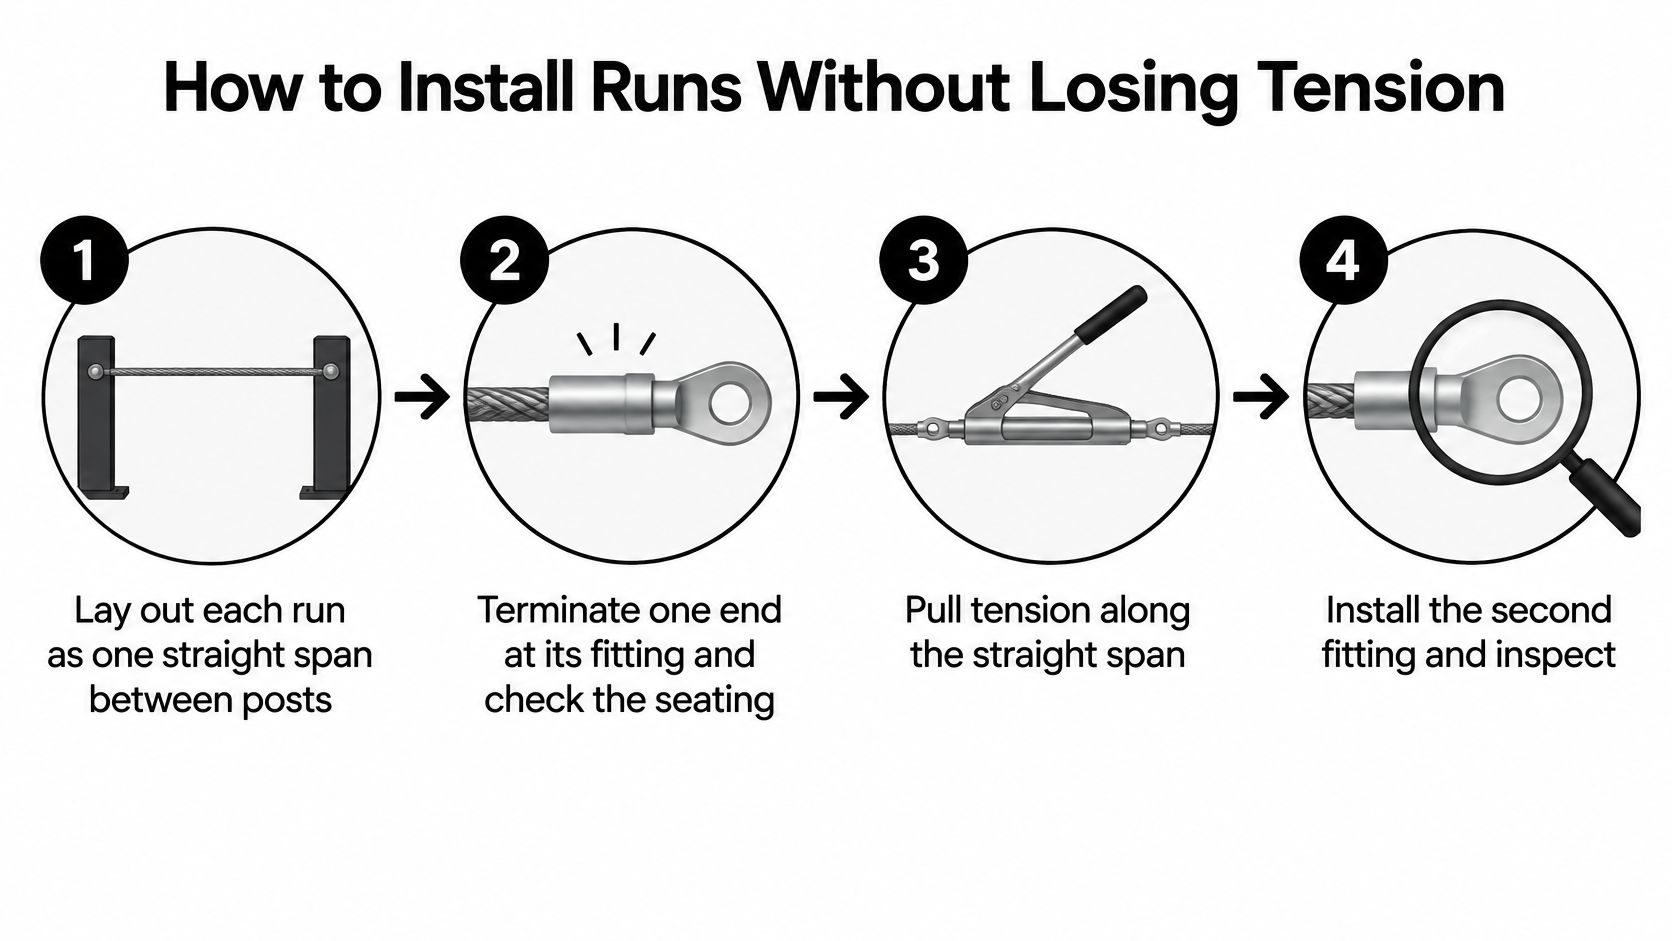
Six steps that keep tension between the posts
- Lay out each run as one straight span between posts. Every cable run is its own straight run, and cable never wraps around a corner post. A wrap puts a hard bend at the post, and that bend is where wire breaks first.
- Terminate the first end and check the seating before pulling anything tight. Catching a badly seated sleeve now costs minutes; catching it after tensioning costs a length of cable.
- Pull the cable through the far posts and attach the second termination at the planned tension point, so later adjustment happens at the end you can reach.
- Tension gradually, working between ends and across posts so load is shared. Taking one run to final value while its neighbours are slack bows posts and tilts the top rail.
- Stop at firm with slight flex. The cable should be tight enough to remove sag without being over-tightened. Over-tensioning overloads the posts, the fittings and the rope.
- Recheck after the first days and weeks. New cable settles, strands bed down and fittings shift, so a run that was perfect on install day will need a small take-up.
The finished check is simple. The run looks straight, feels firm under a flat hand and holds its tension after settling. If a bay still sags at mid-span, add a post or shorten the span before you consider a heavier cable, because layout corrects sag far more reliably than diameter does.
Cleaning and Maintenance Routine
Stainless changes the maintenance task. It doesn't delete it. Lubrication comes off the list and rinsing, washing and looking move on.
- Rinse salt deposits with fresh water on a regular schedule in coastal areas, and rinse the run after winter where de-icing salt is used. Salt held against the surface defeats the passive layer.
- Rinse chlorinated pool deck residue and keep fittings clear of splash and chemical film, since pool chemistry is hard on crevices.
- Wash with mild soap and a soft cloth, never steel wool or an abrasive pad. Abrasives embed iron particles that later rust, which reads as cable corrosion but is contamination.
- Remove construction dust and grinding particles promptly. Masonry dust and metal dust from nearby cutting settle into the strands and start tea-staining.
- Clean the crevices at fittings, where deposits collect and stay wet longest. That's where pitting begins.
- Confirm any stronger chemical with the manufacturer before using it, and check coated cable for chips so exposed metal gets touched up.
- Log the dates. Commercial and hospitality sites benefit from a written record of cleaning and inspection, and the record is what turns a routine into a schedule somebody keeps.
Maintenance truth: the cable that fails first is usually the one nobody rinsed, not the one with the smallest diameter.
Read the routine as a change of task rather than a reduction in effort. You trade lubrication for cleaning and visual checking, and the trade pays back at the ten-year mark.
Code Limits, Working Loads and Inspection Triggers
The question owners ask is when to replace a cable, and it's a better question than which diameter to buy. Neutral U.S. mine-safety rules offer a conservative framework worth borrowing: wire rope is inspected along its active length for broken wires, corrosion, distortion and improper condition, and it comes out of service when corrosion or structural distortion appears, when diameter loss from wear exceeds 6%, or when measured strength loss exceeds 10% (30 CFR Part 57 wire rope rules).
Those thresholds aren't residential railing requirements, and no inspector will apply them to a backyard deck. They matter because they name concrete conditions instead of "it looks fine," and they establish that visible appearance is not the test.
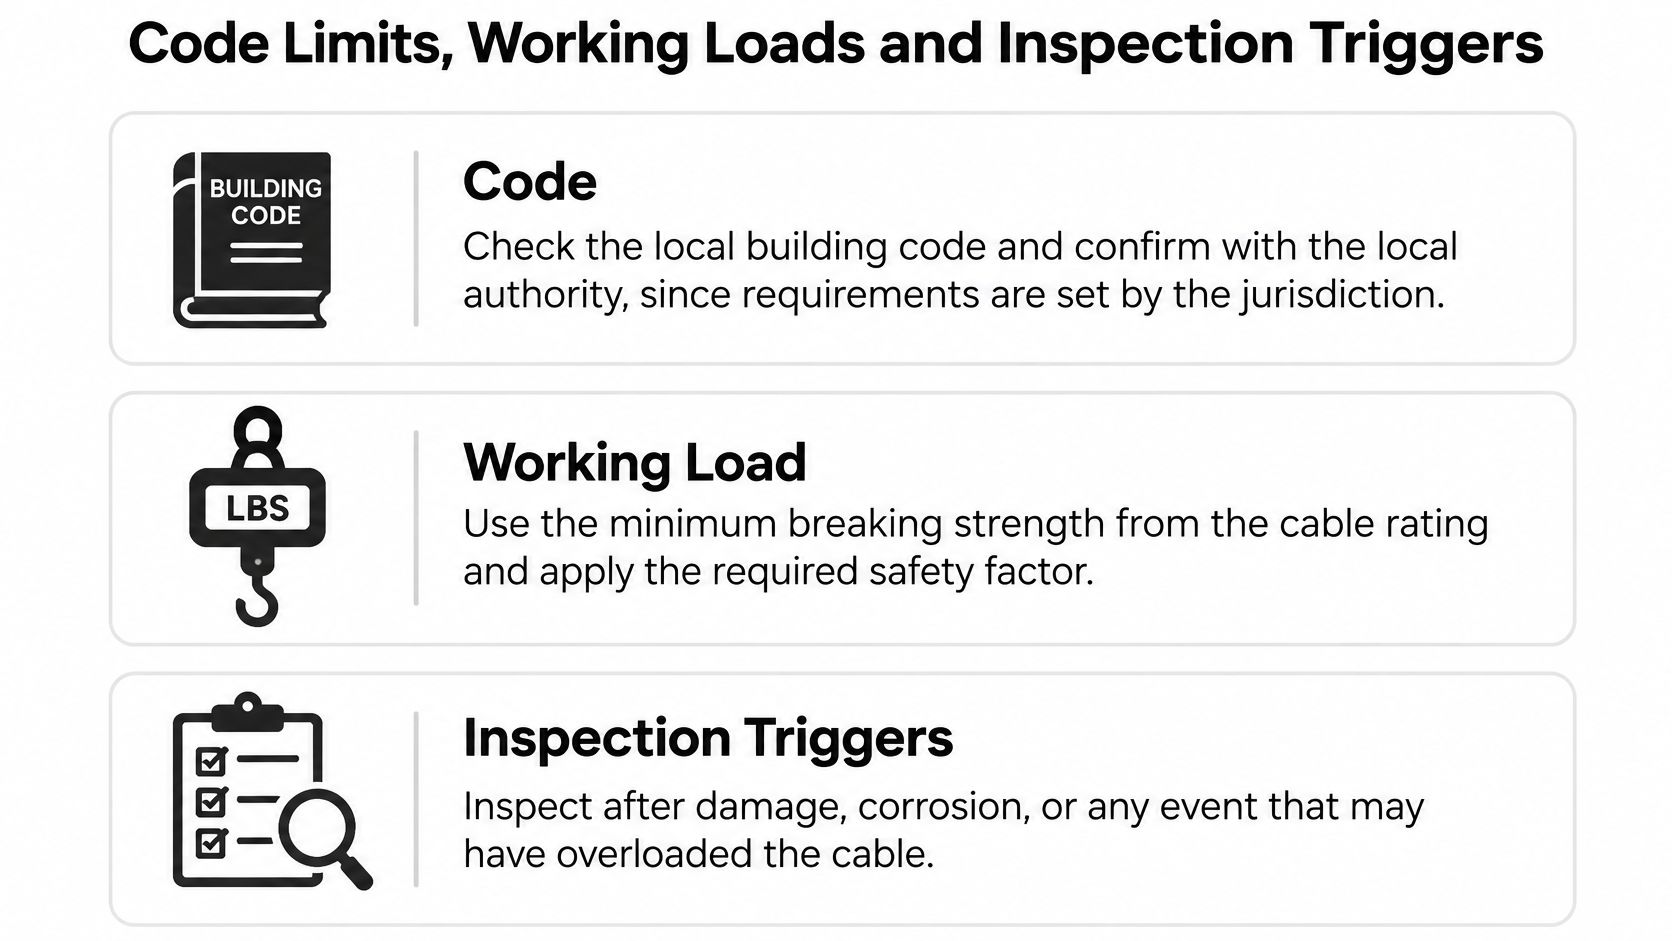
The three separate limits
Code. Guard height, infill spacing and load cases are set by the jurisdiction governing the project, so the local building department is the authority to confirm against, and cable railing code requirements covers what those checks usually include.
Working load. A published minimum breaking strength isn't a design load on its own. The applied safety factor and the engineered design set the permissible load, and they should be applied to certified data for the complete cable-and-fitting assembly rather than to the rope alone.
Inspection. Work along the run checking for broken wires, kinks, corrosion, loose fittings, slipping at terminals and permanent elongation. Damage concentrates where the cable enters each fitting, so inspect the ends before you admire the middle.
Distinguish routine take-up from failure. A cable needing a half turn of tension after its first season is settling. A cable that has visibly lengthened, carries a kink or a birdcage, or has drawn back into a terminal is finished, and re-tensioning it just postpones the replacement. Coastal, poolside, de-icing-salt and commercial installations justify shorter inspection intervals than a dry inland deck, because the corrosion pressure that starts the clock is higher.
Confirm the Spec Before You Order
Seven fields, confirmed in writing, before anyone compares prices.
- Nominal diameter of 1/4 inch on the quote. Neighbouring sizes such as 5/32 inch are a different product with different fittings, not a rounding difference.
- Strand construction, one of 1x19, 7x7 or 7x19, matched to the bends in the run and the tension you plan to carry.
- Stainless grade, 304 or 316, matched to the exposure setting rather than to the price column.
- Finish, natural brushed or coated, along with what the coating will demand from you in upkeep.
- Minimum breaking force with its test basis and certificate for the exact rope, not a family figure carried across constructions.
- Fittings rated for that diameter and construction, in stainless matched to the cable grade.
- Quantity with a spare length for trimming and terminal waste, because a run cut two inches short can't be finished from offcuts of a different size.
A quote naming only quarter inch stainless cable is incomplete in a way no price comparison can fix. A supplier who can't produce a breaking force for the exact construction hasn't specified anything, and the cheapest line item usually turns out to be the one missing a field.
One thing worth knowing when you weigh a 1/4-inch quote against a kit: our standard cable is 5/32 inch 316 marine-grade stainless steel wire rope, each kit includes 10% extra 5/32 inch 316 stainless steel cable, and all cable and hardware are 100% stainless steel. That's a different diameter from the tables above, so hold it to the same seven fields instead of assuming the labels line up.
Run the full spec against the tables once more, then order. Nothing on that list is decorative. Each field closes a gap the size label leaves open.
Ultra Modern Rails supplies factory-direct cable railing systems in 100% stainless steel, with 316 marine-grade cable and the fittings and terminals that turn a diameter into a working assembly. If you're specifying a run, we'll prepare a free custom quote and drawing within 24 hours so you can check construction, grade and fitting compatibility before you commit. Visit Ultra Modern Rails to see the systems and send through your measurements.