

You're standing on the balcony with a new railing system on site, a drill in hand, and a simple question: where should the first post go? The answer isn't determined by the railing's finish or the distance between visible posts. It starts below the surface, with the balcony's framing, concrete, edge geometry, drainage, and the load path connecting the guard to the structure.
A successful balcony railing installation creates a rigid barrier that meets the governing code and stays dry at every penetration. A beautiful cable system attached to weak blocking will move. A strong post installed without proper waterproofing can invite rot, corrosion, or concrete damage. The work that lasts comes from treating the substrate connection and moisture detailing as seriously as the railing itself.
Table of Contents
- Decoding Guardrail Codes and Load Requirements
- Choosing Between Modular Kits and Custom Fabrication
- Anchoring Posts to Wood and Concrete Substrates
- Threading and Tensioning the Cable Infill
- Navigating Edge Setbacks and Waterproofing Details
- Final Inspection and Long-Term Maintenance
Decoding Guardrail Codes and Load Requirements
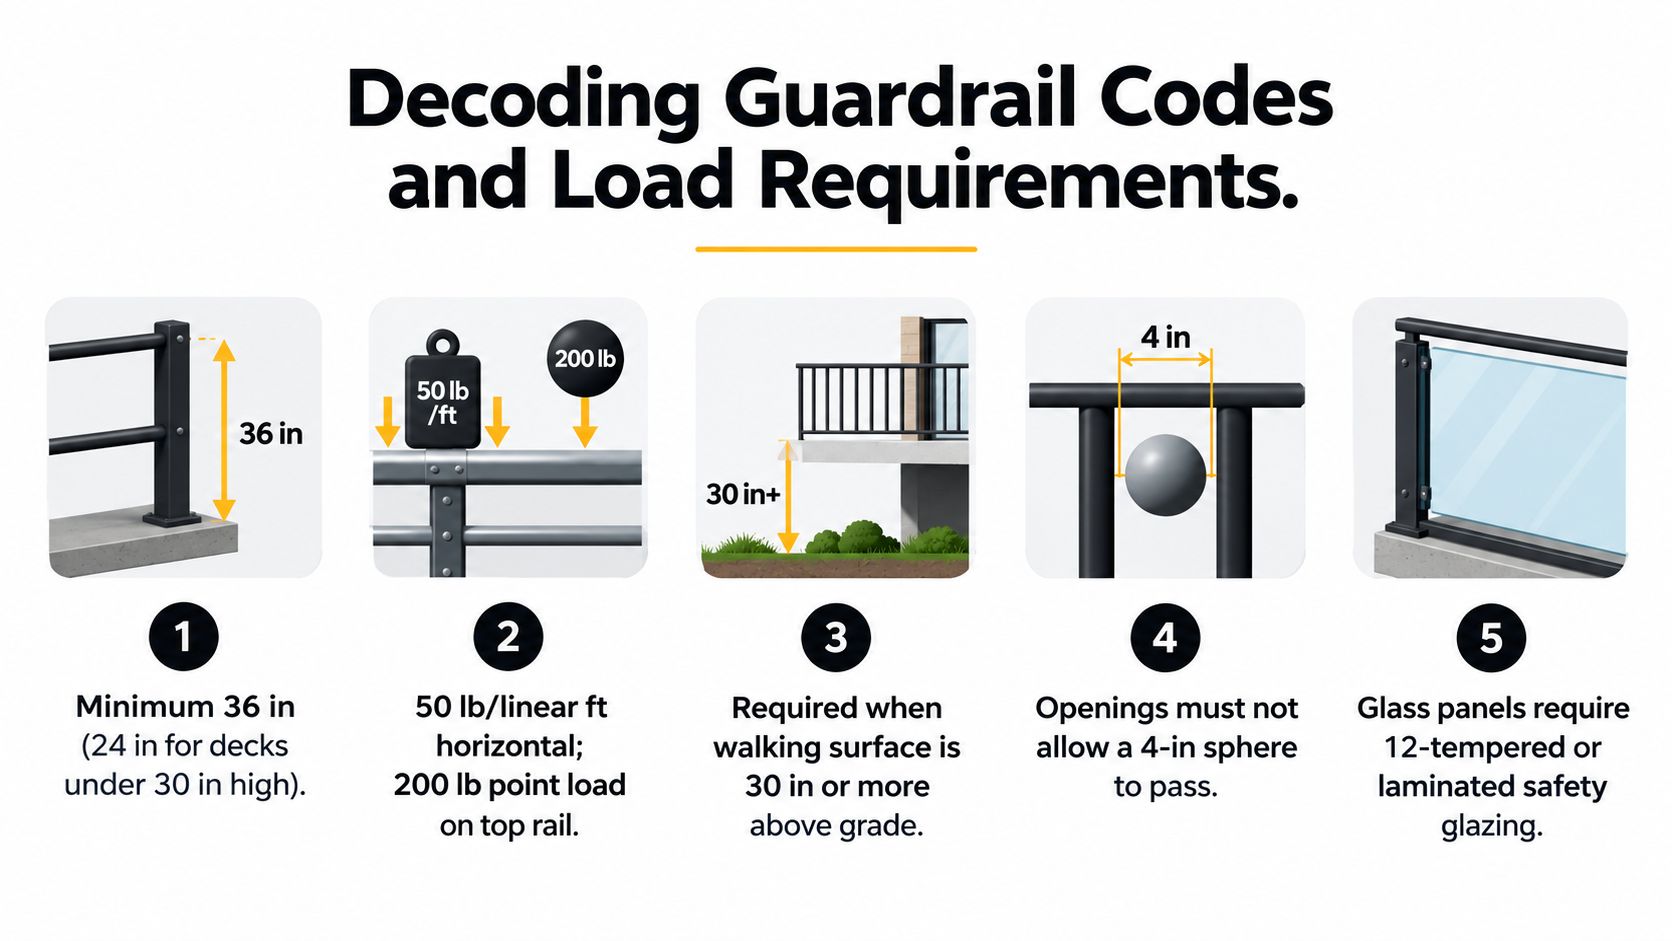
Before ordering material, identify the code that governs the building. A guard is generally required when an open-sided walking surface is more than 30 inches above the floor or grade below, a trigger that catches many homeowners who judge risk by appearance rather than elevation. The exact rule depends on the adopted residential, commercial, or multifamily code, so confirm the local requirements with the authority having jurisdiction before fabrication.
Height is another early decision. The 2006 International Residential Code required a 36-inch minimum guard on open sides of porches and balconies, while the 2005 National Building Code of Canada required 42 inches. Modern commercial and multifamily work commonly uses 42-inch guards, and New York City's 2014 Building Code requires a 42-inch parapet, railing, or fence for roofs and terraces above 22 feet. These examples show why a 36-inch residential design shouldn't automatically be carried into a commercial project. The regulatory history and examples are summarized in this technical review of balcony safety barriers.
Treat the load path as part of the railing
A guard isn't tested only at the cable, picket, or glass panel. The force travels from the top rail through the posts, base plates, fasteners, blocking or concrete, and finally into the balcony structure. Code-focused installation guidance commonly specifies a 200-pound concentrated horizontal load at the top rail and a 50 pounds-per-linear-foot horizontal uniform load, with openings restricted so a 4-inch sphere can't pass through. See the code-compliant guardrail framing and post connection guidance before drilling.
That load path changes the installation plan. A rim board that looks substantial may not provide enough backing for a post under lateral force. A concrete slab may appear sound but contain reinforcement, damaged edges, or insufficient depth for the proposed anchor. Draw the post locations over the framing plan or inspect the slab before you commit to a mounting style.
Practical rule: A railing specification is incomplete until it identifies the substrate, anchor type, edge distance, and load transfer path.
The opening limit matters for more than inspection. One technical review reports that approximately 950 out of 1,000 children under age 10 could pass through a 6-inch opening, which is why cable spacing, picket layout, and infill selection deserve the same attention as rail height. The same guidance explains why code compliance should be established before materials are cut, not after the system is assembled.
For a concise project reference, compare your design against these guard railing requirements, then verify the final interpretation locally. Codes vary by occupancy and jurisdiction, and the stricter requirement usually controls when the building's use creates a higher level of exposure.
Choosing Between Modular Kits and Custom Fabrication
A straight balcony with repeatable post locations is a good candidate for modular railing. A balcony with angled returns, irregular corners, a stair transition, or a questionable edge condition may need custom fabrication. The choice isn't just about the price of the components. It affects field labor, measurement risk, connection locations, lead time, and how cleanly the finished system meets the structure.
A modular section can simplify a standard run because posts and fittings are prepared around a repeatable layout. Pre-drilled posts reduce some on-site marking, while stainless hardware suits exposed locations where corrosion resistance matters. The installer still has to verify the actual opening, substrate, and code height. A kit won't correct a post location that lands over a hollow edge or weak rim board.
Custom fabrication earns its place when the balcony geometry refuses to cooperate with standard sections. Complex radii, non-standard stair pitches, wall returns, changing elevations, and large hospitality layouts often make field alterations a poor substitute for a measured design. Cutting a standard section may shorten the visible rail, but it doesn't automatically solve cable termination, corner tension, or base-plate placement.
Compare the installation consequences
| Feature | Modular 8-Foot Kits | Custom Fabrication |
|---|---|---|
| Best fit | Straight, repeatable balcony runs | Angles, radii, stairs, returns, and unusual substrates |
| Field work | Faster assembly when measurements and post locations are predictable | More coordination before fabrication, less improvisation on site |
| Measurement risk | Standard sizing can expose errors at corners or end conditions | Designed around verified site dimensions |
| Connection planning | Works well when standard posts land on structural backing | Allows post locations to respond to framing and slab geometry |
| Appearance | Clean on uncomplicated runs | Better control over transitions and irregular layouts |
| Main trade-off | Convenience can become a problem if the balcony isn't truly standard | Higher planning demand, with fewer forced compromises |
For modular systems, measure each clear run and plan the end conditions before rounding up to the nearest available module size. The extra length should be resolved with an intentional end post or approved adjustment, not by forcing a terminal fitting into a space that compromises tension. Cable systems need room for fittings and adjustment, so a “close enough” measurement can become a structural and visual problem.
The same principle applies to custom work. Custom doesn't mean the installer can skip verification. Confirm finished floor elevation, post setbacks, wall returns, drainage paths, and the thickness of the mounting surface before the fabricator releases drawings.
Ultra Modern Rails supplies custom-made stainless steel and black metal cable railing systems for balconies, decks, stairs, patios, pools, and commercial spaces. Its modular railing systems can suit predictable runs, while a site-specific drawing is still needed where geometry or anchorage is unusual.
Anchoring Posts to Wood and Concrete Substrates
The most important part of a railing is usually the part nobody sees. A post can be perfectly plumb and the cable can be evenly tensioned, yet the assembly will fail its purpose if the base plate is attached to thin decking, a weak rim board, deteriorated wood, or damaged concrete.
Start with a substrate assessment. Remove the old railing where necessary, expose enough of the mounting area to understand what's underneath, and mark every proposed post. On wood balconies, identify joists, rim boards, blocking, sheathing, and any ledger or edge framing. On concrete balconies, locate slab edges, cracks, reinforcement, embedded services, and the available anchor depth.
Wood mounting requires real backing
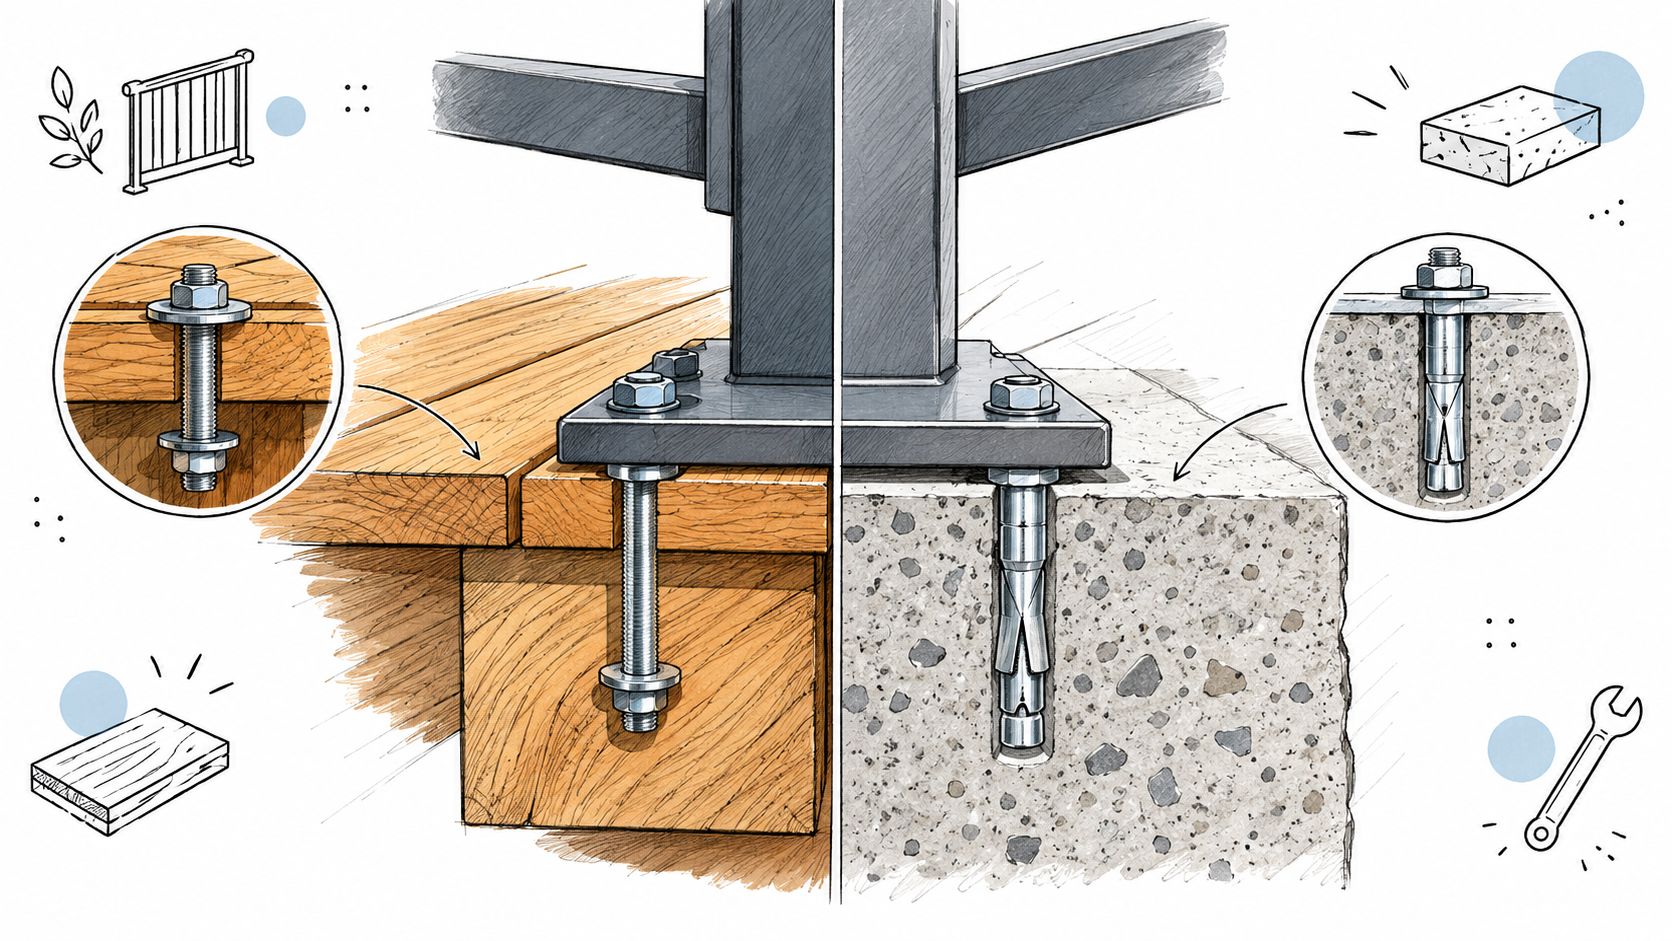
For a top-mounted wood post, don't rely on the surface boards alone. Install structural blocking between joists so the post fasteners transfer lateral force into framing rather than into a thin rim or unsupported decking layer. Tight-fit blocking, properly sized washers, and through-bolted or structurally anchored posts create a positive connection. The guide to mounting railing posts to a deck provides a useful reference for planning that connection.
A practical sequence is:
- Map the framing. Mark joists and the intended post centers. Reject any layout that places a post over unsupported material.
- Add blocking. Fit solid structural members between joists at each post location. Fasten the blocking so it acts with the framing, not as a loose spacer.
- Dry-fit the base plates. Check edge distances, post orientation, drainage, and the location of washers and nuts before drilling.
- Drill cleanly. Use the manufacturer's hole size and depth. Remove dust and confirm the fastener passes through the intended structural member.
- Install the anchor hardware. Through-bolts are often preferable where access allows. Otherwise, use approved structural fasteners designed for the actual framing.
- Plumb before final tightening. A post that is forced upright by tightening can leave the base plate under unwanted stress.
Concrete needs controlled drilling
Concrete anchors require a different discipline. Select an anchor system rated for the load, slab condition, environment, and edge distance. Epoxy anchors can be appropriate where the design calls for them, but the hole must be drilled, cleaned, filled, and installed according to the anchor manufacturer's instructions. Dust left in the hole can undermine the bond.
Avoid the reinforcement grid. Scanning or reviewing structural drawings before drilling can prevent damage to rebar and help identify a safer post layout. Never move a post toward the slab edge just to avoid reinforcement without checking the resulting edge distance and load capacity.
Waterproofing starts before the anchor is tightened. Keep water from entering around base plates and penetrations with a compatible sealant and a detail that sheds water rather than trapping it. On occupied spaces below, coordinate the railing work with the balcony membrane. A bead of caulk applied over a dirty or moving joint isn't a waterproofing system.
The railing connection carries the load. The seal around that connection protects the structure that carries the connection.
Use corrosion-resistant stainless or hot-dipped galvanized fasteners where the environment requires them, and torque bolts to the manufacturer's specification instead of tightening by feel. The safe and durable deck and balcony guidance from BC Housing emphasizes connection quality, corrosion resistance, and load conditions, including an occupancy load of 1.9 kPa where applicable. Canada's BCBC guidance also requires guards on decks and balconies higher than 600 mm, or 24 inches, with openings that prevent passage of a 100 mm, or 4-inch, sphere.
Threading and Tensioning the Cable Infill
Cable infill looks simple because the finished lines are visually quiet. Mechanically, it's a series of tensioned runs that must remain aligned, properly terminated, and supported by posts capable of resisting the force transmitted through the fittings.
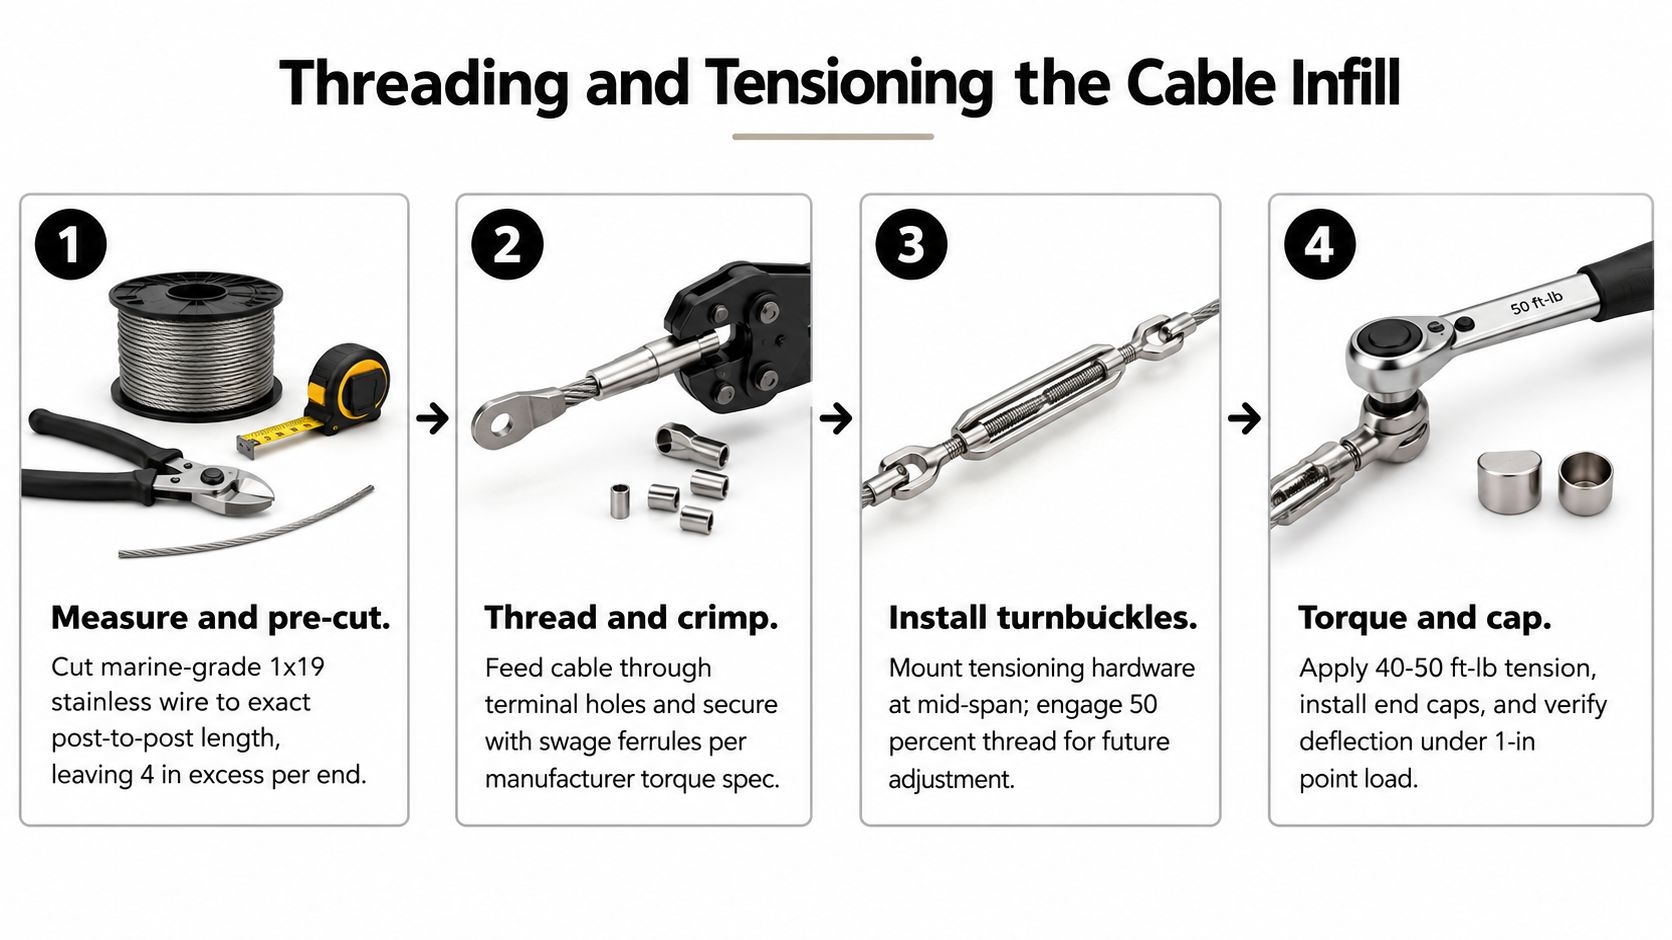
Before cutting cable, confirm the finished post-to-post dimensions, terminal orientation, intermediate posts, and corner details. Use marine-grade stainless wire rope and the fittings specified for that cable system. A clean cut matters. A crushed or flared cable end can make threading difficult and can prevent a swage or mechanical fitting from seating correctly.
Build the runs in a controlled sequence
Thread the cable through the pre-drilled posts without dragging it across sharp edges or unfinished holes. Install terminals exactly as the system manufacturer specifies. Swage fittings require the correct die and a hydraulic swaging tool, while mechanical fittings depend on proper assembly and torque. These aren't interchangeable techniques.
A reliable workflow is:
- Measure and cut each run separately. Don't assume parallel runs share identical lengths, especially on stairs or balconies with uneven returns.
- Leave fitting allowance. Follow the terminal manufacturer's required excess rather than guessing at the tail length.
- Install from the center outward. This helps keep the post alignment and cable pattern balanced as tension develops.
- Tension gradually. Alternate across the run and recheck neighboring cables instead of fully tightening one line before touching the others.
- Finish the ends. Trim cleanly, install caps where specified, and remove sharp protrusions that can catch clothing or skin.
The finished infill must prevent a 4-inch sphere from passing through the openings. Don't rely only on the nominal distance between cables. Check the complete assembly, including deflection under pressure, post flex, and the effect of any top or bottom gap.
Long runs and corners deserve special attention. A cable can appear tight near one terminal while sagging farther along the run if the intermediate post spacing, corner reinforcement, or terminal alignment is wrong. Add intermediate tensioning points where the system design calls for them, and use a properly reinforced corner post when cables change direction. Temperature and seasonal movement can alter tension, so leave the adjustment range required by the fitting manufacturer.
Watch this cable railing installation demonstration after reviewing the hardware instructions. A video can clarify the hand sequence, but it can't replace the project's structural design or the manufacturer's fitting specifications.
Don't substitute a guessed tension value for the manufacturer's requirement. The visual test is not enough. A cable that feels tight by hand may still allow excessive movement, while over-tensioning can pull posts out of plumb or overload the connection.
Navigating Edge Setbacks and Waterproofing Details
Most railing trouble starts at the ends, corners, steps, and transitions. A straight center run distributes attention evenly, but an edge post carries forces near a slab edge, a stair overhang, a wall return, or a change in framing. That's where a small layout error becomes a connection problem.
Post position is not purely aesthetic. Installation guidance notes that posts may need to sit about 1 inch in from a step or landing edge, with a greater offset where the step overhangs. The exact setback depends on the substrate, base plate, anchor system, and governing design, but the principle is consistent: preserve enough material around the anchor to resist the lateral load. The installation guidance for glass balcony railing layouts highlights why edge distance and post placement must be resolved before drilling.
Choose the mount around the structure
Top-mount posts can provide a clean profile when the slab or deck framing has adequate depth and edge distance. Side-mount posts may solve a narrow walking surface or preserve drainage, but they shift the load into the face of the rim or slab edge. Neither option is automatically stronger.
At steps and landings, lay out the complete path before fixing the first post. Check the step overhang, the top rail transition, cable alignment, hand clearance, and the location of each anchor. A post that looks centered from above may be too close to a damaged edge or may force the cable into an awkward angle.
Waterproofing requires the same forethought. Drilled penetrations through a balcony over occupied space can direct water into wood framing, insulation, or concrete. Sealant must be compatible with the membrane, fastener, base plate, and finish. Clean the substrate, prepare the penetration, install the anchor without damaging the waterproofing detail, and tool the seal so water sheds away from the opening.
Never treat waterproofing as a cosmetic bead added after the structural work. The seal is part of the penetration detail.
Inspect for trapped water around base plates, blocked drainage paths, dissimilar-metal contact, and exposed cut edges. Stainless hardware helps resist corrosion, but it won't compensate for standing water, contaminated surfaces, or a failed membrane. On wood, recurring dampness can rot the backing that the post depends on. On concrete, water entering cracks and penetrations can contribute to deterioration around the anchor.
Final Inspection and Long-Term Maintenance
A railing isn't finished when the last cap is installed. Walk the entire system as an inspector and as a user. Push the top rail, examine each post, check the cable pattern, and look underneath every base plate you can access. The finished barrier should feel integrated with the balcony, not like a lightweight screen attached to its edge.
Use this checklist before handover:
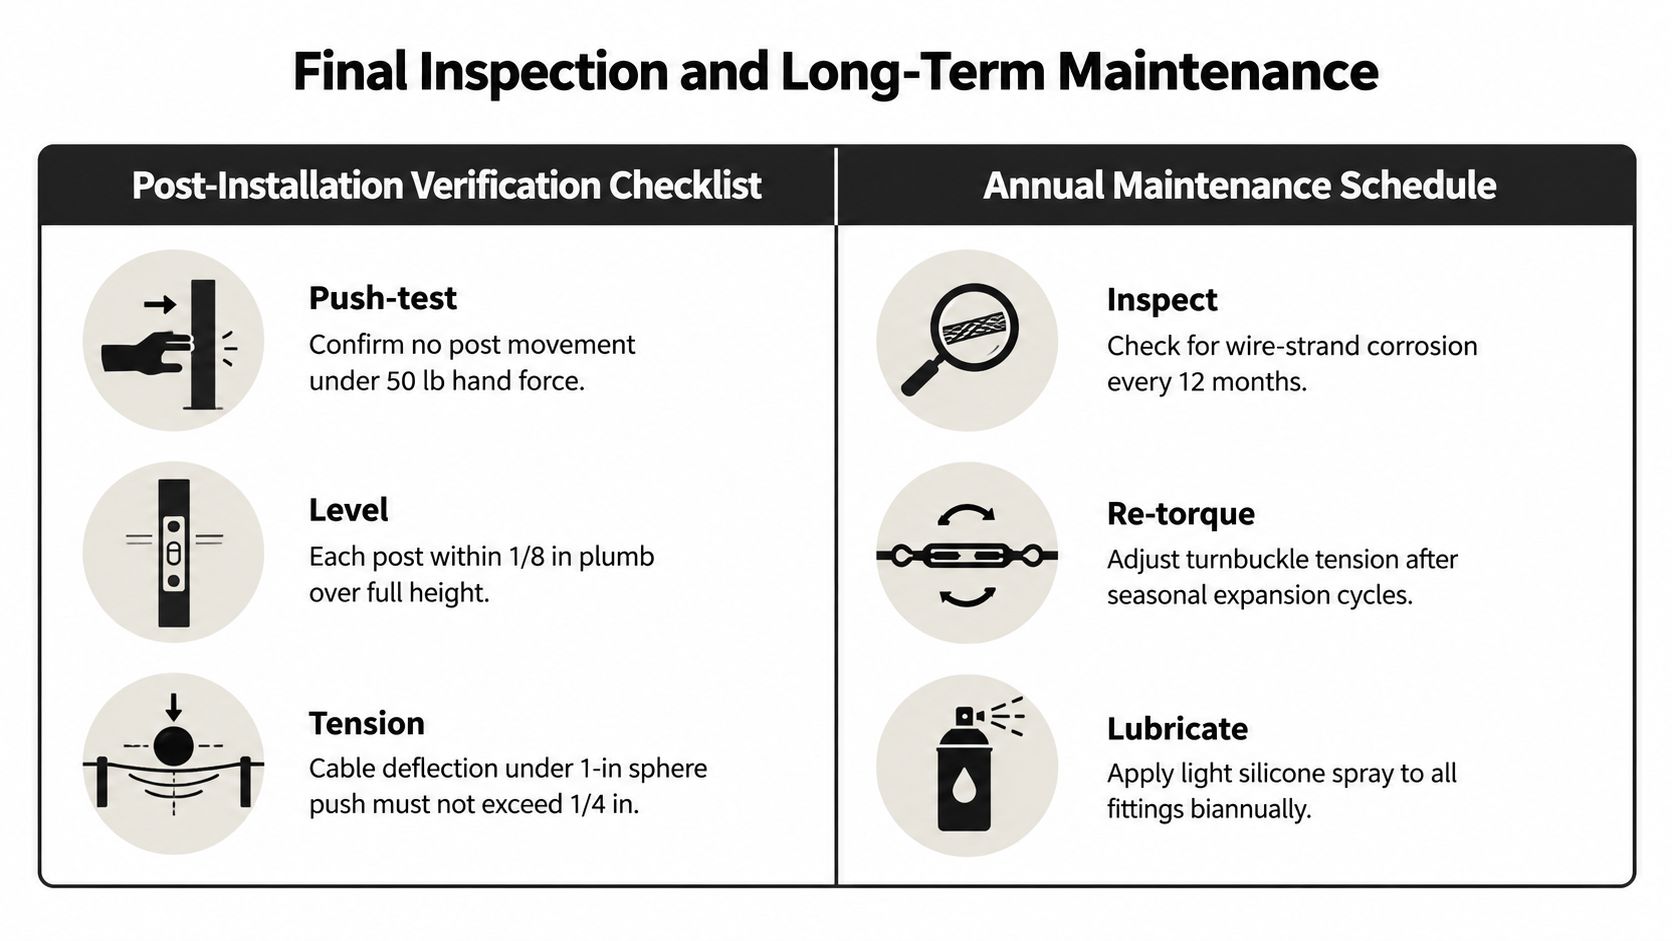
- Check movement. Confirm posts and top rails don't shift under a firm hand test. Any movement at the base deserves investigation, not concealment.
- Verify alignment. Look down the rail line for waviness, leaning posts, uneven cable runs, and corner deflection.
- Inspect openings. Confirm the completed infill blocks the required 4-inch sphere under the governing code.
- Review fasteners. Look for missing washers, loose nuts, damaged threads, corrosion, and sealant gaps.
- Examine the substrate. Check wood for softness and concrete for cracking or edge damage around anchors.
- Confirm drainage. Make sure base plates and sealant details don't create pockets where water can remain.
Maintain the hidden parts
Clean stainless cable and fittings with products compatible with the finish. Don't use abrasive tools that can scratch the surface and create places for contamination to collect. In coastal or highly exposed locations, inspect more often for tea staining, salt residue, galvanic corrosion, and damaged coatings.
Check cable tension and terminal condition at least annually, and inspect after severe weather, impact, or nearby construction. Look for broken wire strands, loose turnbuckles, cable sag, post movement, and water marks around penetrations. If a fitting needs adjustment, follow its instructions and avoid using tension to pull a leaning post back into alignment.
Unfinished wood handrails need appropriate sanding and exterior finishing before exposure, while metal components may require compatible protective coatings where the environment demands them. Maintenance can preserve a sound installation, but it can't repair undersized blocking, inadequate anchor depth, or a failed waterproofing membrane.
Annual inspection should follow the load path, from the handrail down to the substrate and outward to the drainage detail.
The long-term result depends on all those parts working together. A code-compliant height, a rigid connection, controlled cable tension, sound edge geometry, and dry penetrations matter more than a showroom finish applied to a weak assembly.
Ultra Modern Rails supplies custom-made stainless steel cable and modern metal railing systems for residential and commercial balconies, decks, stairs, patios, pools, and hospitality spaces. Request a custom quote and drawing through Ultra Modern Rails, then use the verified site dimensions, substrate details, and mounting requirements to specify a system that can be installed safely and maintained properly.