

You're looking at a finished cable railing and one detail keeps catching your eye: exposed bolt heads interrupt the clean line of the posts, and a threaded end feels rough enough to catch a sleeve. A cap seems like an easy fix. It can be, but the wrong one may hold water against the fastener or hide corrosion until the joint needs attention.
Treat a bolt cap cover as part of the connection, not a decorative afterthought. Choose it for the fastener, the surrounding materials, the exposure, and the inspection the joint will need.
Table of Contents
- What a Bolt Cap Cover Actually Does
- A Short History of Purpose-Built Bolt Covers
- Material and Finish Options Worth Knowing
- Where Bolt Cap Covers Fit on a Cable Railing
- Why the Prettiest Cap Can Be the Wrong Cap
- Installing a Bolt Cap Cover the Right Way
- Maintenance, Inspection, and Smart Selection
What a Bolt Cap Cover Actually Does
On a stainless-steel cable railing, exposed hardware catches light. It can snag a jacket, irritate skin, or start showing stains after exposure to coastal air. A bolt cap cover is a cap or sleeve fitted over an exposed bolt head, nut, or threaded end. Its first job is to cover contact points and give the finished assembly a more deliberate appearance. Its second is to add a barrier between the fastener and contaminants such as moisture, salts, and dirt.
Those jobs matter, but a cover isn't a substitute for choosing the right fastener or building a drainable joint. If a cap traps water, it can conceal the first signs of corrosion while keeping moisture close to the metal. That's why I treat a cap as one part of a material system, not as a stand-alone corrosion fix.
Choose the right kind of cover
The name on the package doesn't always tell you how the part fits. A decorative nut cover usually sits over a nut and may be selected mainly to match nearby hardware. A push-on bolt cap grips the head or exposed end by friction, so the fit depends on the cap's size and the fastener's shape. A cap nut, by contrast, is itself a nut with a domed top that covers exposed threads. It replaces an ordinary nut rather than slipping over one.
For a railing, check what needs covering. If the problem is an exposed threaded stub beyond a nut, a cap for the stub is relevant. If the bolt head is what looks unfinished, the cover must fit the head geometry and leave the joint accessible as required. A mismatched cap may rock, fall off, prevent access to the fastener, or create a pocket that holds water.
Jobsite rule: A cover earns its place only if it fits securely, doesn't create a water trap, and leaves the connection serviceable.
The rest of the decision comes down to material, location, and maintenance. Match the cap to the railing hardware and environment, then check whether it will shed water and remain removable for inspection. Appearance matters, but it comes after safe geometry and a sound joint.
A Short History of Purpose-Built Bolt Covers
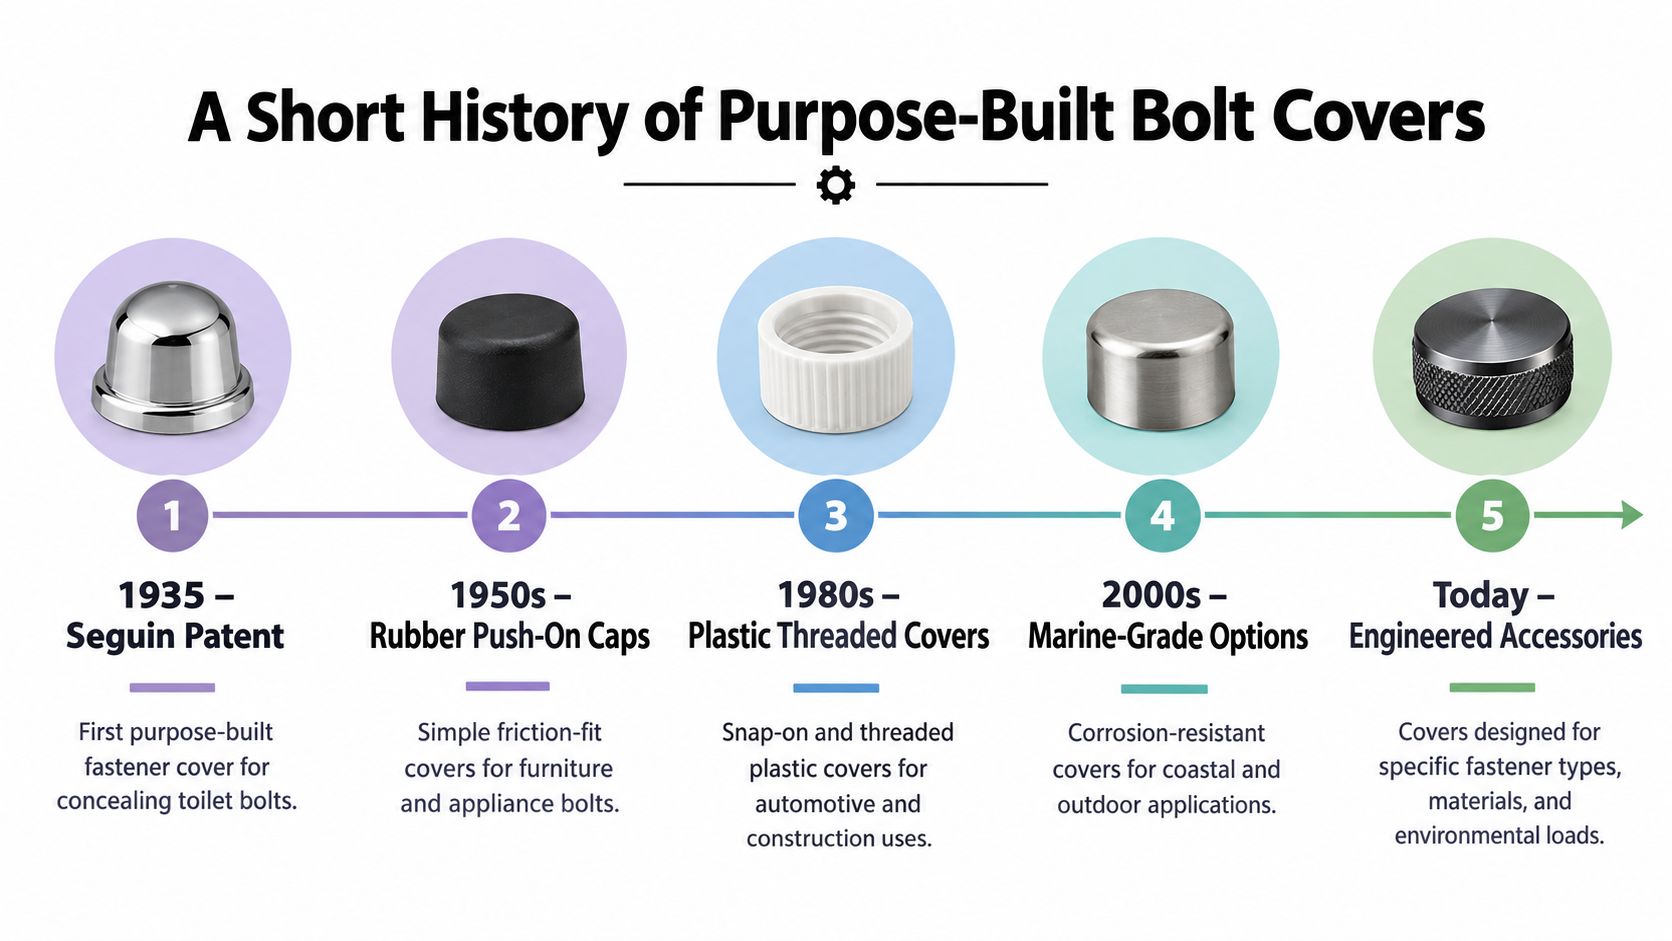
A bolt cover has had a practical job from the start. O. J. Seguin's “Bolt Cap” patent, filed in 1934 and granted in 1935, describes a cap for the head and washer of a bolt securing a toilet fixture. The cover was intended to keep the assembly from marring the surrounding surface while concealing exposed hardware (US patent US2020522A). The same principle applies to railing hardware: a cover should suit the fastening assembly and its job, not just its appearance.
That history matters on a railing because a cap can affect whether you spot corrosion or inspect the connection. A tight-looking cover that traps water or hides rust can create a maintenance problem. Choose a design that protects the hardware without concealing a developing failure.
Standard fasteners made matching covers practical
Interchangeable covers became easier to produce as bolt and thread dimensions became more consistent. Before standardization, nuts and bolts were often made as matched pairs, which limited replacement options. In 1841, Joseph Whitworth proposed standardized bolt and thread dimensions. The system spread widely, although formal British adoption came later, in 1905. Consistency made compatible fasteners and accessories, including washers and caps, more practical (fastener terminology and standardization).
The broader history shows covers serving different purposes: concealing hardware, protecting surfaces, or fitting a particular fastening arrangement. Those functions are not interchangeable. For railing work, prioritize access for inspection and a design that does not hold moisture against the fastener.
Specify the bolt head or nut shape, thread configuration, exposed height, and intended cap material. “Outdoor deck railing” alone does not give a supplier enough detail to confirm fit. Standard dimensions help, but the installer must still check the actual fastener and connection on site. A cap that fits poorly can come loose, obstruct inspection, or retain water, so verify its fit and serviceability before installation.
Material and Finish Options Worth Knowing
Choose a cap for the conditions at the connection, not just its color. A sheltered interior joint faces different exposure from a railing beside a pool, on a coastal deck, or above a roof where deicing salts collect. In each case, the cap must suit the fastener and let you spot corrosion before it compromises the connection.
Stainless steel is a sound choice for exposed hardware when durability matters. In chloride-heavy conditions, specify a compatible grade rather than selecting by appearance. ASTM F593 covers stainless-steel bolts, hex cap screws, and studs intended for general corrosion resistance, providing a useful material framework for the fastener beneath the cap (ASTM F593 stainless-steel fastener scope). A stainless cap will not make a poorly chosen fastener suitable, or protect a joint that traps stagnant water. For more on choosing metals for wet or chloride-heavy settings, read this guide to stainless steel and steel corrosion.
Powder-coated steel or aluminum can match black posts and brackets, but coating damage exposes the base metal to corrosion. Polymer covers avoid adding another metal to the joint and may suit concealed or low-contact locations. They still cannot correct galvanic incompatibility between the fastener and the structure.
Nylon push-on caps suit exposed ends on handrail brackets and other light-duty hardware. Their hold depends on fit and condition. Vibration, cleaning, and handling can loosen a friction-fit cap, so match its shape to the fastener and confirm you can remove it for inspection without disturbing the connection.
| Material | Best Environment | Finish Match | Main Limitation |
|---|---|---|---|
| Stainless steel | Outdoor exposure, with grade selected for the site | Natural stainless hardware | Doesn't fix water traps or incompatible underlying metals |
| Powder-coated metal | Black-finish railing components | Can blend with black posts and brackets | Coating damage can expose the base metal |
| Polymer | Locations where a nonmetal cover suits the assembly | Often available in discreet finishes | Doesn't correct galvanic issues in the joint |
| Nylon | Light-duty push-on applications | Useful for small bracket hardware | Friction fit can loosen or make inspection awkward |
Practical rule: Decide on material and drainage before choosing a color. A close finish match cannot compensate for a cap that holds water against the fastener or hides early rust.
Where Bolt Cap Covers Fit on a Cable Railing
On a cable railing, a cap can clean up exposed hardware, but each location has its own trade-off. Post-to-deck fasteners may benefit from a neat cover where the connection is visible, while a cap around a structural lag must not interfere with seating, inspection, or future tightening. At a handrail-to-post bracket, covering a projecting threaded end can reduce snag risk. At a cable termination, the priority is access: don't bury a fitting that needs adjustment or inspection under a cap that can't be removed cleanly.
A black metal cable railing makes the visual question obvious. Post tops, brackets, and cable terminations are exposed, so a matched black cap may keep a bright fastener from breaking up the railing's line. But don't cap a threaded termination before the installer has finished tensioning and confirmed the connection is ready to remain in service. A cap that blocks access makes routine checks harder.
The hardware details matter, too. A black wood post bolt is one example of a component that can be considered alongside a cover when a project calls for a cleaner visible finish. Check the product's fit and intended use rather than assuming every bolt or post connection takes the same cap.
For cable railing hardware, appearance and access need to be considered together. Compare the stainless-steel cable railing hardware with the cap you plan to use, and confirm that covering the fastener won't obstruct the tool needed to tension, inspect, or retighten it. The video below gives another view of how exposed hardware sits within a cable railing installation.
Stair transitions and top-rail splices deserve the same scrutiny. A cap can soften an exposed edge or tidy a visible connection, but it shouldn't hide a joint that needs regular service. With wood posts, also check that the cap doesn't trap moisture against the timber or leave a cavity that stays wet after rain.
Why the Prettiest Cap Can Be the Wrong Cap
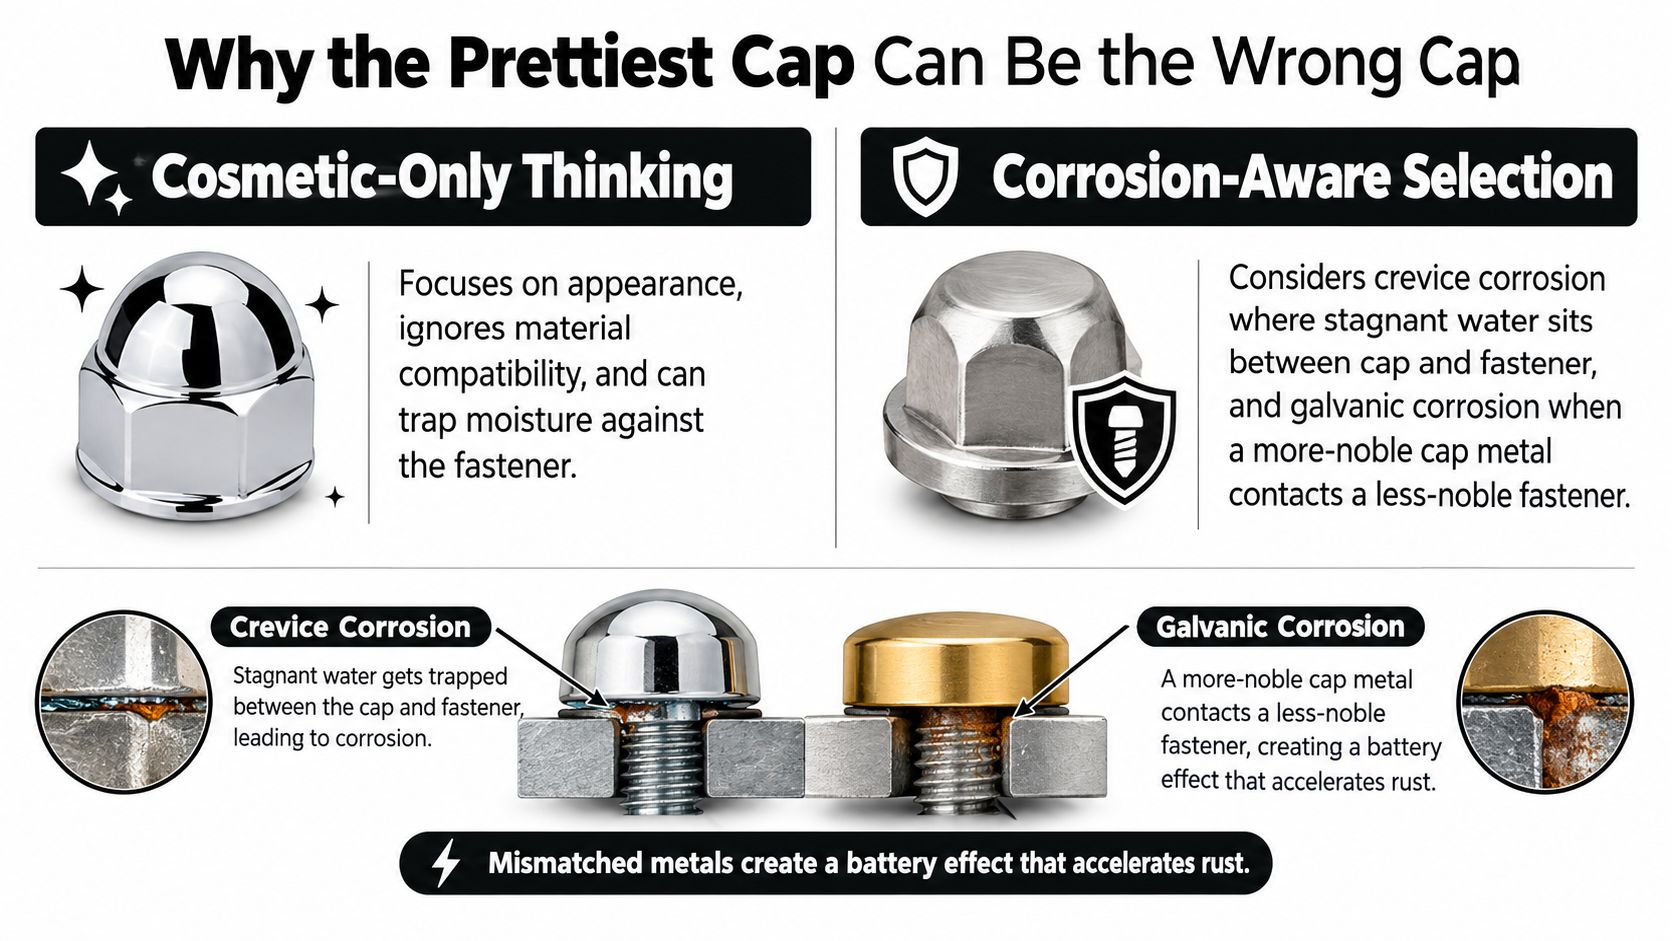
A fully enclosed cap can look like the neatest choice on a drawing and become the least useful choice on the deck. If water gets inside and can't escape, the cap may hold moisture against the fastener. That creates the conditions for crevice corrosion, which can occur where stagnant moisture sits in a tight gap, such as beneath a bolt head, washer, or cap.
The other risk is galvanic corrosion. When dissimilar metals contact each other in the presence of moisture, the less noble metal can corrode faster. A cap doesn't erase that risk. A stainless fastener against carbon steel or aluminum needs a compatible joint design, not just a cover that hides the contact.
Compare the cap's water behavior
An open-bottom cap lets water escape, though it offers less protection from direct splash. A vented design may help avoid a sealed pocket, but the opening still needs to stay clear. A fully sealed cap can be appropriate for some locations when the joint and sealing method are designed for it, but sealing in contaminated moisture is worse than leaving a drain path.
That distinction matters in coastal salt air, around pool splash, at restaurants where staff use cleaning chemicals, and on roof decks where deicing salts arrive on shoes. In those settings, choose for material compatibility, drainage, and access before you choose the smoothest silhouette.
The independent fastener corrosion guidance highlights crevice corrosion under bolt heads and washers and galvanic risks where stainless fasteners contact carbon steel or aluminum. The field lesson is simple: a cap may hide early rust or staining rather than prevent it. If the cap keeps you from spotting a problem, or can't be removed without damage, it can delay the inspection that would catch a failing joint.
Choose an open, vented, or sealed design only after checking where water goes and how the joint will be inspected. Don't assume the most enclosed cap is the most protective. In a wet location, an inspectable cap that drains can be a better long-term choice than a cover that hides the hardware.
Installing a Bolt Cap Cover the Right Way
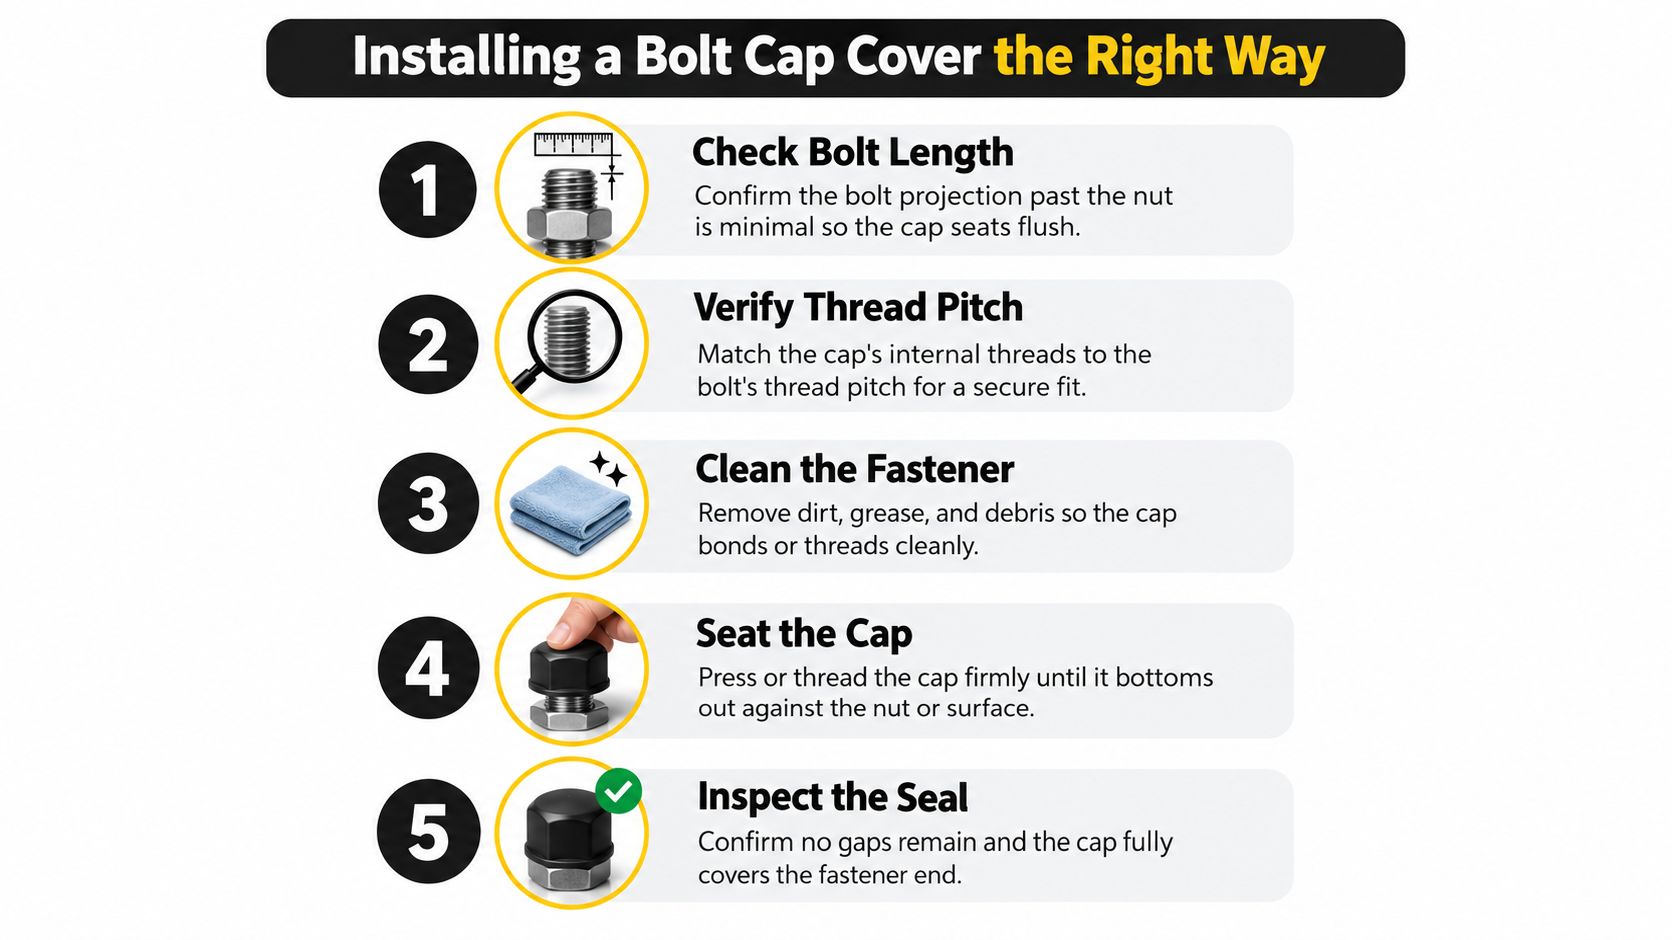
A cap cannot correct an overlong bolt, a loose nut, or a joint assembled without its specified locking method. Before fitting a cover, confirm the fastener type and length suit the connection. The nut must be fully engaged, and the bolt should project only as much as the joint requires. If excess thread creates a snag point, correct the bolt length instead of hiding it.
Dry-fit the cap before final assembly when possible. Check clearance around the nut or bolt head, confirm the shape and any thread match, and make sure the cover leaves room for a wrench or torque tool. Never force a threaded cap onto a near match.
Fit the cap after the joint is sound
Tighten the fastener to the project specification, then verify the torque before covering it. Keep the specified locking washer, self-locking nut, or other locking method in place. A cap does not prevent loosening. Remove dirt, grease, and debris so a push-on cover grips securely and a threaded cover seats without binding.
After tightening, check that the cap is fully seated and retained. Give a push-on cap a firm hand check, and confirm a threaded cap is snug without forcing it. Make sure the cover does not shift, obstruct the finished connection, or prevent access for future checks.
Where dissimilar metals require electrical isolation, use the specified isolation washer or another approved detail. Apply sealant only when the design calls for it. A casual seal can obstruct inspection or trap moisture; if the design specifies a gasket or sealant, follow its instructions and confirm the covered area remains inspectable.
Decide whether water should drain or stay out
An open-bottom cover is often easier to service where water can escape and the joint needs inspection. A sealed cap can suit an assembly designed around that seal, but plan how it will be removed. Where regular checks matter, choose a cover removable with a tool rather than one held only by friction, which may loosen.
For stainless fastener selection, confirm the bolt material meets the ASTM F593 framework discussed earlier. Then inspect the assembled railing: verify cap fit and retention, check that water has a clear path, and confirm the fastener remains accessible for inspection. Do not sign off until the joint is tight, the cap stays in place, and the hardware can still be checked.
Maintenance, Inspection, and Smart Selection
A cap decision should leave the joint safe, corrosion-aware, and inspectable. Before ordering, confirm the bolt material, cap material, exposure, drainage path, removal method, and locking hardware. If the cap covers a connection that must be checked or retightened, service access belongs in the specification, not as an afterthought.
For a residential deck or hospitality terrace, inspect the visible railing hardware as part of routine upkeep. Look for staining around the cap, a cover that has shifted, or signs that water is sitting where it shouldn't. In chloride-heavy locations, rinse the railing with fresh water and remove caps from suspect joints so you can inspect the fastener itself. Replace any cap that no longer grips or that holds moisture against the connection.
The cable railing cleaning and maintenance guide can help with care of the broader railing system, but don't let routine cleaning replace hardware checks. Public safety guidance recommends covering exposed bolt ends and keeping projection beyond a nut limited; it also distinguishes those steps from the locking methods that prevent loosening (outdoor equipment safety guidance). A cap doesn't correct the wrong bolt length, replace proper torque, or keep a nut from loosening.
Skip a cap where it blocks required inspection, hides a connection that needs regular retorquing, or interferes with a structural detail. Before you buy, ask the railing supplier whether the cover fits the exact fastener, how it drains, how it comes off, and whether it suits the site's exposure. Choose a clean finish only after those answers make sense.
Ultra Modern Rails supplies custom-made cable railing systems in stainless steel and black metal for decks, balconies, stairs, patios, and commercial spaces. If you're specifying exposed railing hardware, visit Ultra Modern Rails to request a custom quote and drawing, and confirm which finish and mounting details suit your project.