

A 36-inch corner post for deck railing typically needs oversized structural mounting into the adjacent joists, not simple face screws into the rim joist. At a 90-degree turn, one post may have to handle forces from two railing runs, so the corner connection matters as much as the post itself.
You're probably looking at the finished deck, holding a post against the outside corner, and wondering whether one clean vertical member can do the whole job. It can, but only when the post, cable layout, and framing connection are designed as one structural system. In many projects, a double-post corner is the more practical choice because it gives each railing run its own anchor and avoids forcing one connection to solve every problem at once.
Table of Contents
- Why Corner Posts Carry More Weight Than You Think
- Choosing the Right Material for Your Corner Post
- Installing Corner Posts for Maximum Structural Integrity
- Single Post Versus Double Post Layouts for 90-Degree Turns
- Trimming and Tensioning Cables at Corner Posts
- Verifying Your Corner Railing Meets Code Requirements
Why Corner Posts Carry More Weight Than You Think
Straight railing posts are easy to underestimate, but corner posts expose weak construction quickly. An inline post mainly supports a section running in one direction. A corner post becomes the pivot where the guard load and the pull from two adjacent railing runs meet. If the post moves, both sides of the railing can lose alignment.
The International Residential Code commonly used in the United States requires a 36-inch guard on decks more than 30 inches above grade. The system must also resist a 200-pound concentrated load at the top rail or a 50-pounds-per-linear-foot uniform load. With the usual 2.5 safety factor, engineers translate the concentrated test into 500 pounds of tested resistance. These requirements are summarized in this deck railing load guidance.
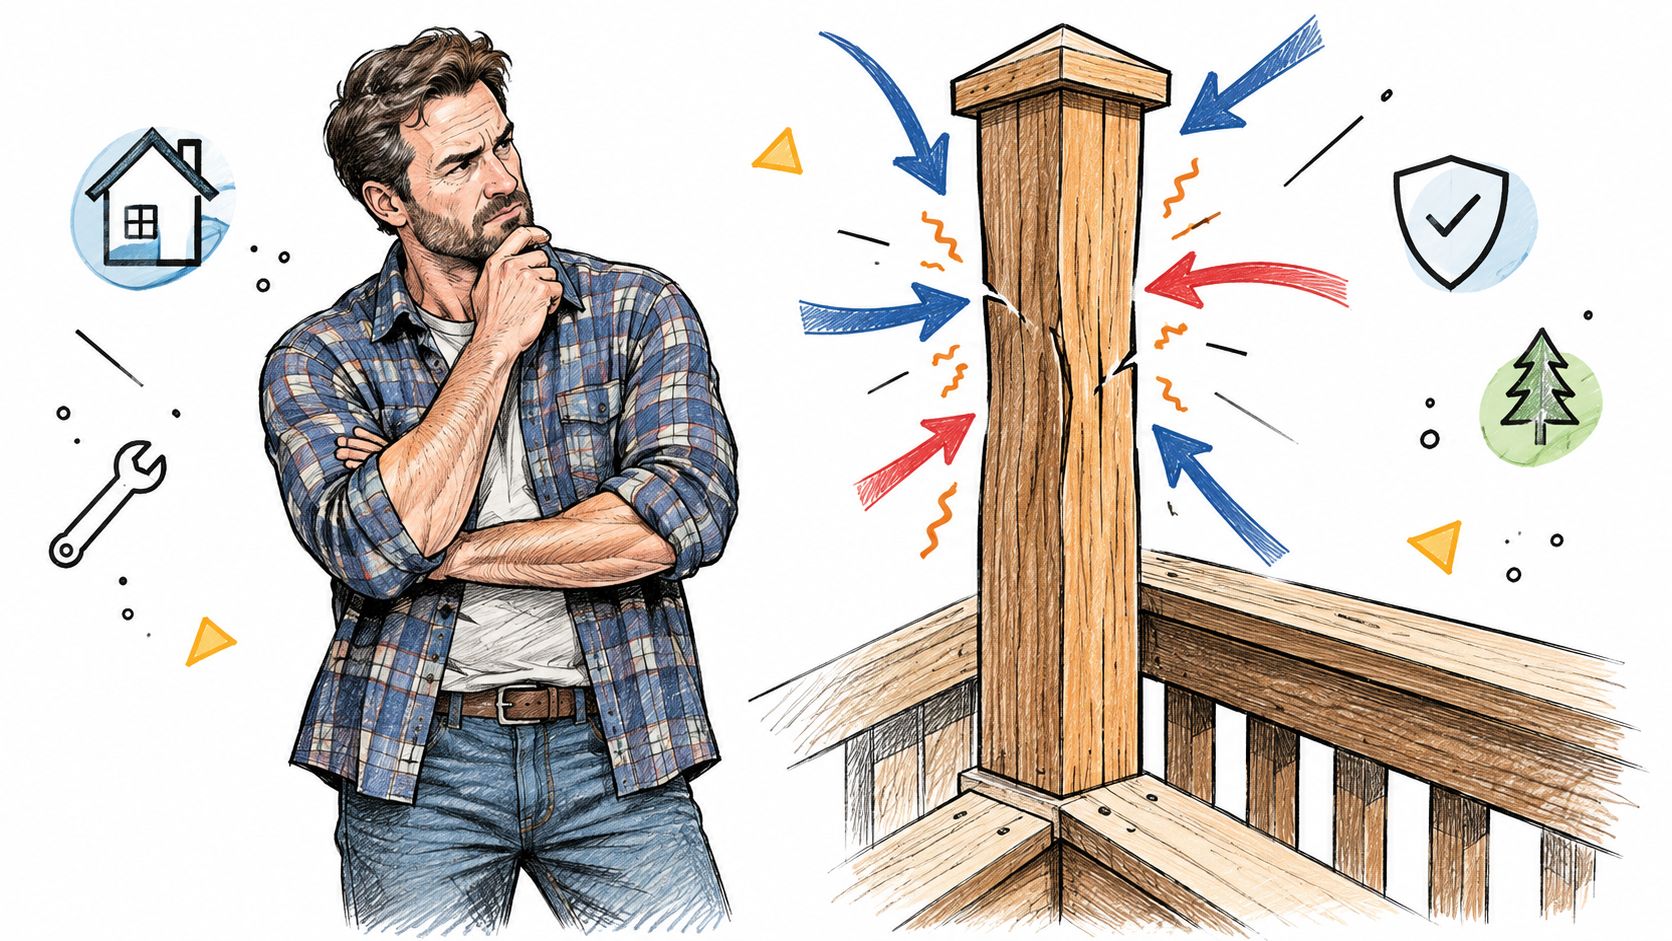
Why surface screws fail at corners
A face-screwed post can look firm when you first install it. The problem appears when someone leans against the corner, the cable runs are tensioned, or seasonal movement works the fasteners loose. Screws driven only into the rim board may not transfer the force far enough into the joists.
A properly built corner post for deck railing should be oversized and tied into the framing. That normally means creating a fastener path through the post and into the adjacent joist, rather than treating the rim joist face as the entire structural support.
Practical rule: If the corner can move independently of the joists, the connection is not doing its job.
Start with the load path
Before choosing a finish or drilling cable holes, identify where the post force will go. At a wood corner, inspect the rim joist, adjacent joist, blocking, and the condition of the ledger or supporting framing. If the joists are twisted, split, or poorly connected, adding a heavier post won't solve the underlying problem.
The installation sequence also matters. Set and reinforce the posts before laying the decking when possible. That gives you access to the framing and lets you position bolts where they can engage the joists. A corner that looks clean from above can still be structurally weak underneath.
Choosing the Right Material for Your Corner Post
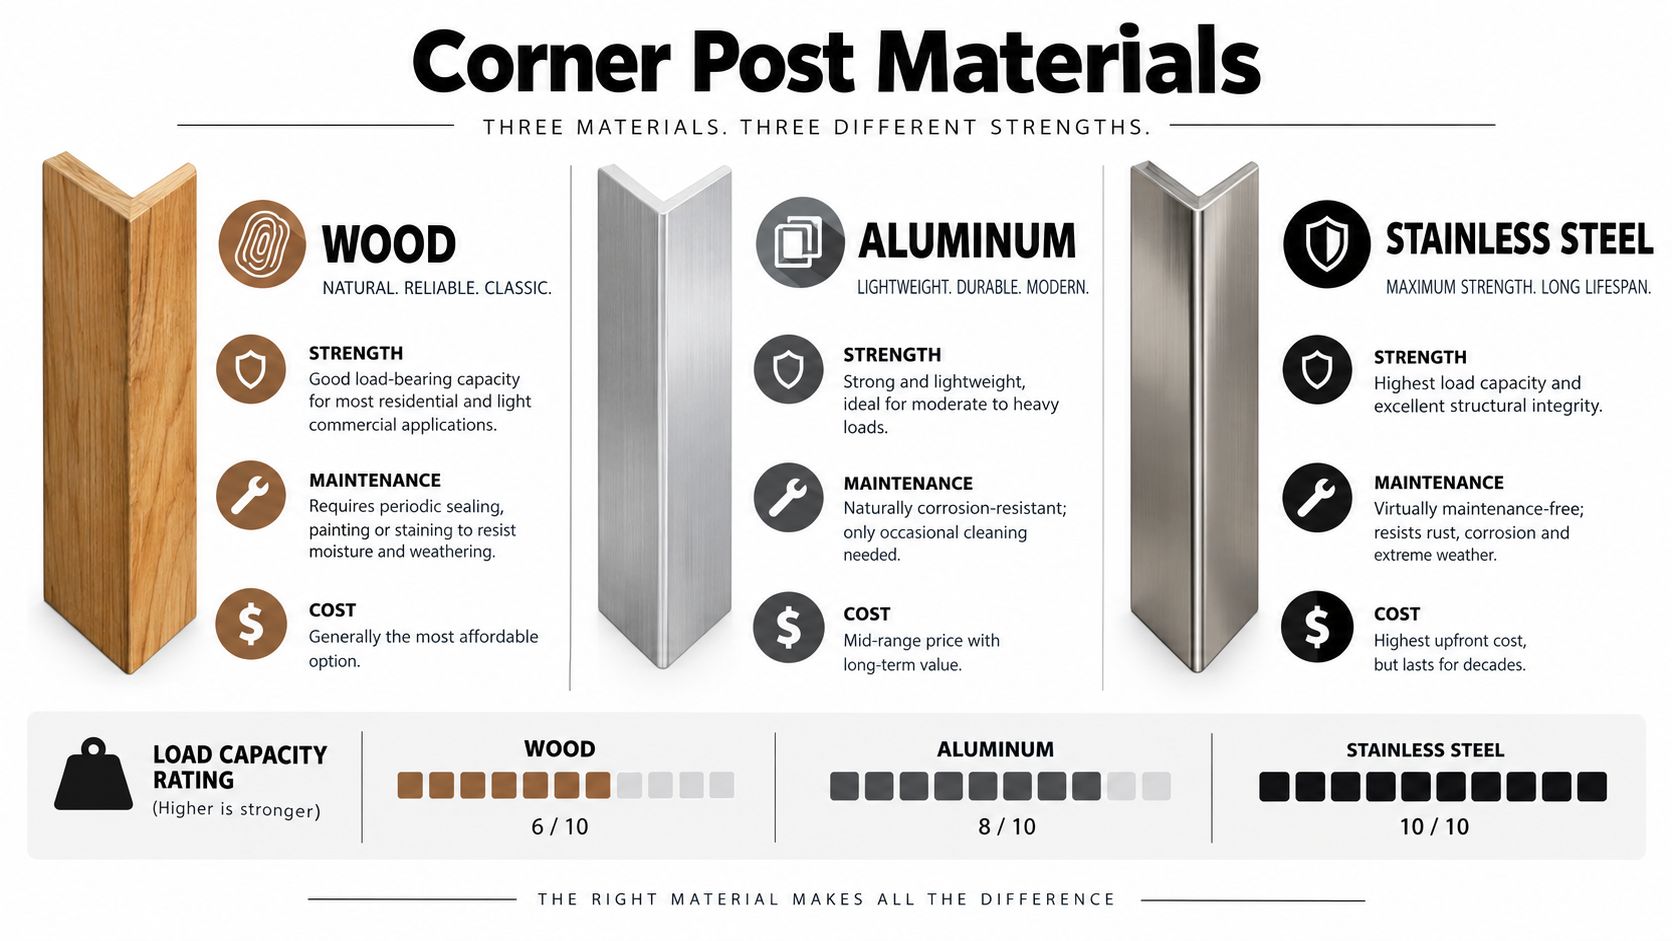
A corner post for deck railing handles a different job from an inline post. At a 90-degree turn, two railing runs may pull toward the same connection, and cable tension can expose weakness that remains hidden on a straight section. Choose the material by checking stiffness, connection quality, and exposure first, then match the appearance to the deck.
Wood works well when the deck already has substantial timber framing and the post can connect directly to it. It is easy to cut and provides a familiar transition between the deck and railing. Moisture movement, checking, and inconsistent grain can change the connection over time, so protect drilled holes and fastener points. A single wood corner post also needs enough section and framing support to resist forces from both railing directions.
Aluminum resists rot and gives the railing a lighter visual profile. Its performance depends on the entire assembly, including the post section, base, bracket, and mounting hardware. Thin decorative tubing cannot replace a structural post. For a corner, confirm that the product has a reinforced base, a documented load rating, and instructions for the actual mounting condition. A double-post layout may be more appropriate if the system does not rate one post for both cable runs.
Stainless steel is a practical match for cable railing because it combines a narrow profile with resistance to exterior deterioration. It still requires sound anchoring and adequate framing. Stainless steel does not correct a weak rim joist, undersized fasteners, or a base plate attached to insufficient material. Review these stainless steel cable railing posts for the construction details that affect selection.
Match the post to the mounting condition
Top-mounted and fascia-mounted posts carry force through different parts of the framing. A top-mounted post can bear over planned blocking. A side-mounted system needs a welded contact pad or reinforced bracket that spreads force through the framing instead of loading a thin edge.
Some cable products use a 36-inch corner post with a section around 3 by 3 inches and a base plate around 5.7 by 5.7 inches. Exact dimensions vary by manufacturer and mounting style. See this corner post product specification before sizing the framing. Do not select a smaller post just because it matches the inline posts. Confirm whether one post is approved for both 90-degree runs or whether two posts provide the required support.
Installing Corner Posts for Maximum Structural Integrity
The most reliable installation starts underneath the deck, not at the visible post surface. Find the joists that can receive the connection, confirm that they're sound, and decide whether additional blocking is needed. A post that is perfectly plumb but attached to weak framing is still a failed installation.
Build the connection in the right order
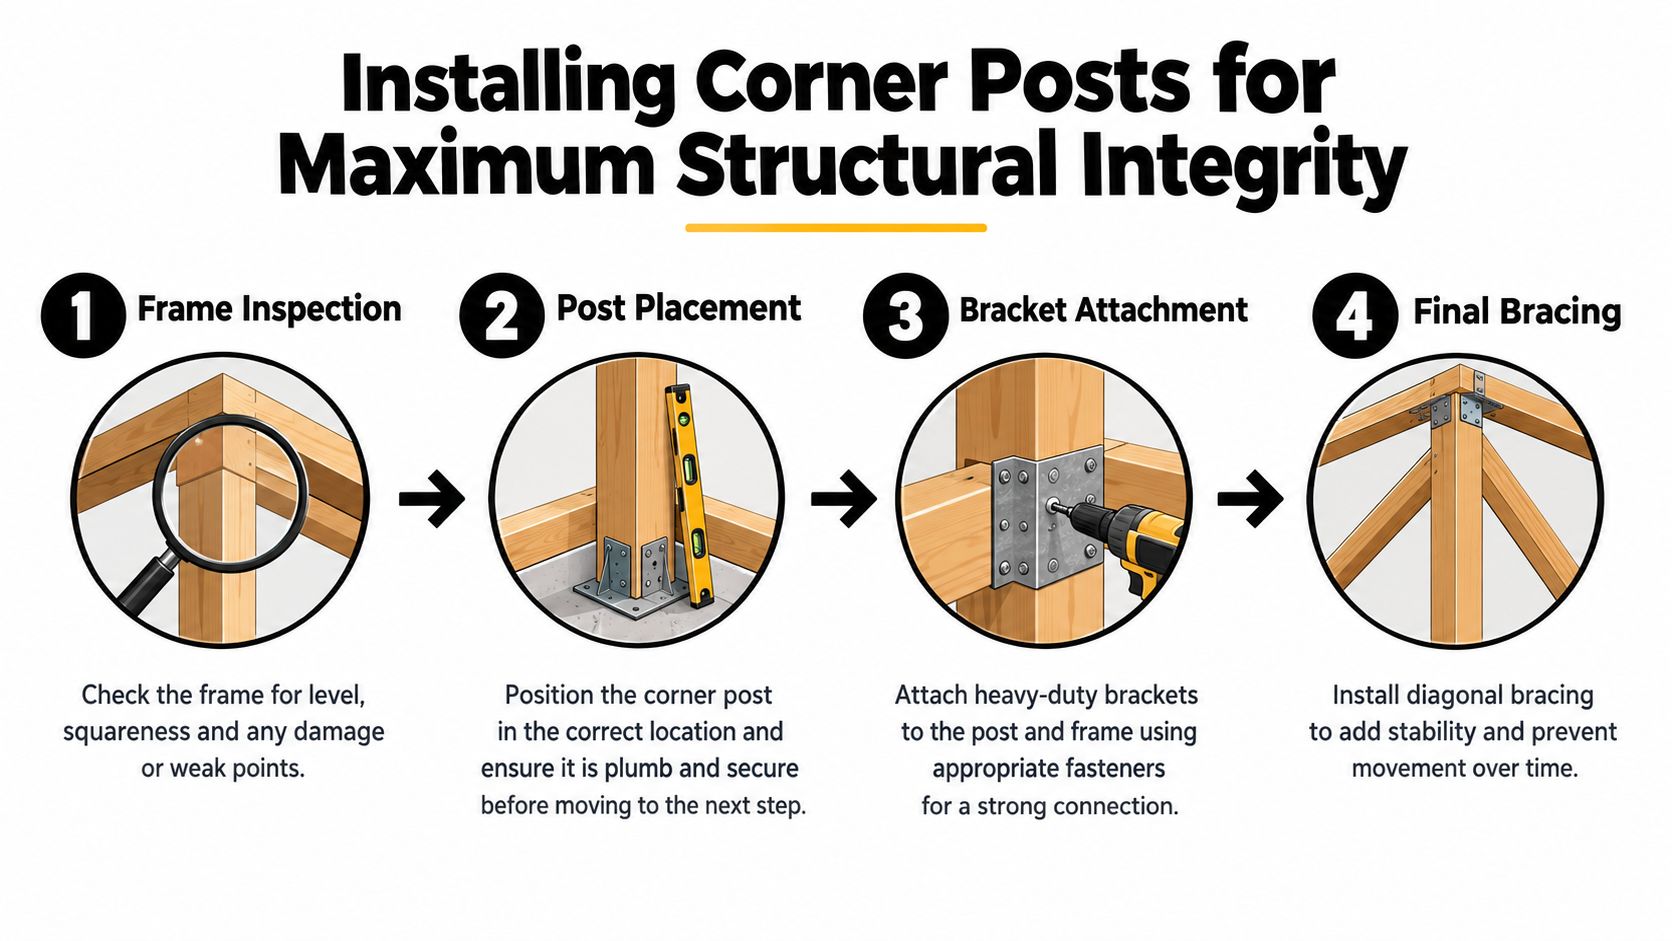
Use this sequence for a wood-framed deck:
- Inspect the framing. Expose enough of the rim and adjacent joists to verify their condition. Remove damaged material and add structural blocking where the post connection needs more bearing.
- Place the post before decking. Position the corner post so the fasteners can reach the adjacent joist. Mark the post centerline and keep the mounting holes clear of splits and edge breakouts.
- Use a through-bolt path. Industry installation guidance recommends placing through-bolts centered in a 4x4 post and offsetting them vertically so the bolts and nuts don't interfere. The exact hardware must follow the post and railing manufacturer's instructions.
- Use compatible hardware. With pressure-treated lumber, use hot-dip galvanized or similarly approved hardware. The connection must remain corrosion-resistant where moisture can collect around the post base and washers.
- Check the post before closing the deck. Test for movement in every direction. A post that shifts before the cables are installed will become harder to diagnose after the decking and handrail hide the connection.
These practices are consistent with the railing installation guidance. Conventional face fastening has historically failed to meet required guard loads because the force stops at the rim instead of reaching the joists.
Keep post spacing under control
For standard deck railing, guidance commonly keeps posts no more than about 6 feet apart. Cable applications can require closer structural support, with some systems recommending spacing of about 4 feet to limit deflection and make tension easier to maintain. Follow the system's instructions when they differ from a general framing rule.
The post connection should resist a force applied in any direction, not just a pull parallel to one cable run. That's why reinforcing the adjacent joist or adding blocking can matter more than adding another surface screw.
For a practical overview of the connection details, see this guide to mounting railing posts to a deck.
The sequence below shows why framing access should come before the visible finish work.
Single Post Versus Double Post Layouts for 90-Degree Turns
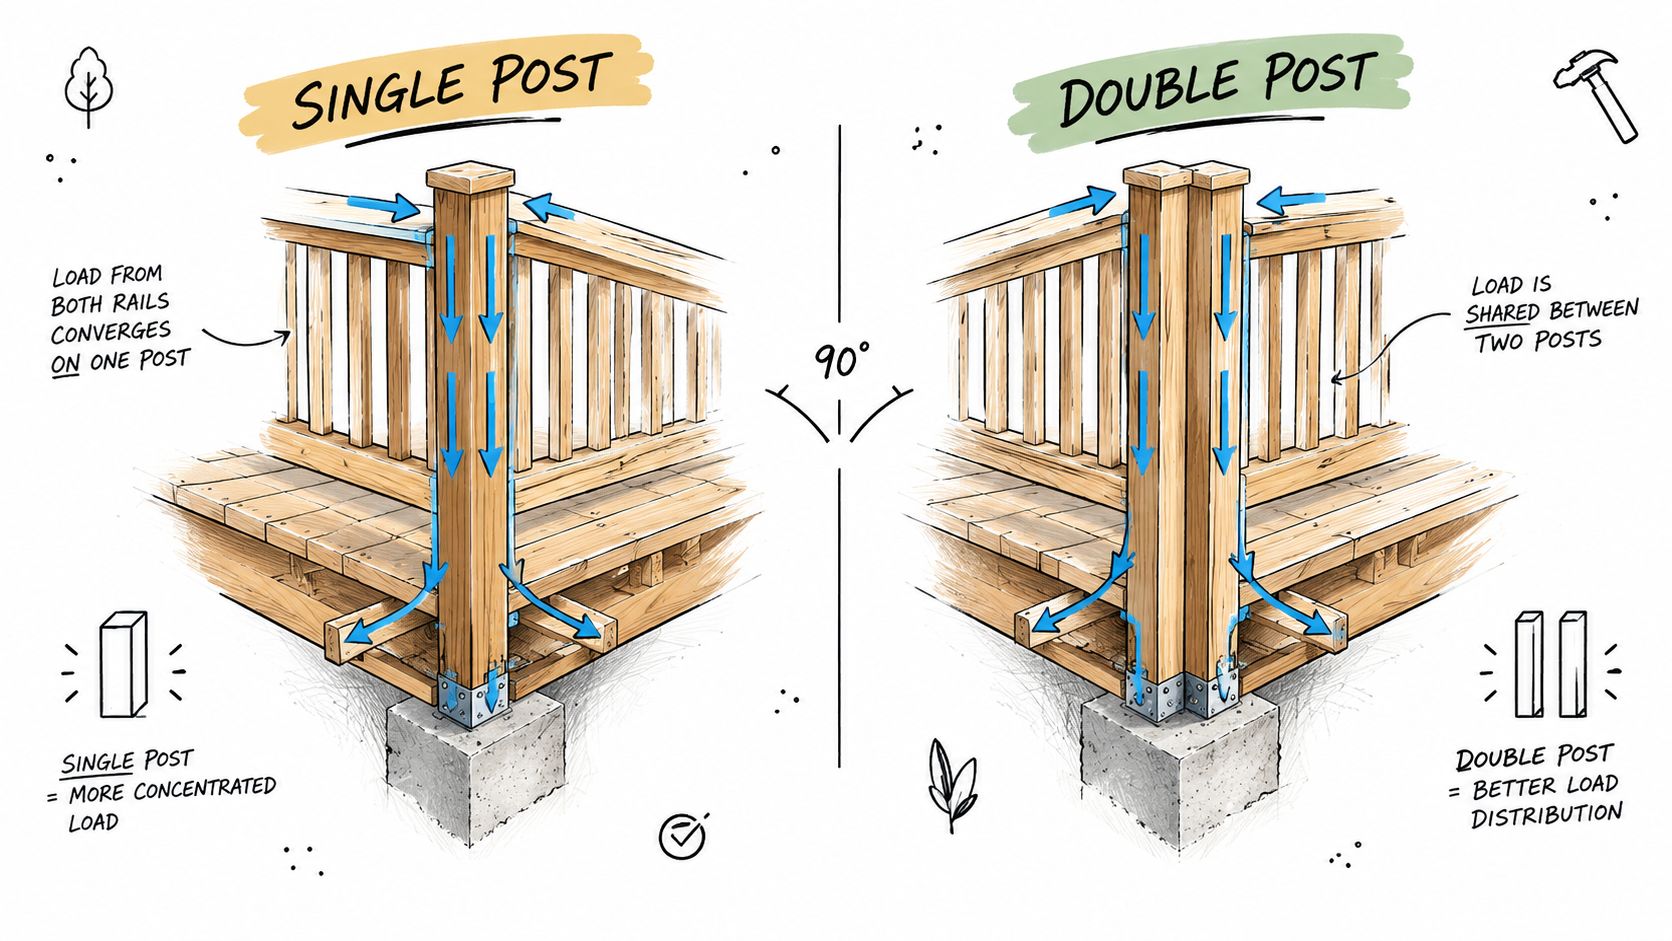
A single post at the exact corner is not automatically the right answer. It offers the cleanest appearance, but it asks one structural member and one connection to absorb the forces from both railing directions. It also forces the cable hardware from perpendicular runs to share limited space inside or around the post.
For a single-post layout to work, the post must be adequately sized, firmly connected to the adjacent framing, and compatible with the manufacturer's corner fittings. The cables may need an offset hole arrangement so hardware from one run doesn't collide with hardware from the other. This is a precision installation, not a matter of drilling both patterns on the same centerline.
Why two posts can be the safer choice
A double-corner-post layout treats the 90-degree turn as two separate railing ends. Each run terminates at its own post, so the load path is easier to see, the hardware is easier to reach, and the installer has more room to tension cables without internal interference.
The trade-off is visual. Two posts create a more noticeable frame at the corner and may move the railing line slightly back from the exact outside point. For many decks, that small change is preferable to a single post that flexes, loosens, or leaves an inspector unable to verify the connection.
Cable routing is another deciding factor. Existing installation guidance commonly advises against bending cable past 45 degrees and recommends a double-corner-post arrangement for a 90-degree turn. The relevant corner installation document supports treating the turn as a pair of controlled cable terminations rather than forcing one cable path around a sharp corner.
A single post saves visual space. A double post usually saves installation complexity.
Choose the single layout when the post and fittings are specifically engineered for it, the framing can accept the loads, and the cable hardware has a clear path. Choose two posts when you want independent end runs, straightforward inspection, or a more forgiving installation.
Trimming and Tensioning Cables at Corner Posts
A corner can look fine right after installation and still show trouble the first time you tension the runs. One side starts to dip, a fitting ends up hard against the post, or the corner post pulls slightly out of plumb. In practice, those problems usually come from cutting too early, crowding the hardware at the turn, or tightening one side of the corner faster than the other.
Start by laying out the hardware, not by guessing cable length from the post alone. Many cable corner posts use 36-inch posts with L-type or T-type hole patterns spaced to keep cable openings consistent and support the 4-inch sphere safety rule, as noted earlier. What matters during trimming is whether the cable run terminates at the corner or passes through it, and whether the fittings have enough room to seat and tension without hitting each other.
Plan the cable path before cutting
Dry-fit every terminal, washer, tensioner, and corner fitting before you trim anything. Leave enough cable for the terminal to grab fully and for the tensioning tool to work without fighting the post face. The required allowance changes with the fitting style, post thickness, and access around the corner, so use the hardware instructions for the system in your hands.
The single-post versus double-post decision shows up during installation.
At a single corner post, both directions compete for the same space. If the hole pattern is not offset for that layout, opposing terminals can collide inside the post area or leave too little wrench clearance. A double-corner layout usually avoids that. Each run ends at its own post, so trimming is simpler, access is better, and you are less likely to force a bad cut just to make the hardware fit.
Tension in stages
Install all cables on both runs before bringing any one line to full tension. Then tighten in small increments, alternating top, bottom, and middle lines so the corner does not get pulled unevenly to one side. After the first round, sight down both railing runs and check the post with a level.
Aim for even spacing, limited deflection, and secure terminals. A cable that needs far more adjustment than the rest usually points to a fitting problem, a misaligned hole, or a corner layout that is fighting the hardware. Fix that issue first. Overtightening nearby cables only hides it for a while.
Verifying Your Corner Railing Meets Code Requirements
A finished corner needs more than a clean miter and evenly spaced cables. Verify the complete assembly, including the post, base, bolts, handrail, cable fittings, and the framing beneath the deck. The corner should perform as part of the guard system, not as a decorative attachment added after the main structure was built.
Use this final inspection sequence:
- Confirm guard height. Measure from the finished deck surface to the top of the guard and compare the result with the applicable residential requirement for your jurisdiction.
- Check the load path. Look for through-bolts, approved brackets, blocking, or other engineered connections that transfer force into the joists. Face screws alone shouldn't be the only structural attachment.
- Inspect cable openings. Check the corner transition as carefully as the straight runs. A cable pattern can look uniform while still creating a larger opening when the post or fitting deflects.
- Review hardware compatibility. Pressure-treated lumber requires approved corrosion-resistant hardware, and metal systems need fittings suited to the post and cable materials.
- Ask the authority having jurisdiction. Local building departments may adopt model-code provisions with their own amendments, inspection steps, or product requirements.
The central decision is simple. Use a single corner post when the post, fittings, and framing are engineered to manage both directions cleanly. Use a double-post layout when independent cable ends, clearer load transfer, and easier inspection outweigh the minimalist appearance. The deck railing code requirements guide can help you organize the review, but local approval remains the final authority.
A sound corner should stay plumb, keep cable openings controlled, and transfer guard loads into the deck structure without relying on wishful fastening. Check those points before the final trim hides the connection.
Ultra Modern Rails offers factory-direct cable railing systems with deck-mounted corner sections, pre-drilled posts, handrails, cables, and installation hardware for corner applications. Visit Ultra Modern Rails to request a custom quote and drawing for a single-post or double-post deck corner that fits your framing and preferred finish.