

A contractor is halfway through a railing installation when the post bracket on the truck suddenly looks suspect. It fits the post, the finish matches the top rail, and the fastener holes line up, but nobody has confirmed that the bracket can transfer guard loads into the framing. Replacing it after the deck boards are installed means opening the assembly, adding blocking, and explaining the delay to the client.
That situation is common because deck railing hardware is often purchased as a parts list rather than specified as a load path. The post, base, anchor, fastener, cable fitting, and framing connection all have to work together. A polished bracket can't compensate for a fastener that misses the structural member, and a strong cable terminal can't correct a post base that's attached only to decking.
Table of Contents
- Why Deck Railing Hardware Matters More Than Most Specifiers Realize
- How Building Codes Reshaped Railing Hardware Into a Structural System
- The Five Main Categories of Deck Railing Hardware
- Posts, Post Bases, and Anchors for Every Mounting Condition
- Stainless Steel Grades, Finishes, and Corrosion Tradeoffs
- Cable Tensioners, Terminals, and End Fittings Explained
- Fasteners and Connectors Matched to Wood, Composite, and Masonry
- Choosing the Right Hardware for Your Specific Deck Setup
- Inspection, Torque, and Maintenance for Long Service Life
- Common Specification Mistakes and How to Avoid Them
- Quick-Reference Chart for Parts, Sizes, and Compatibility
Why Deck Railing Hardware Matters More Than Most Specifiers Realize
A railing can look complete while its load path remains unresolved. A stainless base may sit neatly on composite decking, yet transfer little force if its screws miss the framing below. The finish, shape, and product label do not establish structural capacity. The substrate, fastener, blocking, and connection detail do.
The 2021 IRC guardrail guidance describes a continuous load path into the deck framing and rejects reliance on fasteners installed only into end grain withdrawal. That principle should control the hardware schedule. Every force applied to the top rail needs a defined route through the post, base, anchor, and supporting structure.
The code framework also retains a 200 psf concentrated load requirement for guardrails and handrails, as described in the same guardrail guidance. Separate code-compliance discussions describe a 200-pound concentrated load at any point along the top rail, with engineered assemblies evaluated through more demanding tests at critical locations, including post tops and midspan areas, as documented by JLC's guide to code-compliant guardrail posts.
Those requirements change how a specifier should review a product quote. Stainless steel tells you about material and corrosion resistance. It does not tell you whether the base can resist rotation, whether the anchor suits the substrate, or whether the fastener has adequate structural backing. Confirm where the load enters the post, where it leaves the base, which member receives it, and how the connection resists pullout and shear.
Follow the force instead of the parts list
Start at the hand contact point and work downward:
- Top rail and infill receive lateral pressure and distribute it to the posts.
- Posts resist bending and transfer vertical and lateral forces to their bases.
- Post bases and anchors transfer those forces into wood framing, concrete, steel, or engineered blocking.
- Fasteners and connectors create the connection between the base and substrate.
- Framing or supporting structure carries the load into the deck or building.
The failure symptom often points back to the connection. A loose top rail may result from insufficient blocking. Rust staining on cedar can indicate an incompatible fastener coating. A cable run that keeps sagging may involve a mismatched terminal, poor swage, or a tensioner not selected for that cable system.
Practical rule: Specify the substrate and load path before selecting the finish.
Identify the framing, confirm the mounting condition, select the anchor and fastener, then choose the visible hardware around that connection. A surface-mount base earns its place only when the entire assembly can transfer the required forces into suitable structural material.
How Building Codes Reshaped Railing Hardware Into a Structural System
A guard can look finished and still fail at the rim joist. Older railing work often treated the assembly as a carpentry finish: attach the rail to a post, conceal the joint with trim, and rely on the deck framing to absorb the force. Current prescriptive requirements put the connection to the structure at the center of the detail.
The 2021 IRC guardrail overview describes a continuous load path and addresses the limits of end-grain fastening. It also reflects the shift away from notched guard posts at the beam or rim joist. That change affects hardware selection. A post base, anchor, and fastener must work with the framing behind the finished surface, because many railing failures start at the post-to-framing connection.
Loads now shape the hardware schedule
Guardrails are commonly required to resist a 200-pound concentrated load at the top rail, according to JLC's discussion of guardrail post requirements. The same discussion covers engineered guard assemblies evaluated with 500-lbf concentrated load tests at critical locations. These requirements make the base, anchor, and supporting member part of the performance detail, not just installation accessories.
Infill spacing and guard height also affect the hardware schedule. Practical guidance cites a maximum 4-inch opening, with typical guard heights of 36 inches for residential decks and 42 inches for many commercial or multifamily applications, as outlined in essential railing safety features from Decks.com. Verify local requirements before ordering posts, infill, or fittings.
Engineered post-base kits, tested connectors, structural fasteners, and matched cable assemblies have replaced many generic brackets. Off-the-shelf hardware may match the rail finish while leaving the substrate or load path unresolved. Specify the connection first, then select hardware that documents how it transfers force into the deck or building.
The Five Main Categories of Deck Railing Hardware
A useful quote sheet separates railing components by the job each one performs in the load path. The categories below aren't interchangeable. A tensioner maintains cable tension, but it doesn't anchor a post. A post base transfers force into the deck, but it doesn't control infill spacing.
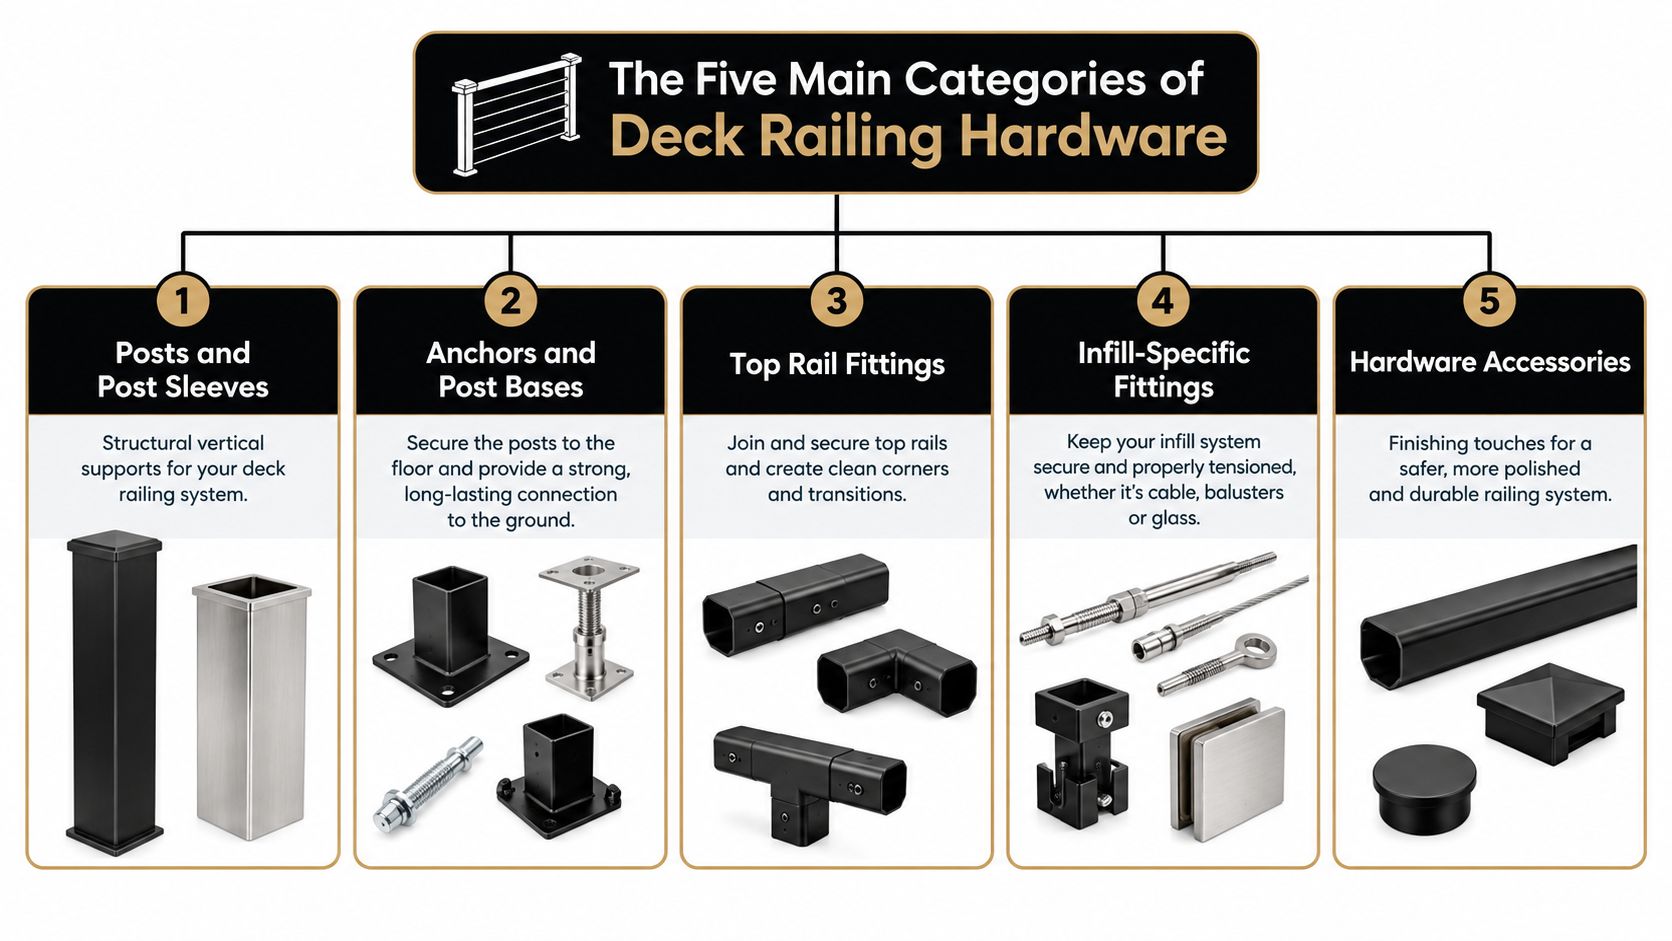
Posts and post sleeves
Posts are the vertical structural members that receive the top rail, cable, glass, or baluster fittings. A post sleeve may provide the visible finish around a structural post, but it shouldn't be assumed to carry the load unless the manufacturer specifically designs it to do so. Quote sheets may identify surface posts, corner posts, stair posts, or end posts.
Anchors and post bases
A post base connects the post to the supporting surface. Surface-mount bases sit on a deck or slab. Fascia bases attach to the side of framing. Through-bolt plates and bolt-through brackets suit conditions where the anchor can pass through a structural member or connect to steel.
The base is the point where a visually simple railing becomes a structural connection. Its hole pattern, bearing surface, standoff, and anchor type must match the substrate.
Top rail fittings
Top rail fittings join straight sections, corners, transitions, and stair runs. They manage geometry and alignment, but their structural role depends on the system. A corner fitting that merely aligns two rails doesn't replace the post or connector required to resist lateral movement.
Infill-specific fittings
Cable tensioners, swage terminals, baluster connectors, and glass clamps belong here. Each component is shaped around its infill material and installation method. Cable fittings need a compatible cable diameter and termination method. Glass clamps need the specified gasket and panel support arrangement. Baluster connectors must hold the infill without allowing unwanted movement.
Hardware accessories
Handrail brackets, post caps, rail returns, and finishing pieces complete the installation. Accessories can improve serviceability and appearance, but they shouldn't conceal an unresolved structural connection. If a cap makes it impossible to inspect a critical fastener, provide another inspection method or choose a more serviceable detail.
Specify every category by function, substrate, finish, and compatibility. A product name alone isn't a connection detail.
Posts, Post Bases, and Anchors for Every Mounting Condition
Post selection is where many load-path problems begin. Before choosing a base, locate the framing or supporting structure, measure the finished surface, and determine whether the connection can resist bending as well as direct shear. A base sitting on a deck board may have excellent material properties and still fail if the board isn't backed by structural framing.
Surface-mount posts
Surface-mount bases work when the deck structure below can accept the connection. On wood framing, the base should sit over a doubled rim joist or properly designed blocking, with the fasteners transferring force into that structure rather than stopping in the decking. Composite boards are a finish surface, not structural backing, so the blocking must be planned before the boards are installed.
A surface base is often mistaken for a moment connection because it has a wide plate and several holes. The plate only spreads force if the anchors are installed into adequate structural material. Check the manufacturer's installation requirements for bolt diameter, edge distance, washer arrangement, and bearing. For retrofit work, remove enough decking to verify the framing instead of guessing from the board layout.
Fascia-mount and side-mounted posts
Fascia mounting can solve clearance problems, but it moves the connection to the side of the joist or rim. The bracket and blocking must resist the force created by the guard height. A thin decorative cleat isn't equivalent to structural blocking, and a lag that enters only the rim's outer layer won't create a reliable moment connection.
Use a side-mount system only when the framing layout, bracket geometry, and anchor schedule have been coordinated. The finished deck may hide the connection, but it doesn't reduce the force at that connection.
Through-bolts, concrete, and steel
Through-bolting is often the most forgiving approach on accessible wood framing because the bolt, washer, and nut can clamp the base to the structural member. On steel framing, a bolt-through plate or welded base may be appropriate, subject to the engineer's connection design. Concrete requires anchors selected for the slab or wall condition, hole pattern, edge distance, and installation method.
The railing-post mounting guidance from Ultra Modern Rails is useful when comparing mounting arrangements, but the manufacturer's details and local code still control the final specification.
| Base Type | Typical Substrate | Min. Fastener | Load Path Note |
|---|---|---|---|
| Surface-mount base | Wood framing, composite over blocking, concrete slab | Structural fasteners or approved anchors selected for the substrate | The base must bear on a structural surface and transfer overturning force through the anchors |
| Fascia-mount bracket | Rim joist, side-mounted beam, engineered blocking | Structural screws or through-bolts specified for the bracket | Side framing must resist moment, not just provide a thin mounting face |
| Through-bolt base | Accessible wood framing or steel plate | Through-bolts with washers and nuts | Clamping action transfers force through the structural member |
| Concrete anchor base | Sound concrete | Approved concrete anchors matched to the base | Verify edge distance, embedment, cracking condition, and hole cleaning |
| Weld-on or bolt-through plate | Steel frame | Engineered weld or bolted connection | Coordinate base plate, welds, corrosion protection, and shop drawings |
Stainless Steel Grades, Finishes, and Corrosion Tradeoffs
Material selection should begin with the environment, not the color card. A railing beside a saltwater coast, a pool, or a de-icing salt splash zone places different demands on hardware than an inland residential deck. The visible finish can remain attractive while hidden corrosion weakens threads, terminals, or washers.
304 stainless steel is a common workhorse for railing hardware. One industry education source states that 304 accounts for approximately 50 percent of world stainless steel production, which helps explain its availability and broad use. The same stainless cable railing education source notes that cable-rail systems can withstand roughly 1,000 to 3,000 pounds of force without breaking, depending on the system and components.
Compare the environment before the alloy
304 may suit many inland applications when the hardware is detailed, installed, and maintained correctly. 316 stainless steel is generally preferred where chloride exposure makes corrosion resistance a higher priority. It is commonly selected for coastal settings, pool environments, and other high-moisture applications where salt or chemical exposure can reach fittings.
The important point is system consistency. Specifying 316 cable fittings while using a less resistant fastener, washer, or bracket in the same exposed connection can create a weak maintenance point. Galvanic interaction, trapped moisture, and dissimilar coatings deserve attention at every interface.
| Grade | Best Environment | Yield Strength | Cost Factor |
|---|---|---|---|
| 304 stainless steel | Inland exterior and lower-chloride applications | Confirm from the product data sheet | Usually lower than more corrosion-resistant grades |
| 316 stainless steel | Coastal, poolside, and chloride-exposed locations | Confirm from the product data sheet | Usually higher than 304 |
| Coated steel | Applications where the coating system is approved for the exposure | Confirm from the product data sheet | Varies by coating and exposure rating |
| Galvanized steel | Structural applications with compatible surrounding materials and suitable exposure | Confirm from the product data sheet | Often selected for cost and availability |
The stainless steel deck railing material guide offers a product-focused comparison of stainless railing construction. For a project specification, pair that material discussion with the actual alloy, finish, fastener coating, and maintenance requirements listed by the manufacturer.
Cable Tensioners, Terminals, and End Fittings Explained
Cable infill works only when the terminal, tensioner, cable, post, and tool are treated as one system. Mixing visually similar parts from different manufacturers can create thread incompatibility, incorrect swage geometry, or a connection that can't be inspected confidently.
Tensioners adjust the run
A tensioner provides the adjustment needed to bring a cable run into alignment and maintain the manufacturer's specified tension. Common forms include threaded tensioner bodies, turnbuckle-style adjusters, and compact fittings that sit inside or against the post.
The tensioner should be selected after confirming cable diameter, post configuration, run direction, and access for a wrench. A stair run may need an angled or articulated fitting. A corner may require tensioning from one direction, both directions, or a dedicated corner arrangement. Don't assume a straight-run fitting will work at a change in angle.
Terminals anchor the cable
Fixed terminals include swage studs, threaded terminals, and button-style fittings. They hold the cable end at the far post while the tensioner applies adjustment at the opposite end. Some systems use mechanical fittings that can be installed with hand tools. Others require a dedicated hydraulic swage tool and a defined crimp sequence.
The cable end must be cut cleanly. A damaged or flattened end can prevent the terminal from seating correctly, while an incorrect swage die can leave a connection that looks finished but has insufficient holding power.
End fittings manage geometry
Washers, beveled washers, ball-and-shank ends, and angled receivers connect the terminal to the post. Their job is more than appearance. They accommodate the cable angle, distribute bearing, protect the post finish, and prevent the terminal from binding during tensioning.
| Component | Function | Cable Size | Tool Required |
|---|---|---|---|
| Cable tensioner | Adjusts cable preload and alignment | Match the complete cable system | Manufacturer-specified wrench or driver |
| Fixed terminal | Anchors the non-adjustable cable end | Match the cable and terminal family | Swage tool or approved installation tool |
| Swage fitting | Permanently compresses around the cable | Match cable diameter and die | Correct hydraulic or mechanical swager |
| Beveled washer | Supports angled or stair connections | Match terminal geometry | Hand tools specified by the system |
| Cable cutter | Produces a clean cable end | Match cable construction | Dedicated cable cutter |
| Tension gauge | Verifies installed tension | Match the system's measurement range | Compatible tension gauge |
The cable rail tensioner guide provides a practical reference for tensioner selection. Confirm every component against one manufacturer's system documentation, including cable construction, thread size, swage method, and inspection procedure.
Fasteners and Connectors Matched to Wood, Composite, and Masonry
A post can look securely mounted while the load path stops at the decking or a thin rim board. Fasteners must transfer guard loads into framing, blocking, concrete, masonry, or steel that can carry them. Select the connector by substrate and load direction, not by finish or convenience.
For wood framing, first identify the member receiving the post base. Suitable locations include a doubled rim joist, beam, joist, or properly designed blocking. Structural screws work when the product is approved for that connection and installed to its stated requirements. Through-bolts create direct clamping force when the rear of the framing is accessible. Traditional lag screws may fit an engineered detail, but they are not interchangeable with a specified structural connector. Check the required diameter, embedment, edge distance, washers, and installation method before substituting hardware.
The base must bear against framing that is continuous enough to distribute the post reaction. A fastener driven only into trim, fascia, or a single unsupported board cannot correct a weak load path.
Composite decking changes the installation sequence
Composite boards provide a finished walking surface, not structural backing for a guard post. Surface compression, moisture movement, and contact between dissimilar metals can also affect the connection. Install blocking and establish post-base locations before fixing the boards whenever the project schedule allows.
For a retrofit, open the decking as needed to locate joists and blocking. Fasteners should pass through the composite surface and engage the supporting framing or an engineered connector. Use the coating, washers, and isolation materials specified for the railing and decking systems. A 316 stainless fitting paired with an incompatible plated fastener can promote corrosion at the joint, especially in wet or chloride-exposed conditions.
Masonry needs anchor-specific planning
Concrete and masonry anchors must match the base-plate hole pattern and the supporting material. Confirm whether the concrete is cracked or uncracked, whether edge distances are adequate, and whether the installation permits the required hole cleaning and embedment. Expansion, sleeve, and adhesive anchors have different installation requirements and cannot be exchanged casually.
Use the load criteria and infill opening guidance discussed in Decks.com's railing safety reference as a compliance starting point. Then verify the anchor design, substrate condition, and local requirements for the project.
| Substrate | Primary Fastener | Minimum Size | Coating | Torque |
|---|---|---|---|---|
| Solid wood framing | Approved structural screws or through-bolts | Manufacturer specified | Compatible stainless or approved exterior coating | Manufacturer specified |
| Wood framing with blocking | Structural screws, through-bolts, or engineered connector | Manufacturer specified | Match the railing environment | Manufacturer specified |
| Composite decking over framing | Fasteners into blocking or framing, never composite alone | Manufacturer specified | Match decking and railing materials | Manufacturer specified |
| Sound concrete | Approved expansion, sleeve, or adhesive anchors | Match base and design load | Exterior-rated and compatible with railing hardware | Manufacturer specified |
| Steel framing | Bolt-through plate or engineered weld | Engineer specified | Compatible corrosion-protection system | Engineer specified |
Complete the post-base installation and the specified fastener procedure before tensioning cable or loading infill. Cable tension applies repeated lateral demand to every post, so a weak base connection may become apparent only after the system is placed under load.
Choosing the Right Hardware for Your Specific Deck Setup
The right hardware depends on what the deck can support. Before ordering, answer four questions:
- Where is the structural member? Identify the rim joist, blocking, beam, slab, wall, or steel plate that will receive the load.
- What surface covers it? Wood, composite, concrete, masonry, and steel require different anchors and installation methods.
- How does the railing change direction? Corners, stairs, ramps, and transitions need fittings that match the cable or infill geometry.
- Can the connection be inspected and maintained? Hidden hardware is useful only if the installer can reach it and confirm its condition.
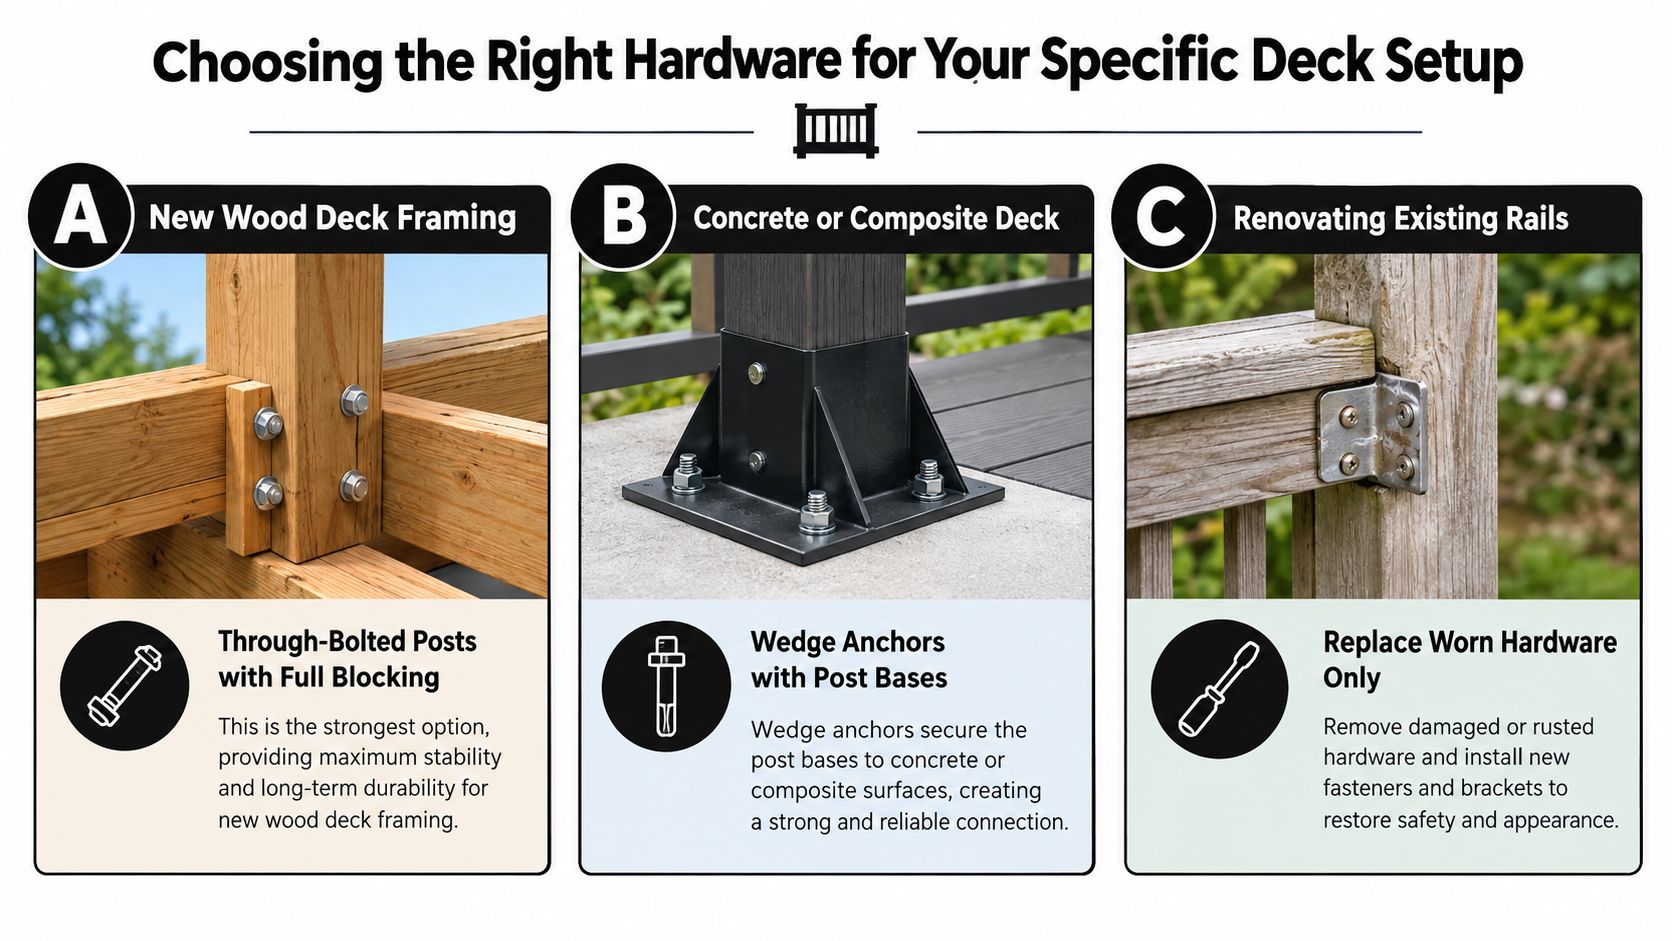
New wood framing
New wood framing gives the installer the most control. Add full blocking where posts land, verify the rim connection, and use a base designed for the framing depth and post geometry. Through-bolted posts are often easier to inspect and adjust when the framing remains accessible.
Existing composite decking
A retrofit over composite boards starts with investigation. Remove or open the surface as needed to locate joists and blocking. If the existing framing can't accept the proposed post layout, a fascia-mounted arrangement or supplemental blocking may be necessary. Don't force a surface base into a location chosen only for visual symmetry.
Concrete patios and slabs
Concrete installations need a base with a hole pattern suited to the slab and a detail that keeps the post connection clear of standing moisture. Check slab thickness, edge distances, cracks, and anchor installation requirements before drilling. A base that allows drainage and inspection is preferable to a detail that traps water at the post.
Steel-frame commercial decks
Steel systems require coordination between the railing fabricator, steel detailer, and engineer. A weld-on base, bolt-through plate, or supplemental steel member should appear in the shop drawings. Cable direction, handrail continuity, coating repair, and access for final tightening all need to be resolved before fabrication.
If the hardware almost fits, stop the order. “Almost” usually becomes field drilling, improvised blocking, or a connection nobody wants to approve.
Inspection, Torque, and Maintenance for Long Service Life
Railing hardware needs an inspection plan, especially during the early service period and in aggressive environments. Wood can settle, connections can bed in, and cable systems can require adjustment after installation. Use the manufacturer's torque and tension requirements rather than relying on feel.
Inspect the following:
- Post movement: Push at the top rail and check for rotation, looseness, or movement at the base.
- Fastener condition: Look for rust, coating failure, damaged heads, and washers that have pulled into the substrate.
- Cable fittings: Check for sag, terminal movement, thread exposure, and signs of slippage.
- Stainless surfaces: Tea staining can indicate chloride exposure and a need for cleaning, even when the fitting remains structurally sound.
- Substrate condition: Examine wood for splitting, rot, moisture damage, or compression around the base.
Coastal and poolside railings deserve more frequent rinsing with fresh water than sheltered inland installations. Clean without introducing steel wool or contaminated tools that can embed particles into stainless surfaces. Keep an inspection log with the date, connection checked, adjustment made, and any replacement part installed.
Common Specification Mistakes and How to Avoid Them
Most ordering errors fall into three groups.
First, the material doesn't match the environment. A 304 fitting may be unsuitable for a heavily chloride-exposed location. Specify the alloy and finish for the site, then keep the surrounding fasteners and washers compatible.
Second, the cable and fittings don't match. Confirm cable construction, diameter, terminal family, thread, swage die, and tensioner before shipping the order. A fitting that accepts the cable physically may still be wrong for the manufacturer's tested assembly.
Third, the post base is treated as trim. A decorative base without structural blocking or an approved anchor schedule leaves the load path incomplete. The correction is simple in principle, specify the substrate, backing, anchor type, and installation detail together.
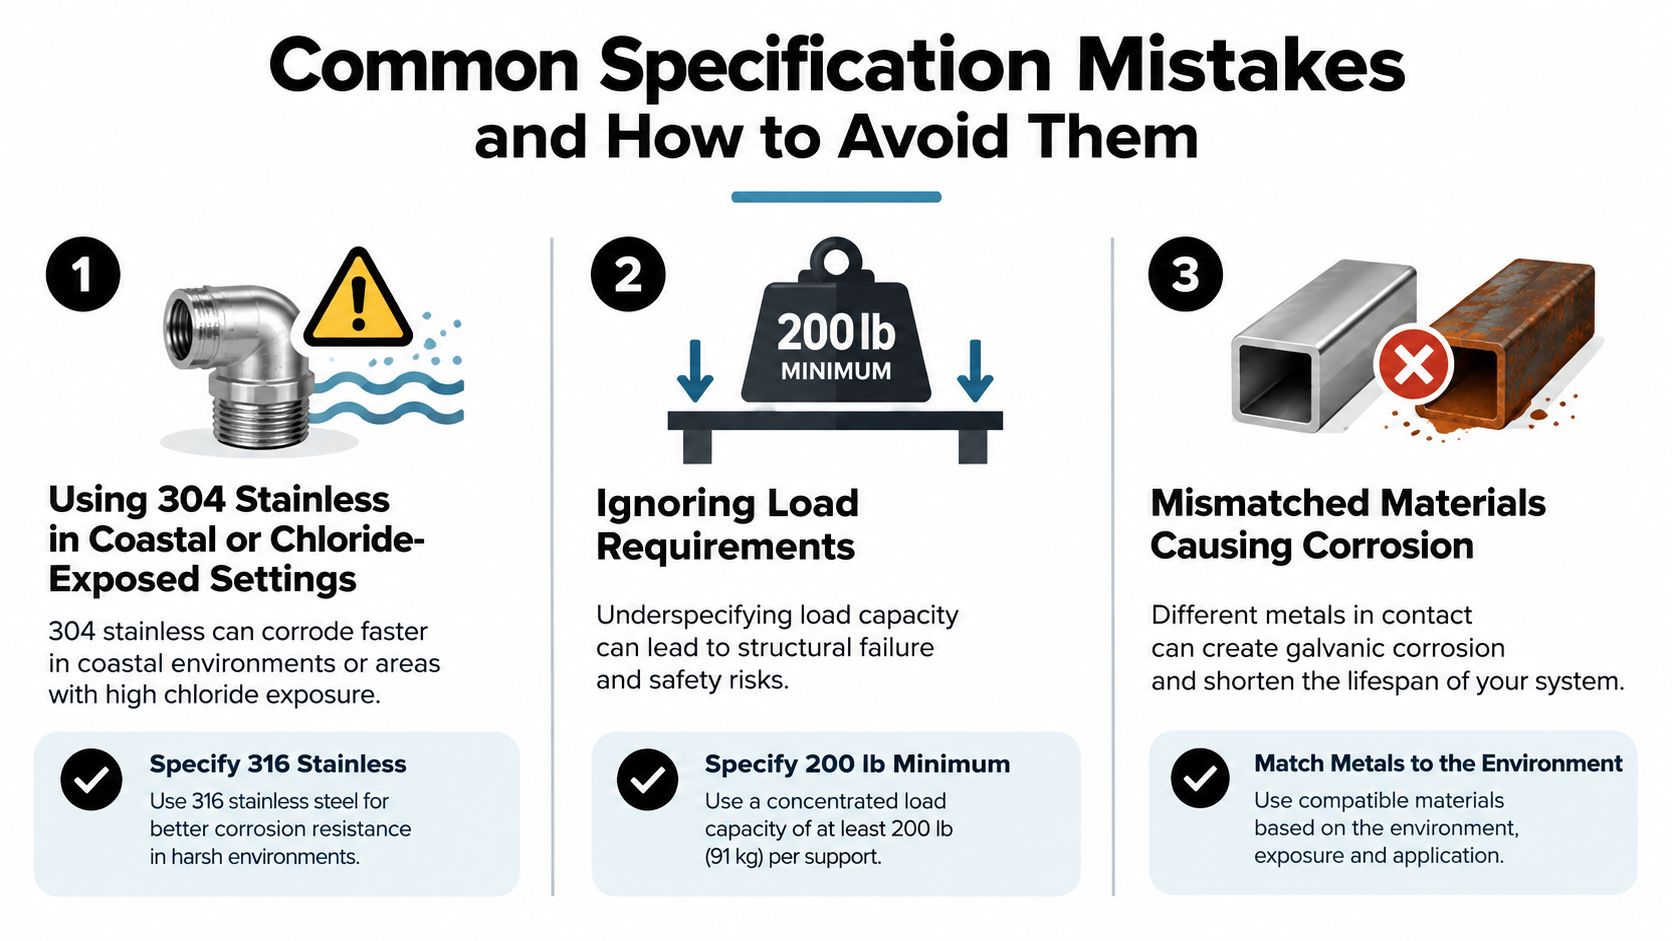
A complete schedule should let the installer trace the force from the top rail to the structural frame without making assumptions. If the schedule names only “stainless railing hardware,” it isn't complete enough.
Quick-Reference Chart for Parts, Sizes, and Compatibility
Use this chart during takeoffs, but confirm final dimensions and tools against the selected manufacturer's installation documents.
| Part Name | Typical Sizes | Required Tool | Guide Section |
|---|---|---|---|
| Surface-mount post base | Match post profile and anchor layout | Drill, driver, torque wrench | Posts and post bases |
| Fascia bracket | Match rim or side-framing geometry | Driver or wrench | Posts and post bases |
| Through-bolt connection | Match base holes and framing depth | Drill, wrench, torque wrench | Posts and post bases |
| Cable tensioner | Match cable and terminal family | Manufacturer-specified wrench | Cable fittings |
| Swage terminal | Match cable diameter and swage system | Approved swager | Cable fittings |
| Stainless fastener | Match substrate, alloy, and exposure | Driver or wrench | Fasteners and connectors |
Ultra Modern Rails supplies factory-direct stainless steel cable railing systems for decks, balconies, stairs, patios, pools, and commercial spaces, with custom sections, mounting styles, handrails, and drawings available for project planning. If you need help matching cable fittings and post hardware to your deck's substrate and layout, visit Ultra Modern Rails and request a system quote before ordering components.