

The most common advice about handrail post mounting brackets is to buy the heaviest, strongest-looking hardware you can find. That misses the failure point: a stout bracket fastened to weak framing can pull out, split the substrate or deform the post. The bracket matters, but the whole load path matters more.
Start by identifying what the bracket will attach to and how the force will travel from the handrail into the building. Then match the bracket's position, profile, material and fasteners to that assembly. A clean-looking mount is useful only if the rail fits, the structure can take the load and the finished handrail meets the project's requirements.
Table of Contents
- Bracket Types Compared at a Glance
- Load Ratings and the Code Numbers Behind Them
- Materials and Finishes for Each Environment
- Matching Brackets to Handrail Profiles and Cable Systems
- Measuring Height, Clearance and Layout
- Checking the Substrate Before You Mount
- Installation Steps and Pitfalls to Avoid
- Confirm the Bracket Spec Before You Order
Bracket Types Compared at a Glance
The mounting position decides how the handrail connects to the post and where the load goes next. A top-mount bracket sits on the post's top face, a side-mount bracket fixes to a post or stringer from the side, a surface-mount plate attaches to a flat face, and an inset bracket sits inside a drilled post. Each arrangement can work, but only when the mounting surface and fastening method suit the design.
| Bracket type | Where it mounts | Typical use | Check before buying |
|---|---|---|---|
| Top-mount | Top face of the post; handrail rests on or clamps to the bracket | Level runs and deck posts with a flat top | Post top is flat, sealed and plumb |
| Fascia or side-mount | Side face of the post or stringer | Stairs and runs where framing sits beside the post | Solid backing behind the post face |
| Surface-mount | Flat plate fixed to deck edge, wall or slab face | Retrofits and surface-applied posts | Reinforced blocking or evaluated anchors |
| Inset or core-mount | Into a drilled post or core | Clean-look posts with hidden hardware | Post wall thickness and hole tolerance |
Choose by the surface you can reach
Begin with the actual mounting surface, not the bracket photo. If the post can only be fastened from one face, a side- or surface-mount design is usually the practical choice. A top-mount bracket needs a suitable post top, while an inset design needs enough material around its bore to accept the fitting without weakening the post.
The surface also determines what hardware can work. Wood framing may need structural fasteners or through-bolts into backing; concrete calls for an anchor system suited to the slab or curb; hollow metal may need a through-bolted or specifically rated connection. A bracket that looks compatible with the railing can still be the wrong choice if you can't reach adequate structure to fasten it.
Practical rule: Pick the mounting arrangement that transfers force into structure you can verify. Choose the finish and appearance after that.
Check how the rail attaches to the bracket, too. Some fittings clamp around a rail, others provide a seat or a concealed connection. Confirm that the post stays plumb, the rail can be aligned and the fasteners remain accessible for installation and inspection. If the bracket requires drilling, make sure the post material and wall thickness can tolerate the specified hole.
The table is a starting point, not a capacity rating. A bracket's stated strength doesn't automatically describe the strength of the installed assembly. The substrate, fasteners, post and rail connection all have to work together.
Load Ratings and the Code Numbers Behind Them
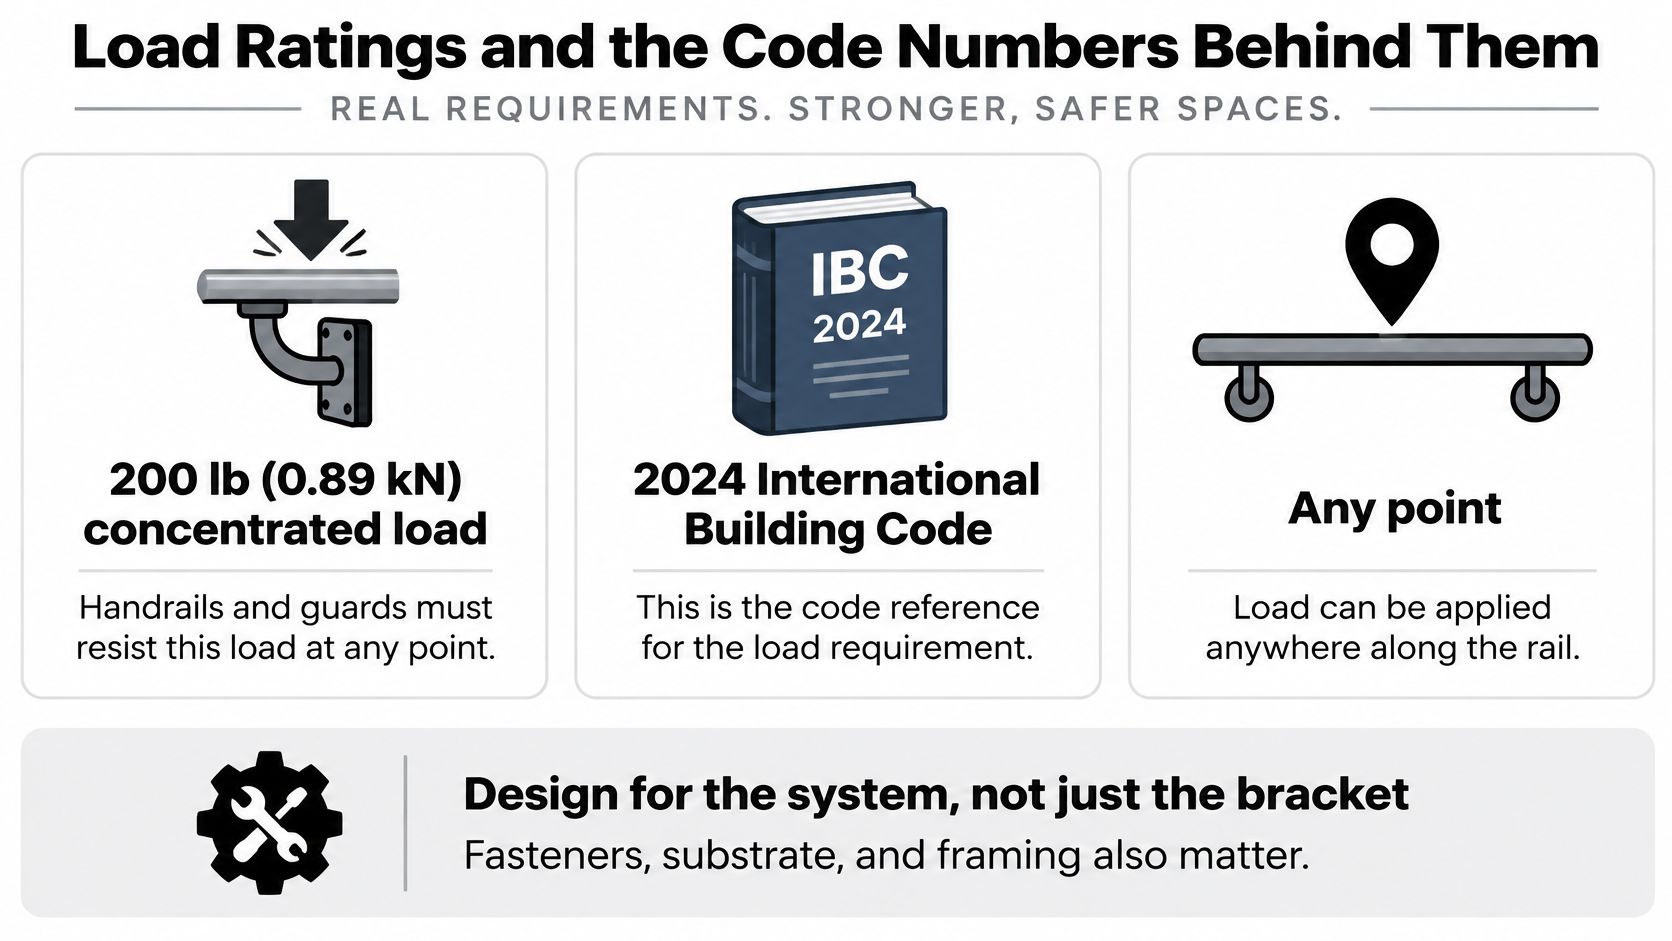
The key design reference is the 200 lb (0.89 kN) concentrated load. Under the 2024 International Building Code, handrails and guards must resist that load at any point and in any direction, or a 50 lb per linear foot (0.73 kN/m) uniform load; the two cases aren't required to act at the same time, according to the 2024 International Building Code structural-design provisions. These loads apply to the assembly, not just the rail or the bracket in isolation.
| Requirement | Value | Applies to | How to use it |
|---|---|---|---|
| IBC concentrated load | 200 lb (0.89 kN) in any direction at any point | Handrails and guards | Check the bracket and post at top-rail height |
| IBC uniform load | 50 lb per linear ft (0.73 kN/m) in any direction | Handrails and guards | Check the continuous rail load carried by each post |
| Minnesota new-construction rule | Each bracket supports at least 250 lb; supports at most 6 ft on center | Wall-bracket supports | Set spacing and confirm bracket rating |
| ADA mounting devices and fasteners | Resist 250 lbf | Accessible handrail mounting | Confirm both device and substrate meet the value |
The Minnesota rule is a jurisdiction-specific comparison, not a universal spacing or capacity rule. For new construction, it requires wall-bracket supports no more than 6 feet on center, with each mounted bracket capable of supporting at least 250 pounds, as stated in the Minnesota construction rule. Federal accessibility rules also require mounting devices and fasteners to resist 250 lbf, while limiting allowable capacity to the weaker of the device or supporting structure under the 1991 ADA Design Standards.
Follow the force through the assembly
A handrail load travels from the rail into the bracket, then through the bracket plate or weld, fasteners, post wall, backing or masonry, and finally into the supporting structure. Each connection can fail differently. The bracket may bend, a screw may shear or pull out, a thin post wall may deform, or the supporting material may split or break away.
A concentrated horizontal push near the top of a tall post creates an overturning moment at the mount. For example, applying 200 lb at a height of 36 inches produces 7,200 lb-in of moment before dynamic effects are considered. That's why a tall unsupported post and a short, closely spaced fastener pattern can be a poor combination even when the bracket itself looks substantial.
Check the bracket plate thickness, welds, fastener tensile and shear capacity, post-wall stiffness and local substrate failure. Increasing the vertical distance between fasteners can help resist rotation by creating a larger couple, but it works only if the substrate can carry those forces. A stiffer bracket can transfer more demand into weak framing rather than make the overall installation safer.
Drawings should name the design load and direction, substrate, fastener grade and embedment, and whether the bracket is for handrail-only or guardrail duty. Check the code edition adopted by the local jurisdiction before specifying. Where a bracket's geometry, loading direction or substrate differs from a tested assembly, arrange project-specific engineering or testing. For related stair dimensions, see the guide to stair railing requirements.
Materials and Finishes for Each Environment
Choose the material for the toughest exposure the railing will face, not for the weather on an average day. A bracket under a covered porch may still encounter windblown salt or de-icing residue, and a poolside fitting can see frequent moisture and cleaning. Those conditions affect corrosion and maintenance even when the bracket is structurally adequate.
| Material or finish | Typical environment | Corrosion behaviour | Watch for |
|---|---|---|---|
| 304 stainless steel | Covered exterior and interior-adjacent work | Good general corrosion resistance | Salt and chloride exposure over time |
| 316 stainless steel | Coastal, pool-side and de-icing salt sites | Better resistance to chloride pitting | Cost and custom-quote lead time |
| Black powder-coated steel | Interior stairs and walkways | Protected while coating is intact | Chips and scratches exposing bare metal |
| Galvanized steel | Utility or exterior applications where a zinc coating is acceptable | Zinc coating protects the underlying steel | Coating damage and cut edges |
| Aluminium | Lightweight installations in compatible environments | Doesn't rust like steel, but surface corrosion and contact conditions still matter | Dissimilar metal contact at fasteners |
Match the grade to the exposure
304 stainless steel is a sensible general choice for covered locations and interior-adjacent work. It isn't the automatic answer for every exterior site. Where salt or chlorides are routine, 316 stainless steel offers better resistance to pitting, though it can cost more and may require a custom quote for a particular system.
Black powder-coated steel suits many interior stairs and walkways, especially where the finish needs to coordinate with dark railing components. Its protection depends on the coating staying intact. A deep scratch or chipped edge exposes the steel beneath, so use a compatible touch-up product and avoid cutting coated components in place unless the exposed edge can be properly finished.
Galvanized steel can be practical where a zinc-coated utility finish fits the project. Aluminium is worth considering where reducing component weight is useful, but don't treat it as interchangeable with stainless steel in every connection. Each material brings different surface and fastening requirements.
Protect the connection as well as the bracket
Dissimilar metals in contact can corrode, particularly where moisture stays trapped around a fastener. Match the fastener material to the bracket where practical, or use an appropriate isolating method. A coating on the visible bracket won't protect a mismatched, wet connection hidden underneath it.
For exterior railings, inspect coatings and connections regularly. Rinse salt residue from stainless steel, check painted or powder-coated parts for chips, and repair damaged finishes before corrosion spreads. Use cleaners suitable for the metal and finish rather than abrasive pads that can scratch the surface.
The best material isn't necessarily the most expensive grade. It's the one suited to the site's harshest exposure, with compatible fasteners and a finish that can be maintained. A well-chosen bracket still needs sound anchorage; corrosion resistance can't compensate for an inadequate load path.
Matching Brackets to Handrail Profiles and Cable Systems
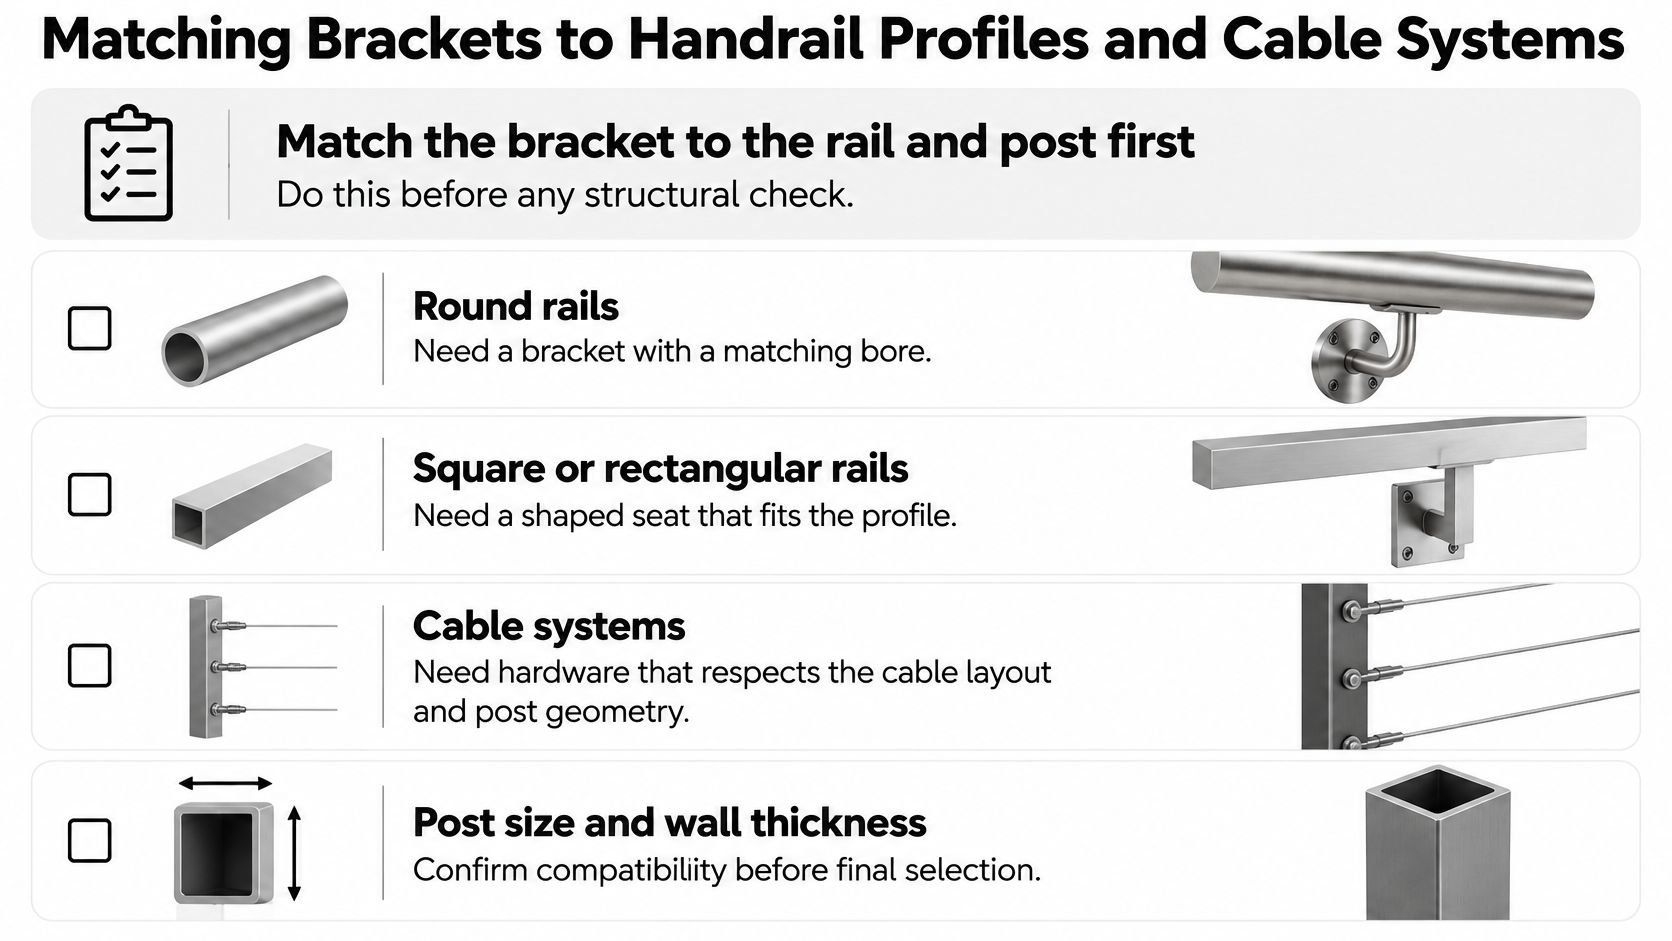
First confirm that the bracket fits both the handrail and the post. A rail that sits loosely in its saddle, or a post that doesn't match the bracket socket, can make alignment difficult and compromise the connection. Don't start with appearance alone: take the measurements from the actual components or their verified specifications.
Richelieu's square post-mounted adjustable bracket is specified for a 1.5-inch (38 mm) diameter handrail and a 1.5625-inch (40 mm) square post, according to the product details published by Home Depot Canada. That example shows why both dimensions matter. A bracket can fit the rail but fail to seat on the post, or match the post while being the wrong size for the handrail.
Check the rail and post as a pair
Round rails generally need a matching bore or clamp. Square and rectangular rails need a shaped seat or fitting that supports the profile without rocking. Adjustable-angle brackets can accommodate stair pitch or transitions; fixed brackets are suited to a planned angle, such as a level run. Confirm the adjustment range rather than assuming an adjustable fitting can cover any stair angle.
For profile ideas and planning, compare your handrail dimensions with the wood handrail profiles guide. Then run through this fit check before ordering:
- Rail outside diameter or dimensions: Measure the rail itself, including any finish that changes the fit.
- Post profile and size: Confirm whether the post is round, square or rectangular.
- Bracket bore or seat: Check that the rail fits securely without forced bending or excessive play.
- Angle range: Confirm that the bracket suits the stair pitch or transition.
- Cable layout: Keep cable terminals, tension points and corners clear.
- Fastener access: Make sure tools can reach the mounting hardware after the rail is positioned.
Plan for cable tension and service access
Cable railing creates layout constraints around corners and terminal posts. The bracket must support the handrail without obstructing cable hardware, and its position must not cause the post to twist when the cables are tensioned. A fitting that clears the rail in a product drawing may still conflict with a cable terminal or prevent a wrench from reaching a fastener.
Lay out the rail, bracket and cable fittings together before drilling. Mark the post face, cable routes, corner connections and tool access. If the bracket blocks a terminal or a fastener, move the bracket or revise the layout before making holes. Reworking a drilled post can weaken it and leave visible abandoned holes.
Measuring Height, Clearance and Layout
Measure the installed handrail from the mounting surface to the top of the handrail, not just to the top of the post. The bracket and rail add height, so measuring only the post can leave the finished assembly outside the required range. Mark the finished rail position before drilling, then check the clearance around the grip.
The U.S. Access Board's ADA guidance sets these dimensions for accessible handrails:
- Gripping-surface height: The top of the gripping surface must be 34 to 38 inches above the walking surface.
- Wall clearance: Keep 1.5 inches between the handrail and an adjacent surface.
- Extensions: Handrail extensions generally project 12 inches beyond the top of a stair or ramp and return to a wall, guard or landing surface.
Mark the finished geometry
Measure from the walking surface to the rail's gripping surface, not to a bracket plate or post cap. On a stair, take the measurement relative to the stair geometry rather than assuming a level floor measurement carries across the run. Check each run and landing separately, especially at switchbacks where rails turn or terminate.
Bracket projection affects the clearance measurement. A low-profile bracket may look neat but push the rail too close to a wall or put hardware where it interferes with a continuous grip. A larger or offset bracket may improve clearance, but it can protrude into the circulation space. Assess the complete assembly, including the rail, bracket, return and nearby wall or guard.
Confirm which requirements govern
Accessibility requirements and local residential or commercial building codes aren't interchangeable. Confirm which provisions apply to the project with the local building department before setting out the post locations. A drawing that shows only post height may not capture the final rail height, wall clearance or extension detail.
Use the actual handrail and bracket dimensions when laying out the mount. If the rail section will be finished or a cap added later, account for that finished profile in the measurement. For a product-specific example, a 36-inch railing system can combine a 33.5-inch post, a 1.5-inch adjustable handrail bracket and a 1-inch handrail to produce a 36-inch installed height. That kind of stack-up is why the mounting surface-to-rail measurement is the one to verify on site.
Checking the Substrate Before You Mount
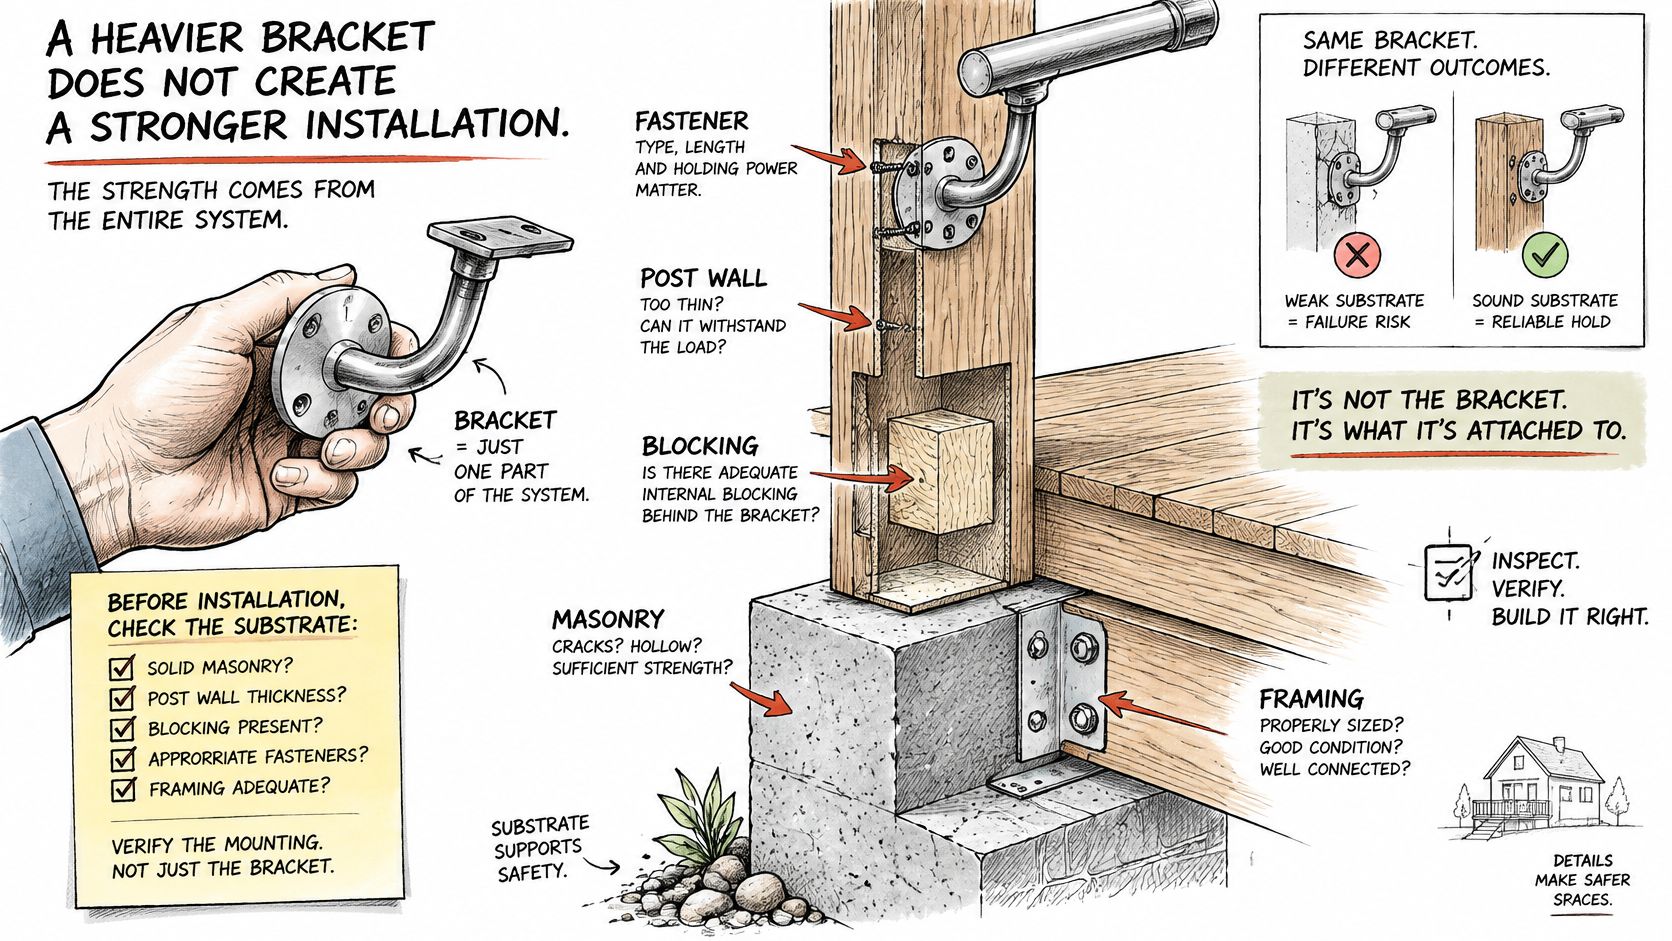
A heavier bracket doesn't make a stronger installation. The fastener, post wall, blocking, masonry or deck framing may fail first. Federal accessibility provisions require mounting devices and fasteners to resist 250 lbf, while the allowable capacity is limited by the weakest element, either the device or supporting structure, under the 1991 ADA Design Standards. That's why “use strong screws” isn't a complete fastening specification.
Inspect the mounting surface in sequence
- Identify the substrate. Determine whether the bracket will attach to wood, concrete, steel or hollow metal, or composite decking. A finished surface may conceal a different material underneath.
- Locate the framing. Use a stud or joist finder, then confirm the framing position with a small probe or another appropriate inspection method. Don't assume trim or decking sits over backing.
- Measure the backing. Confirm its thickness and whether it's continuous behind the bracket. For side-mount railings, solid backing is required, commonly double 2x8 or equivalent. For surface-mount railings, reinforced blocking is required, commonly triple 2x8 or equivalent.
- Check the edge distance. Measure from the planned anchors to a slab edge, stair nosing or curb. Anchors too close to an edge can cause the surrounding concrete to break away.
- Check concrete condition and thickness. Look for cracks, spalling or signs that the slab or curb is too thin for the proposed anchor.
- Decide whether engineering is needed. If the structure, material or connection capacity can't be confirmed, stop before installation and get an engineer or authority approval.
| Substrate and mount | Fastening approach | Verify before mounting |
|---|---|---|
| Wood, side mount | Through-bolts or structural fasteners into backing | Backing continuous behind the post |
| Wood, surface mount | Fasteners into blocking | Blocking tied into the framing |
| Concrete | Post-installed anchors evaluated for edge distance and spacing | Slab or curb thickness, edge distance and cracks |
| Steel or hollow metal | Through-bolts or manufacturer-rated fasteners | Wall thickness and tapping strength |
| Composite decking | Fasteners into structure beneath boards | Structure under the decking, not the decking alone |
Match the anchor to the substrate
For concrete, check the anchor manufacturer's evaluated embedment, spacing and edge-distance limits. Concrete breakout or splitting can govern even when the steel anchor itself has sufficient capacity. A surface plate fixed near a slab edge is a poor location if the anchors can't meet the required distances.
For wood, make sure the fasteners reach structural backing rather than siding, fascia or a single thin rim board. A lag bolt driven into one rim board can pull out under a 200 lb push even if the bracket's published rating is higher. For hollow metal, confirm the wall thickness and whether the fastening method is rated for the load; a screw that bites into thin sheet metal may not provide a dependable connection.
For further deck-specific planning, review how to mount railing posts to a deck. Backing sizes must be set by the governing code or project engineer, and concrete or steel requirements must be selected for the actual assembly. If you can't verify the structure, don't install the bracket until engineering or authority approval is in hand.
Installation Steps and Pitfalls to Avoid
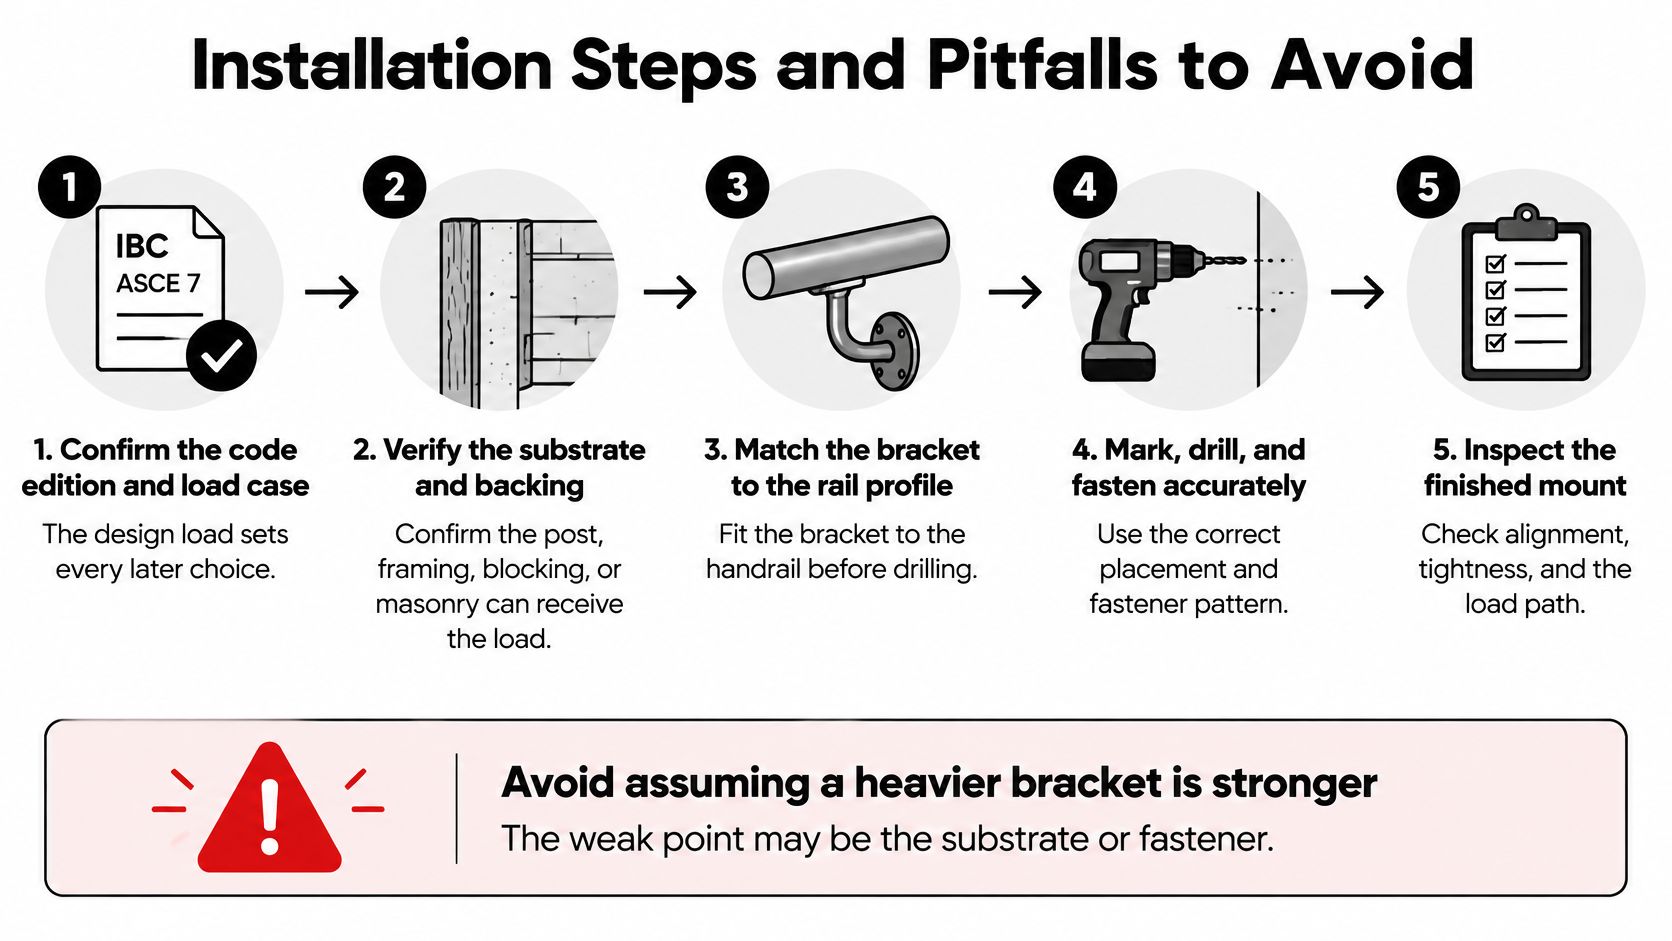
A sound installation starts with the design information, not the drill. Follow the sequence below so the load requirement, actual substrate and bracket geometry are resolved before fasteners go into the post or structure.
- Confirm the code edition and load case. The design load and whether the bracket serves a handrail or guardrail set the basis for the selection.
- Verify the substrate and backing. Find the post, framing, blocking or masonry that will receive the load. Don't count a finish board or deck surface as structural backing.
- Mark the layout. Use the required height, support spacing and clearance for the project. Mark the finished handrail position, not only the bracket plate.
- Drill to the anchor manufacturer's diameter and depth. Clean each hole as specified. Dust or incorrect hole size can reduce the anchor's installed capacity.
- Fasten to the specified embedment. Apply the stated torque or observe the required cure time. Rated capacity assumes the fastener has been installed as specified.
- Set the post plumb and check the finished height. Measure from the mounting surface to the top of the handrail after the rail and bracket are installed.
- Inspect the completed mount. Check alignment, fastener tightness and the full connection path before finishing or putting the railing into service. Any formal load test should follow the project engineer's direction, not an improvised field test.
Avoid shortcuts that hide a weak connection
Fasteners lined up in one narrow vertical line may provide little resistance to rotation. Where the bracket design permits it, vertical separation between fasteners can improve the connection's ability to resist a turning force, but only when the backing can take the load.
Water entering around penetrations can contribute to corrosion or damage the surrounding material. Seal exterior penetrations appropriately and use fasteners compatible with the bracket metal. Don't mix metals casually in a wet connection; corrosion at the fastener can undermine the joint even when the visible bracket still looks sound.
Secure the handrail before cutting it on site. An unsecured section can shift or vibrate during cutting, damaging the finish or creating an inaccurate fit. Use tools appropriate to the rail material and finish the cut edge before assembly.
If concrete is weak, cracked, thin or of unknown quality, don't try to solve the problem by choosing a larger bracket. An engineer should select a qualified alternate anchorage system or design a through-bolted connection. The same principle applies to hidden framing: if you can't confirm what the fasteners are engaging, pause the work.
Confirm the Bracket Spec Before You Order
Don't order by appearance alone. Confirm the mounting type, intended load, rail and post dimensions, substrate and exposure first. A supplier quote is useful only if it describes the same assembly you plan to install, including the mounting surface and connection hardware.
Use this checklist before requesting a quote:
- Mounting type: Choose top, side, surface or inset based on the surface you can fasten to.
- Load case and code edition: State the applicable project requirements and whether the bracket is for handrail-only or guardrail duty.
- Rail and post profile: Provide the rail shape and size, post profile and dimensions, and bracket angle or adjustment needs.
- Bracket quantity and spacing: Set the layout using the governing code and the manufacturer's rating for the substrate. Minnesota's rule, for example, limits wall-bracket spacing to 6 feet on center for new construction.
- Verified substrate and backing: Confirm the framing, blocking, concrete or metal thickness and the fasteners intended for it.
- Height and clearance: Record the finished rail height and the clearance to adjacent surfaces.
- Finish and exposure: Specify the material and finish for the site's most demanding conditions.
If you're buying a handrail set, verify what comes with it rather than assuming brackets and mounting hardware are separate. Each handrail from Ultra Modern Rails is sold as a complete set that includes brackets and hardware, and customers choose wood or concrete mounting so the appropriate base hardware can be included. The installation surface still needs to be verified before the parts are ordered.
Send the completed details with the request for a quote, then check that the quoted rating and hardware apply to the actual substrate and load case. Confirm the final specification with the local building department, and don't order until any required engineering or authority approval is in hand.
Ultra Modern Rails supplies custom-made railing systems in stainless steel and black metal finishes for indoor and outdoor projects, with options for mounting styles and handrails. Visit Ultra Modern Rails to request a free custom quote and drawing for your railing layout.