

You've found balcony railing lights that look right, but the product photos don't show where the transformer goes, how the wiring passes a cable terminal, or what happens when rain reaches the connectors. Those details decide whether the installation stays tidy and serviceable or becomes a collection of loose brackets and intermittent lights.
Treat the job as an electrical, weatherproofing and mounting project first. Choose the power source, identify the exposure, and confirm where the railing can accept a fixture before ordering anything.
Table of Contents
- Balcony Railing Light Types and Power Options Compared
- Choosing IP Ratings for Exposed and Covered Balconies
- Placing Lights for Safety Without Glare or Light Trespass
- Electrical and Code Checks Before You Buy or Install
- Mounting Railing Lights on Cable Rail and Posts
- How to Wire and Install Railing Lights Step by Step
- Maintenance and Troubleshooting
- Quote Checklist and Next Step
Balcony Railing Light Types and Power Options Compared
Most wired balcony railing lights use low-voltage LED, but the fixture determines how much cable routing, drilling and future disassembly you'll need. Start with the wiring consequence, not just the appearance.
Balcony railing light types, power sources and mounting
| Fixture type | Best use | Power source | Mounting method |
|---|---|---|---|
| Integrated handrail strip | Continuous glow along the top rail | Low-voltage DC matched to the strip | Channel or cap built into the rail |
| Recessed post or fascia light | Step and threshold lighting | Low-voltage DC matched to the fixture | Drilled into the post face or fascia |
| Clip-on LED puck | Quick accent on a bar | Battery or small low-voltage supply | Clamp to a compatible bar; battery versions need no wiring |
| Post-cap light | Top-of-post marker | Low-voltage or solar | Screwed to the post cap |
| Solar fixture | Simple, cable-free outdoor glow | Integrated panel and battery | Screw mount in an unshaded position |
| Line-voltage wall fixture | General light above the balcony | Building mains supply | Junction box; licensed electrician required |
Choose the power system first
A low-voltage system needs a compatible transformer or LED driver in a reachable location. Match its output voltage, current type, dimming method and capacity to the fixtures. A connector that physically fits doesn't prove electrical compatibility.
Line-voltage fixtures need appropriate junction boxes, circuit protection and a safe means of isolation. That work belongs to a licensed electrician, including changes to the permanent supply serving a low-voltage driver.
LED is an established outdoor technology, not an experimental decorative option. The U.S. Department of Energy's LED adoption report recorded 51.4% LED penetration in outdoor applications in 2018, compared with 29.8% indoors.
Match the fixture to future access
Integrated strips give the cleanest continuous glow, but replacement can require removing a diffuser or rail cap. Recessed fixtures look discreet, although their pockets must avoid structural fasteners and cable terminals.
Battery pucks are useful for trying a lighting position before committing to wiring. They also create a recurring battery-maintenance task. Don't assume a clip intended for a rigid bar is suitable for tensioned cable.
Post-cap lights mark corners neatly but don't necessarily illuminate the walking surface. Solar fixtures avoid supply wiring, yet shade and seasonal daylight make their output less dependable.
Practical rule: Pick the power type first, then choose a fixture you can mount, connect and replace without dismantling the railing.
Choosing IP Ratings for Exposed and Covered Balconies
Match the enclosure to the actual exposure zone, not the brand name or the word outdoor on the packaging. A roof overhead doesn't guarantee shelter if wind drives rain across the rail.
IP ratings matched to balcony exposure
| Rating | What it protects against | Balcony placement | Watch for |
|---|---|---|---|
| IP44 | Splashing water | Sheltered balconies and protected soffit positions | Don't default to it for directly rain-exposed rails |
| IP65 | Dust and water jets | Open balconies and exposed rail positions | Not permission for submersion |
| IP67 | Temporary immersion under specified test conditions | Low positions where temporary pooling is a credible risk | Confirm the manufacturer's immersion conditions; avoid standing water |
The outdoor lighting installation guide distinguishes IP44 for sheltered splash exposure from IP65 for stronger dust and water-jet protection, while emphasizing that installation instructions still govern. For an immersion-rated product, check the complete assembly rather than assuming the fixture's rating covers separately purchased connectors.
A coastal balcony also needs attention to corrosion resistance. An enclosure's water rating doesn't tell you whether its finish, screws or brackets will tolerate salt exposure.
Commission the complete assembly
- Classify each location. Mark protected and directly rain-exposed positions on a sketch. Treat a connector beneath an open rail differently from a fitting tucked under a deep soffit.
- Select the enclosure and accessories together. Check the light, cable entry, connector and end cap. The weakest exposed component needs attention.
- Place the supply somewhere protected and accessible. Respect the driver's ventilation and mounting requirements rather than wrapping it in an improvised sealed bag.
- Check the installation after wet weather. Inspect isolated connections for moisture before closing service covers. Don't spray energized open equipment to simulate rain.
Use a correctly sized gland where cable enters an enclosure. The stainless steel cable gland guide is useful when planning entries through metal housings; the gland must grip the cable jacket, not loose individual conductors.
A weather-resistant fixture can still fail through an unsuitable cable entry or a connector left in a puddle.
Drilling an extra hole through a sealed housing can invalidate its protection. Don't modify a luminaire to make routing easier unless the manufacturer explicitly permits that modification.
Placing Lights for Safety Without Glare or Light Trespass
Brighter doesn't automatically mean safer. Aim for uniform visibility at thresholds, changes in level and the handrail, without putting an exposed light source in someone's normal sightline.
The difference is easiest to understand by comparing shielded and exposed fixtures.
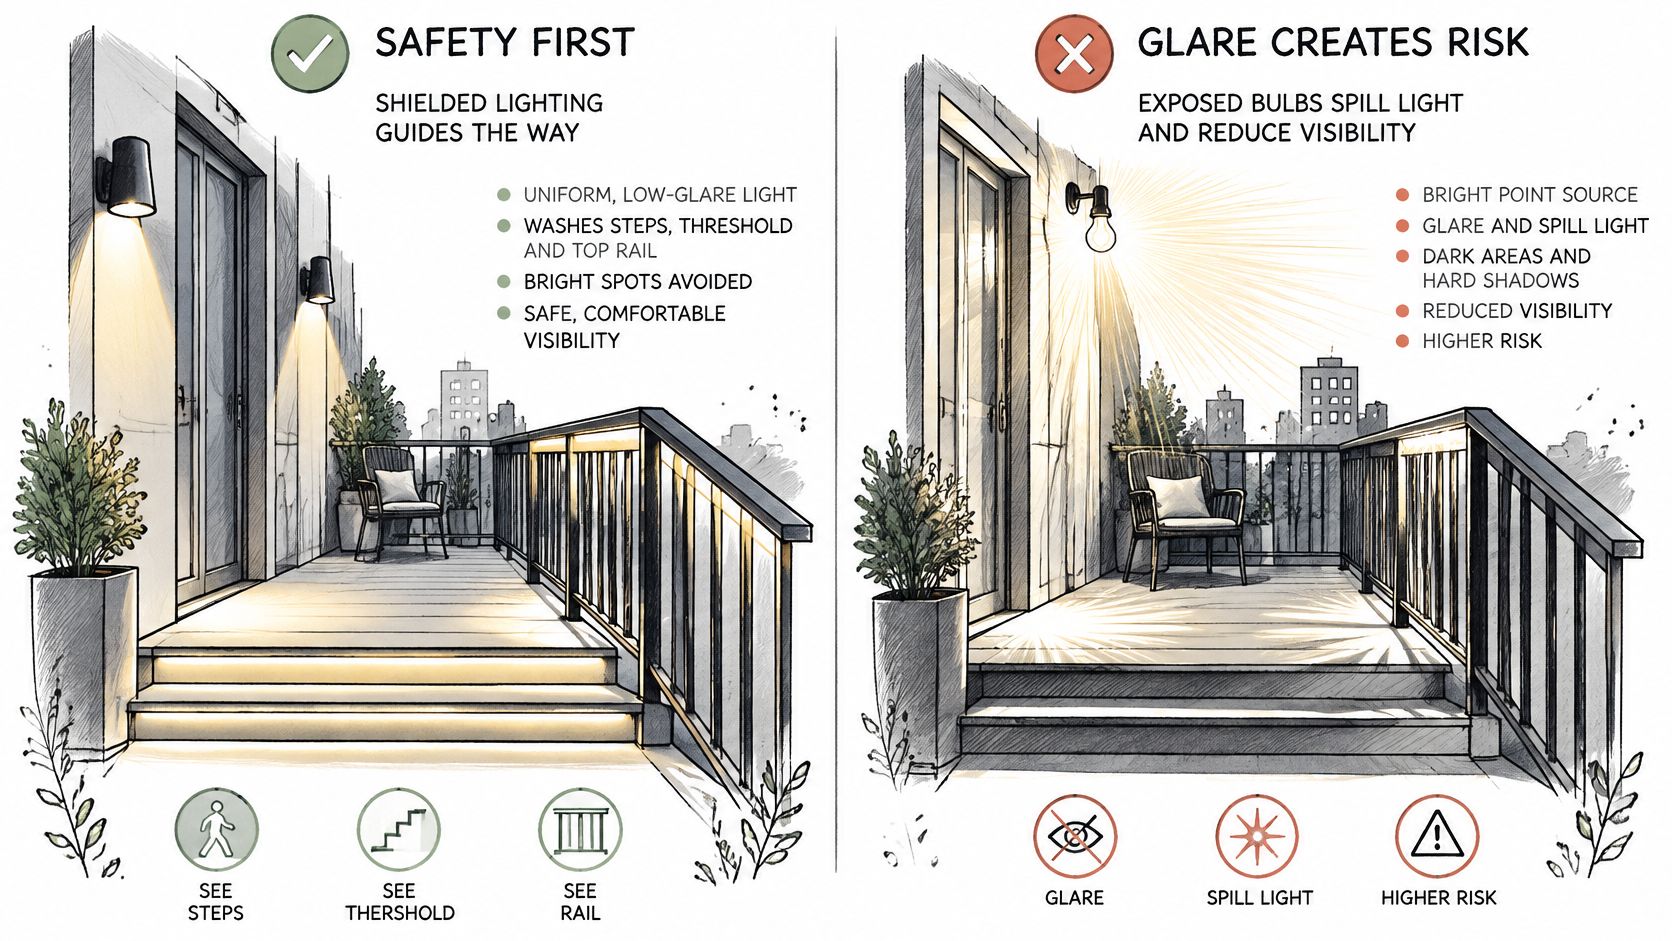
A downward-shielded post light can reveal the floor while keeping its emitting surface out of view. An exposed puck facing across the balcony may look brighter but make nearby dark areas harder to judge.
IEEE Spectrum's coverage of LED light pollution discusses glare, light trespass and the move toward very warm 1800K–2000K or amber lighting, together with shielding and controls. Where dark-sky expectations apply, start with warm, adjustable fixtures and avoid uplight rather than trying to solve excessive brightness with a warmer color alone.
Check from the neighbor's side
Consider what a person sees from the neighboring balcony or bedroom, not just from your chair. Put the light below the shielding edge of the rail where practical, and aim it toward your walking surface.
Hotels and restaurants need particular care because guests may leave balcony lights on after going indoors. Dense residential buildings also need settings that respect nearby bedrooms and nighttime wildlife.
Use controls that suit the space:
- Photocell: Switches according to ambient light, but needs a position where nearby fixtures won't confuse it.
- Astronomical timer: Follows calculated sunset and sunrise settings without an exposed light sensor.
- Occupancy control: Suits intermittent access, provided detection covers the approach without unnecessary triggering.
- Scheduled dimming: Reduces output after the main evening-use period while preserving appropriate access lighting.
Use this visual reference when assessing placement.
Do a nighttime walk-through
Stand at the far end of the balcony and look toward each fixture. Then walk the threshold and any steps, checking whether your body creates a dark patch over the next foothold.
Sit down as well. A light that's shielded at standing height may shine directly into seated eyes. Re-aim, shield or dim it before deciding that you need another fixture.
Electrical and Code Checks Before You Buy or Install
A matched, plug-in low-voltage kit can be suitable for a capable DIY installer where local rules permit. Line-voltage work belongs to a licensed electrician, and a low-voltage label doesn't authorize alterations to the mains supply.
Use this distinction before buying components.
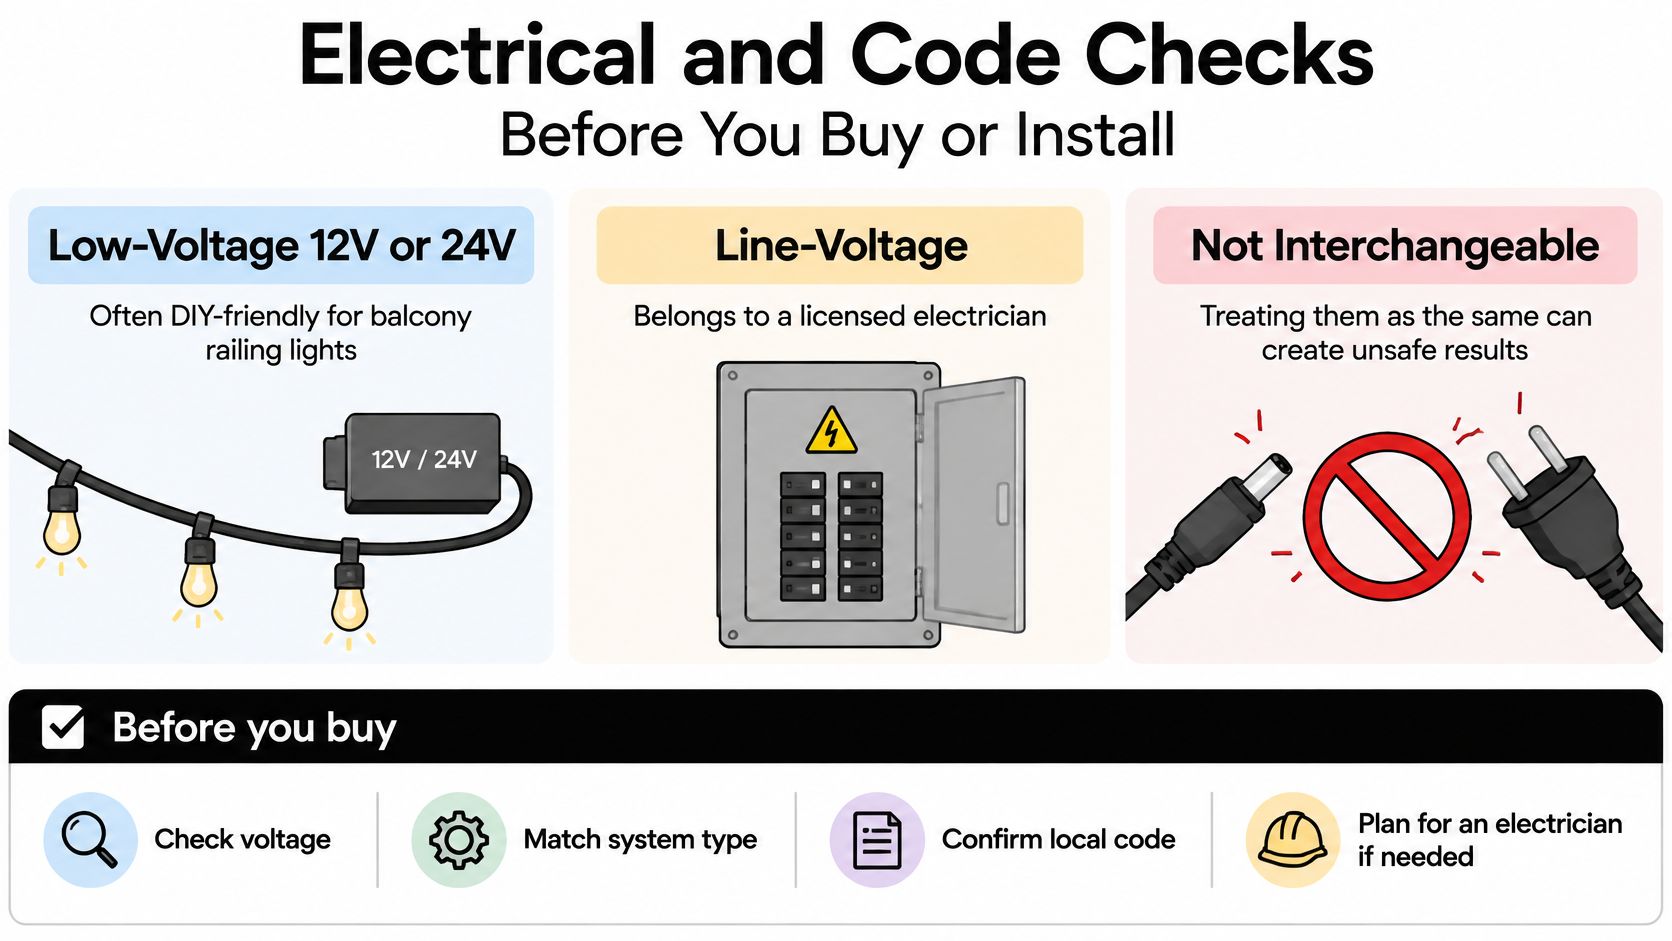
The Jefferson County electrical wiring guide addresses balcony receptacles and safe electrical arrangements. It's a jurisdiction-specific reference, not a substitute for confirming the rules that apply to your building.
Run the pre-installation checklist
- Confirm circuit protection. Have the electrician establish whether GFCI or RCD protection is required under local rules. Don't assume an outdoor outlet is correctly protected because it has a weather cover.
- Check every exposed component. Cable, boxes, connectors and covers must suit their installation conditions. Indoor extension leads and tape-wrapped splices aren't permanent outdoor wiring methods.
- Draw the cable route. Keep conductors clear of sharp edges, cable-tensioning hardware and foot traffic. Fit suitable bushings at metal penetrations and support the cable so it can't rub against a moving fitting.
- Reserve service access. Put drivers, transformers and replaceable connectors where they can be reached without taking apart a structural rail. Access should be possible with ordinary tools and without leaning beyond the balcony edge.
- Plan safe isolation. The electrician should confirm how the supply can be disconnected for servicing. Opening a decorative cap shouldn't unexpectedly expose mains terminals.
- Protect the railing's function. Locate terminal fittings, reinforcement and attachment bolts before drilling. A convenient hole isn't acceptable if it compromises the post or prevents cable adjustment.
Check the balcony railing height and code guidance while reviewing the proposed fixture position. Lighting shouldn't obstruct the handhold, interfere with required clearances or create an unintended foothold.
Record what will be concealed
Photograph the cable route before fitting caps and covers. Include identifiable post locations, connector positions and the driver label so future troubleshooting doesn't begin with guesswork.
For apartments and managed buildings, obtain approval from the building or strata office before fixing to the facade or shared railing. Confirm access arrangements for future repairs too, especially where work could affect waterproofing or require access outside the balcony.
Mounting Railing Lights on Cable Rail and Posts
On stainless posts and rails, specify compatible corrosion-resistant hardware, commonly marine-grade stainless screws and clamps, with suitable isolation gaskets where needed. Stainless fasteners alone won't prevent corrosion if an unsuitable fixture bracket traps saltwater against a dissimilar metal.
Mounting methods by railing component
| Railing component | Mount method | Hardware | Watch for |
|---|---|---|---|
| Post face | Approved clamp or flange bracket | Compatible stainless screws and isolation gasket | Keep drilling away from cable terminals |
| Top rail or cap | Channel or under-cap track | Manufacturer-specified set screws and end caps | Leave access for pulling and replacing wire |
| Fascia or deck edge | Surface bracket into blocking | Stainless lag screws into solid backing | Confirm backing before drilling |
| Cable run between posts | Not recommended for fixtures | Mount on posts or rails instead | A bracket can alter cable alignment and tension |
| Wood top rail | Approved recessed pocket | Suitable screws, sealed cut surfaces and pilot holes | Prevent moisture entry without trapping drainage |
Fit the bracket to the substrate
A clamp should match the post profile and bear evenly against it. Don't pull an undersized clamp into shape by tightening its screws, and don't use a thick improvised pad that lets the fixture rotate.
For stainless drilling, use a suitable sharp bit, cutting lubricant and controlled pressure. Remove swarf promptly so loose metal particles don't remain on the finished surface.
- Leave tensioned cables alone. Don't suspend fixtures from them, even if a universal clip appears to fit.
- Keep terminals accessible. Allow room for the tools needed to adjust or replace cable fittings.
- Size pilot holes to the fastener and substrate. Wood screws, self-tapping metal screws and tapped machine screws require different preparation.
- Seal wood penetrations properly. Treat exposed pocket surfaces and screw entries with compatible exterior products, while preserving the fixture's intended drainage.
- Respect tightening instructions. Excessive force can distort a bracket, crush a gasket or crack a plastic lens.
Give the wire a workable route
A post-mounted light can use an approved internal route or protected external conduit. Provide a drip loop before a vulnerable entry, and keep covers removable without pulling against a short wire.
An under-rail channel needs accessible ends and a way to replace the strip. Don't glue the entire assembly shut just to hide a small cable transition.
Before accepting the mount: Push and pull each bracket by hand. A fixture that shifts now won't become more secure outdoors.
Check nearby cable alignment afterward. If mounting has disturbed the railing, resolve the bracket position rather than casually retensioning cables to compensate.
How to Wire and Install Railing Lights Step by Step
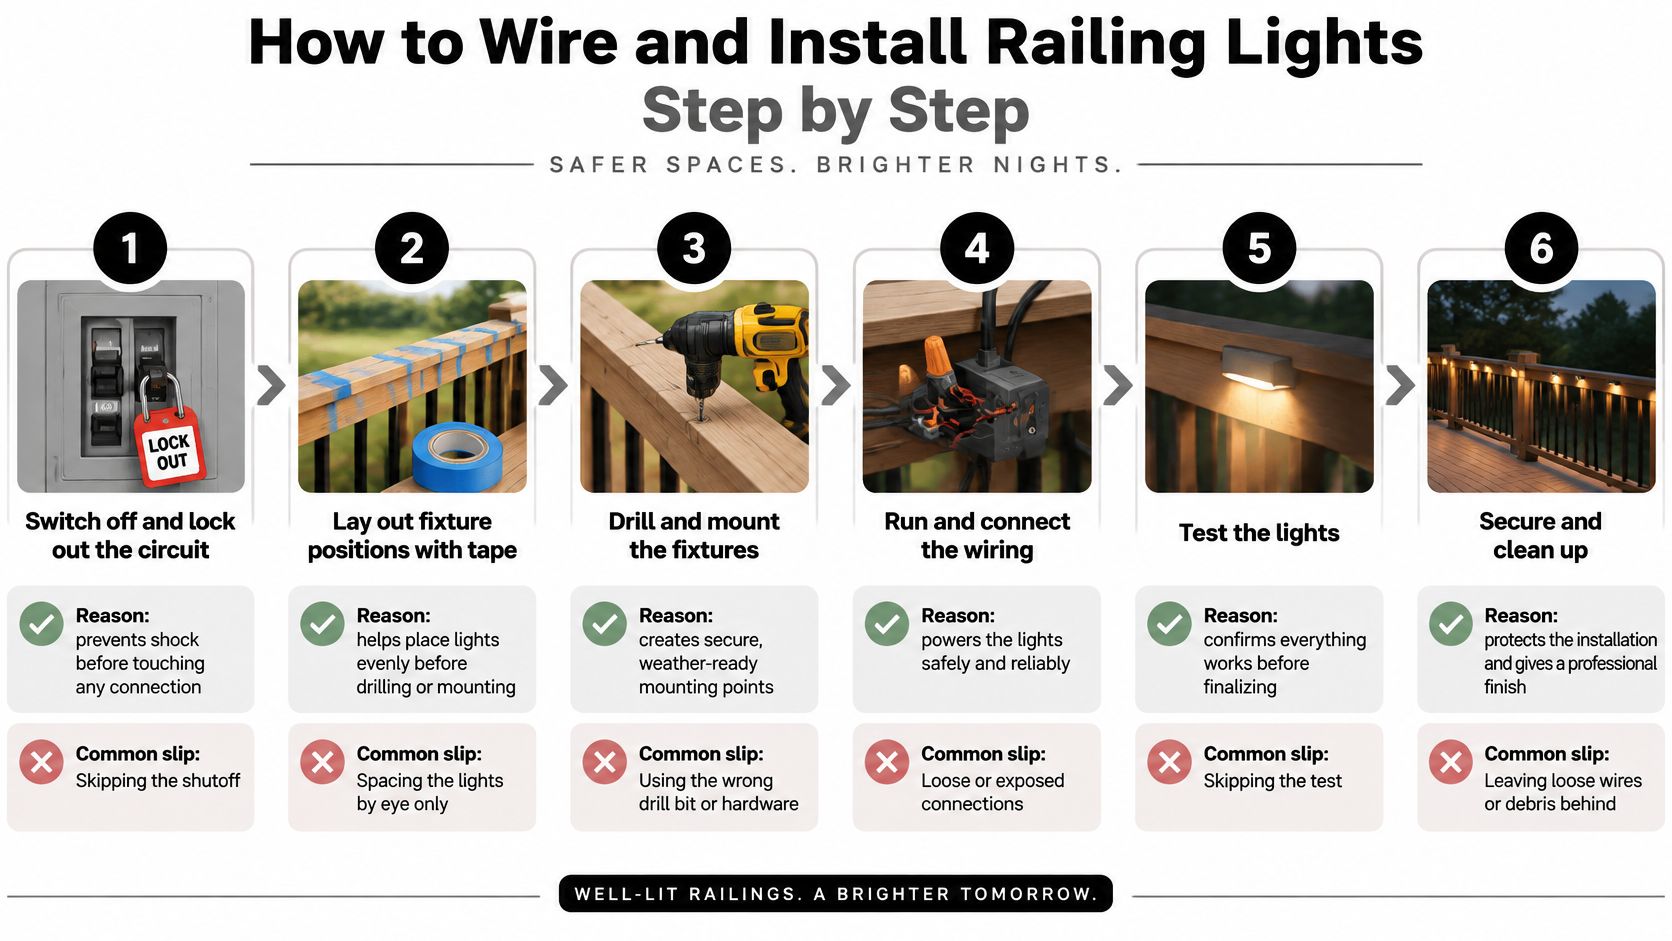
Use the following sequence for a matched low-voltage system after the supply and mounting arrangements are approved. Have an electrician complete any fixed mains work before connecting the lighting kit.
Keep the installation sequence visible while laying out components.
Prepare and mount
- Isolate the supply and prevent reconnection. Unplug a plug-in supply or have the fixed circuit safely isolated and verified before touching connections. A wall switch alone isn't proof that wiring is dead.
- Lay out the lights with masking tape. Use a tape measure and level to mark consistent positions, then check the proposed beam direction and bracket clearance. Spacing by eye often produces an obvious mismatch once the lights are on.
- Drill and fit the mounting hardware. Confirm what's behind each drill point, deburr metal holes and protect cable entries. Don't tighten a bracket over trapped wire or use the fixture body to force an uneven mounting surface flat.
If the railing itself is being assembled, coordinate the lighting route with the balcony railing installation guidance before closing posts or fitting the top rail. Leave structural assembly and cable-adjustment access unobstructed.
Connect and commission
- Run the specified low-voltage cable. Follow the manufacturer's wiring layout, maintaining polarity where required and allowing a service loop at removable fixtures. Don't substitute thin cable because it's easier to conceal; conductor size and run length affect performance.
- Make the weatherproof connections. Use connectors approved for the cable and exposure, with the jacket seated correctly and seals fully engaged. Position connections above local low points, because a splice resting in a sagging cable loop can sit in collected moisture.
- Secure the driver in its planned location. Observe mounting orientation, ventilation and clearance instructions, and arrange a drip loop where appropriate. Don't bury the supply behind a permanently sealed cover or exceed its permitted connected load.
- Power up and inspect every fixture. Check for flicker, inconsistent color, dim sections and unreliable dimming through the intended operating range. Correct compatibility or connection faults before concealing anything; increasing brightness settings won't repair a poor connection.
- Complete the weather and mechanical checks. Inspect after rain, or use only a manufacturer-permitted water test with covers closed and safe isolation procedures. Recheck brackets after initial use, but don't overtighten clamps in an attempt to eliminate movement caused by the wrong bracket.
Accept the finished installation
A good result has a consistent light pattern, secure fixtures and protected wiring that doesn't draw attention. There shouldn't be an exposed splice, a cable stretched across a terminal fitting or a cover that needs force to close.
Keep spare connector seals, fixture details and the wiring sketch together. Replaceable parts are useful only if you can identify them without removing the entire installation.
Maintenance and Troubleshooting
Build maintenance around safe access and early inspection, not waiting for a complete failure. During the first season, check brackets after the installation has settled and again after a period of rough weather.
Clean lenses with warm water, mild soap and a soft cloth, then rinse and dry as the manufacturer permits. Avoid abrasive pads, aggressive cleaners and pressure washing around seals.
Inspect before diagnosing
- Mounts: Look for rotation, loose screws, split pads and contact marks where a bracket has moved. Tighten to the manufacturer's specification rather than applying more force each time.
- Connections: After storms, inspect for condensation, green corrosion, damaged seals and cracked insulation. Isolate power before opening a connector.
- Cable routes: Check for rubbing at post entries and strain where removable caps meet fixed wiring.
- Solar units: Keep panels clean and unobstructed, and assess the battery before assuming the LED has failed.
Trace faults from the supply
| Symptom | First check | Next action |
|---|---|---|
| Whole run is dead | Supply, timer settings and driver protection | Have a qualified person investigate repeated fuse or breaker operation |
| Far end is dim | Connections and voltage under load | Review cable sizing, run length and feed arrangement |
| One fixture flickers | Connector seating and moisture | Isolate, inspect and repair the connection |
| One fixture is dead | Voltage at its connector | Confirm the supply is correct before replacing the fixture |
Don't immediately blame a long cable run for dimming. A corroded connector, overloaded driver or incompatible control can produce similar symptoms.
Voltage testing should be done only by someone competent to use the meter safely. Never probe mains terminals as part of a DIY low-voltage check.
Keep the concealed-route photographs and driver details with the building records. Add replacement part information when anything changes so the next repair starts with an accurate record.
Quote Checklist and Next Step
A useful quote starts with a small site packet, not just a fixture photo. Give the supplier and electrician enough information to distinguish straightforward mounting from work that needs new wiring, access provisions or railing changes.
Bring these details
- Post and cable photographs: Include close-ups of terminals, caps, corners and the underside of the handrail.
- Exposure classification: Identify sheltered locations, open rails and places where water can collect.
- Supply position: Show the proposed driver location, nearby outlet and available service access.
- Chosen power type: State whether you want a plug-in low-voltage system or fixed line-voltage fixtures.
- Permitted mounting method: Identify approved clamps, channels or fixing locations, plus any building restrictions.
Ask the electrician to separate supply work and required GFCI or RCD protection from fixture installation. Request clear allowances for cable routing, weatherproof connectors, controls and commissioning so a low fixture price doesn't hide the rest of the job.
Coordinate a railing replacement
If you're replacing the railing too, our stainless steel cable railing for decks and balconies starts at $600.00, while full 316 marine-grade posts and handrail require a custom quote. Request both prices together, with the proposed lighting locations shown, so the mounting approach can be resolved before fabrication.
Don't order fixtures while the power source remains uncertain. Confirm the supply location and exposure zone first, then use those decisions to narrow the enclosure, fixture and bracket choices.
Ultra Modern Rails offers made-to-order cable railing systems for indoor and outdoor projects, including balconies. Visit Ultra Modern Rails to request a custom railing quote, and include your lighting layout, post photos and preferred mounting approach so the railing and lighting plans can be coordinated.