

The most popular advice on how to cover balcony railing starts with buying a privacy roll and fastening it with zip ties. That skips the important part: a cover changes the load on the railing and the geometry around it. A screen that looks lightweight can catch wind, pull on fittings, or create footholds where there weren't any.
Start with the guard, the balcony's exposure, and the available structural fixing points. Then choose the covering. A pretty screen isn't a guard, and no-drill hardware doesn't make the forces disappear.
Table of Contents
- Confirm Guard Height and the 4-Inch Rule
- Choose a Cover for Privacy Wind or Safety
- Gather Materials and Tools
- Install the Cover Without Loading the Rail
- Maintain the Cover and Decide Screen or Replace
Confirm Guard Height and the 4-Inch Rule
Check the required height and openings before choosing a material. The handrail and guardrail code reference describes the U.S. model-code framework requiring guards at open-sided walking surfaces more than 30 inches above the floor or grade below, with a 36-inch residential minimum under the 2018 IRC and an example local ordinance requiring 42 inches for commercial applications.
Local adoption matters. Don't assume a residential rule applies to an apartment building, restaurant terrace, or hotel balcony because the railing looks similar.
Guard thresholds to check before any cover
The 2021 IRC guard provisions establish a 36-inch minimum residential guard height and a guard-opening framework that prevents passage of a 4-inch-diameter sphere; the applicable occupancy and local amendments determine the final specification.
| Check | Requirement | Basis |
|---|---|---|
| Guard required | Open-sided walking surface more than 30 inches above floor or grade | U.S. model-code framework described above |
| Minimum residential guard height | 36 inches from the finished walking surface under the 2018 IRC; some references and local codes require 42 inches | Verify the adopted local code |
| Commercial guard height | 42 inches | Example local ordinance described above |
| Maximum opening | A 4-inch sphere must not pass through the guard | IRC guard-opening framework described above |
| Vertical slat clear gap | Lay out clear gaps smaller than the permitted opening, allowing for tolerances and movement | Working layout guidance |
| Measurement point | Top of the guard's handrail where it forms the guard top, measured after installation | Field check |
Use this checklist while inspecting the bare railing.
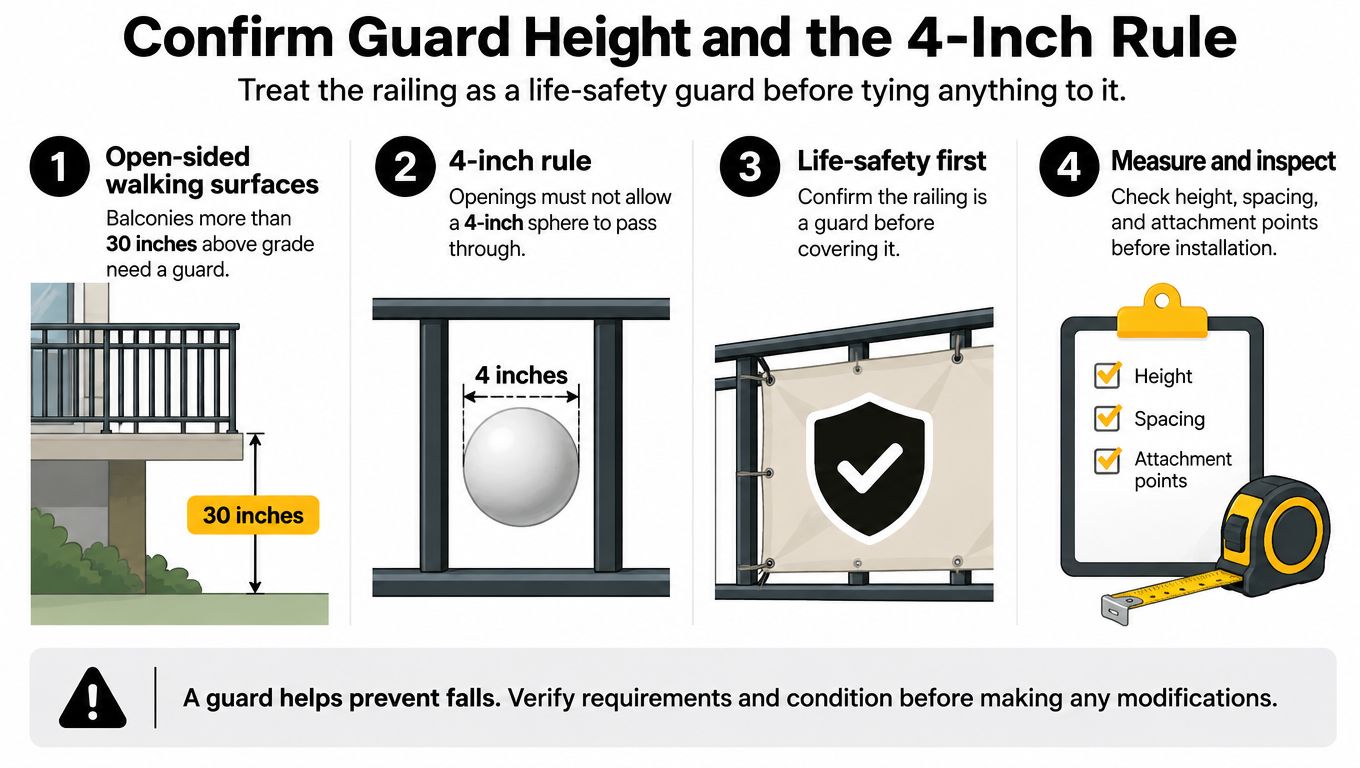
For final system height, we measure from the mounting surface to the top of the handrail, not just the post. For code compliance, also verify the vertical distance from the finished walking surface. These measurements can differ when posts mount beside the deck or when decking has been added.
Measure actual unobstructed openings, including gaps beside posts and beneath panels. Cable deflection and frame geometry matter, so nominal spacing on a product label isn't enough. Our balcony railing height code guide can help organize that check before you confirm requirements with the local authority.
Establish what the cover may touch
Photograph the railing, note its mounting arrangement, and identify structural posts separately from decorative balusters. Don't hang a heavy panel from thin infill unless its manufacturer or an engineer confirms capacity.
Before drilling, obtain landlord, condominium, or building-owner approval and check fire, egress, façade, and drainage restrictions. Keep handholds usable, eliminate sharp projections, and avoid brackets or horizontal trim that introduce climbing ledges.
Practical rule: If you can't identify the load path from the proposed covering into verified structure, you aren't ready to buy its fixings.
Choose a Cover for Privacy Wind or Safety
Choose the primary job first: block sightlines, reduce wind, or correct a deficient guard. Those are different projects. The architectural privacy-screen and railing guide distinguishes privacy coverings from guards that must satisfy structural and code requirements.
Balcony railing covers compared
| Cover | Best use | Wind behavior | Attachment | Counts as a guard? |
|---|---|---|---|---|
| Open fabric or mesh screen | Sight privacy with airflow | Less sail effect than a dense sheet, subject to actual permeability | Grommets or tracks connected to verified supports | No |
| Reed or bamboo roll | Dense visual privacy | Semi-solid, with substantial sail potential | Distributed ties or hooks with post support | No, and often climbable |
| Vertical slats | Privacy plus controlled openings | Gaps allow some airflow | Brackets or screws into structural posts | Only as a complete, structurally verified, code-compliant assembly |
| Horizontal slats or lattice | Partial privacy and shade | Resistance increases with coverage | Independent or verified post-mounted frame, not cables | Not as an unverified decorative addition; climbing geometry needs review |
| Tempered or laminated glass | Wind block with a view | Solid surface with substantial wind demand | Designed structural shoe or post clamps | Only as a rated, code-checked guard system |
| Deck planter boxes | Green screening | Foliage catches wind; exposure and stability matter | Supported on the deck, not hung from the rail | No |
Match coverage to the sightline
For a seated apartment balcony, you may only need to block the view through the middle of the railing. Covering every opening from floor to handrail can add wind resistance without improving the privacy you use.
Open mesh is usually the first option to assess, not an automatic approval. Hold a sample at the intended position and check visibility from inside and outside. A fabric that looks opaque against a bright sky may provide much less privacy when the balcony is lit after dark.
Reed and bamboo offer texture, but their irregular surfaces complicate secure fastening. They can also hide deteriorating connections. Vertical slats give more predictable openings, while horizontal slats and lattice require particular care around climbing opportunities.
For appearance options, compare contemporary balcony railing designs against the structural arrangement you already have. Don't select a pattern first and invent an attachment afterward.
Choose the least obstructive covering that solves the actual sightline problem.
Deck planters can soften the edge without attaching anything to the guard. Keep them stable, clear of circulation, and away from positions where they become steps beside the railing. Their weight still belongs in the balcony load assessment, especially when soil is wet.
Gather Materials and Tools
Make a bay sketch before shopping. Record the clear width between supports, the proposed screen height, door movement, drainage routes, and approved fixing zones. Mark anything you must leave accessible, including cable tensioners, post bolts, and drainage outlets.
Tools for measuring and fastening
- Steel tape and level: Measure the opening at different heights and check whether posts lean. Don't assume a rectangular screen will fit a distorted bay.
- Drill and substrate-appropriate bits: Match the bit to the approved fastening detail. Drilling into concrete, metal, and timber requires different preparation.
- Torque driver or wrench: Tighten bolts to the hardware manufacturer's specification rather than judging by how hard you can pull.
- Pliers and suitable cutters: Trim temporary ties cleanly and remove sharp tails.
- Soft protective pads: Protect fabric at approved contact points without trapping water against the railing finish.
- A helper: Support the loose panel while you establish alignment from inside the balcony.
Materials matched to the support
For fabric, select outdoor-rated, UV-resistant material with reinforced edges and grommets. Bare holes punched through an unreinforced sheet tear easily because the load concentrates at the hole.
Choose clamps or brackets that fit the post profile and are compatible with its finish. Use outdoor-rated fasteners suited to the substrate and surrounding metals. A stainless fastener alone doesn't make an unsuitable connection durable.
- Tracks and intermediate supports: Use components intended for the selected screen system and span.
- Temporary mesh ties: Use them to locate the panel, not to substitute for its designed permanent attachments.
- Glass or rigid infill hardware: Obtain the specified clamps, shoes, setting blocks, and frame components as a coordinated system.
- Planter drainage: Provide drain holes and suitable containment that won't hold standing water against the deck.
Before purchasing, compare the hardware with your sketch. If a clamp would cover a tensioner or a bracket would obstruct a door, change the detail now. Don't improvise around the conflict while holding a panel over an exposed edge.
Install the Cover Without Loading the Rail
You can't install a covering without loading something. The aim is to keep that load off unverified infill and transfer it into supports designed to receive it. The S-Polytec privacy-screen installation guide explains why dense panels require wind-load consideration and why distributed perimeter attachments are preferable to concentrating force at a few ties or eyelets.
Use the following visual as a layout reminder, not as a structural attachment specification.
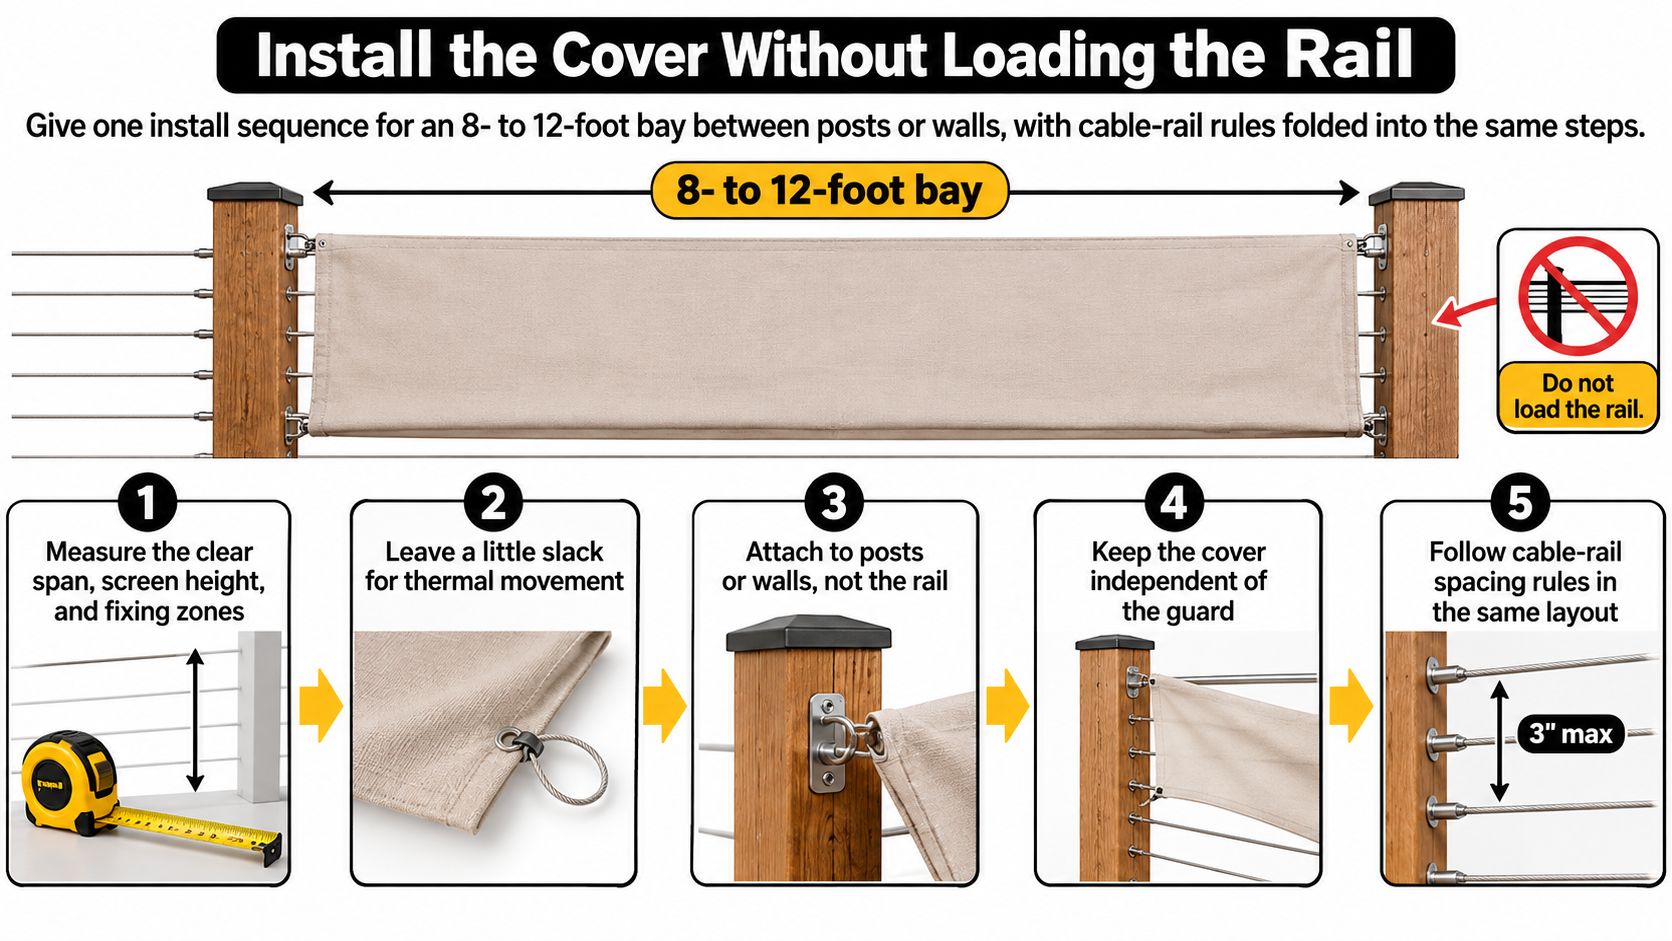
Lay out the approved attachment
- Measure the clear span, screen height, and fixing zones. Keep the bottom edge clear of drainage paths so runoff can escape and debris can be removed. Size this clearance to the actual deck arrangement rather than assuming a standard gap suits every balcony.
- Mark the structural attachment lines. Use approved posts, framing, or wall anchors, because the panel's forces need a continuous path into the building. Treat the top rail as an attachment only when its capacity and connections have been verified.
- Confirm the material against the exposure. A more permeable screen may be appropriate where a solid sheet isn't, but permeability doesn't establish an allowable wind load. Stop for project-specific review if the balcony is exposed or the existing anchor capacity is unknown.
- Lay out fixings around the perimeter and at required intermediate supports. Follow the approved screen-system spacing, because a few widely separated attachments allow the panel to pull hard on individual grommets. Don't substitute a universal tie spacing for a manufacturer's tested arrangement.
Do the layout from inside the balcony. If the installation requires reaching beyond the guard, leaning over it, or removing protective components, stop and arrange suitable professional access.
Hang the panel without distorting the guard
- Support the panel while loosely engaging its attachments. Start with the panel aligned, then work around the perimeter progressively so one corner doesn't carry its weight during installation. Keep fabric away from sharp post edges and protruding fasteners.
- Stabilize the screen without overtightening. Remove excessive flapping while preserving the movement allowed by the screen manufacturer. Pulling fabric drum-tight can distort the frame, overload eyelets, or draw posts inward.
- Fit the specified intermediate support. Prevent the panel from billowing into cables or rubbing on glass, and terminate separate panels at corner supports rather than pulling a continuous sheet around a turn. A corner wrap can apply force in different directions to the same connection.
- Inspect the entire load path before use. Check clamps, brackets, post bases, and the building-side anchors. For surface-mounted railings, we require reinforced blocking, commonly triple 2x8 or equivalent; an engineer must confirm the appropriate detail for the substrate and added loading.
Our balcony railing installation guide provides additional system-planning context, but adding a cover still requires checking its particular attachments.
Cable rail needs a separate load path
Don't use the cables as screen anchors. Fastening a sheet to them can change tension, distort spacing, and load end fittings in ways the screen installer hasn't evaluated. Temporary locating ties should not become the permanent support by default.
Never stack boards across cables or weave rigid strips through them. Support the covering on its own verified frame or approved post connections, leaving tensioners accessible.
If a fitting rotates, a cable slackens, or a post moves during installation, stop and remove the added load. Don't tighten the cable harder to disguise movement; have the guard checked and restored to its specified condition before use.
This video provides additional railing installation context.
Open mesh is not fall protection. It must never be used to conceal a missing, damaged, or incomplete guard.
Maintain the Cover and Decide Screen or Replace
Inspect the screen during its first period of use, not just when it starts looking tired. Fabric can settle, clamps can rotate, and a panel that fitted neatly in calm weather may rub against infill when the wind changes direction.
Take baseline photographs of the completed attachments. They make it easier to identify a shifted bracket, elongated grommet hole, or change in post alignment without relying on memory.
Check the connections and drainage
Inspect seasonally and after strong winds. There's no universal wind-speed trigger that makes every balcony screen safe below it, so follow any removal instructions and operating limits for the approved system.
- Grommets and hems: Look for stretched holes, split stitching, and fabric whitening around loaded areas. Repair the reinforced edge or replace the panel rather than adding another tie beside a tear.
- Clamps and brackets: Check for rotation, missing pads, corrosion, and contact damage. Tighten only to the specified torque.
- Post bases and anchors: Look for new movement, cracked finishes, displaced covers, or deterioration around the substrate. Don't hide these areas behind permanent trim.
- Drainage and thresholds: Remove leaves and sediment beneath the screen. Keep fabric, reed, and planter trays out of door tracks and drain outlets.
- Cable fittings: Confirm that access remains clear and that the covering hasn't begun bearing against the cables.
A skirt sealed to the floor can obstruct runoff. Leave the designed drainage route open, and investigate staining or dampness below the balcony rather than assuming it's cosmetic.
Rinse exposed metal clamps with fresh water in salt-air conditions when compatible with the system's care instructions. Store removable fabric or reed dry when taking it down for seasonal weather or forecast severe conditions. Only remove it when you can do so safely, before conditions deteriorate.
Maintenance test: A covering that prevents you from inspecting the guard needs a different access detail.
Exposure changes the decision
The 2025 Mississauga qualitative wind-comfort study identified recessed balcony geometry and façade positioning as wind-mitigation features that encourage flow stagnation. That finding supports assessing the building's shape and balcony location, rather than selecting a screen by opacity alone.
It doesn't establish a universal screen specification. A recessed balcony and a projecting corner balcony shouldn't receive the same covering just because their railings match.
For an exposed, high-rise, coastal, or corner location, have a designer or engineer review a proposed solid panel and obtain building-management approval. The review should consider the supports, anchors, façade interfaces, neighboring balconies, and the building's maintenance arrangements.
No-drill means no drilled holes, not no wind force. A clamped panel still transfers force into whatever it grips. If management permits removable screens, ask for the permitted material and fixing arrangement in writing rather than treating permission as structural approval.
Make the screen-or-replace decision
A covering is reasonable when the existing guard is sound, its geometry complies, the attachment is approved, and the proposed screen has an acceptable load path. A reversible permeable panel can then address privacy without rebuilding the protective barrier.
Repair comes first when cables won't hold their specified condition, posts move at their bases, timber is soft, or anchors show deterioration. Replacement may be necessary when the guard is too low, its openings can't be corrected appropriately, or its structure can't support the intended use.
| Condition | Decision |
|---|---|
| Sound, compliant guard with approved screen attachments | Proceed with the permitted covering |
| Sound guard but unknown attachment capacity | Pause for structural review |
| Damaged infill or loose connections | Repair and verify before screening |
| Deficient height, geometry, or supporting structure | Redesign or replace the guard |
| Building rules prohibit the proposed covering | Choose an approved alternative |
We maintain a Cable Railing Safety Code page to help customers identify questions for their local authority. Our expert design team also helps plan railing layouts, but the governing code and project-specific structural requirements still control the final design.
Before ordering anything, photograph the bare railing, record its dimensions, and identify the approved fixing points. Go ahead with a screen only when the guard and attachments pass review. Otherwise, repair or replace the guard first.
Ultra Modern Rails offers custom-made cable railing systems and design support for balcony projects. Visit Ultra Modern Rails with your measurements, mounting details, and photographs to discuss a railing layout that keeps the guard's safety function separate from your privacy covering.