

You've picked a railing style, but the porch edge is covered with trim, fascia, or decking, and it's not obvious what the mounting bolts will reach. That's the decision to solve before choosing a bracket. A good-looking connector won't make a weak attachment safe.
Porch railing mounting brackets are part of a structural load path: the rail transfers force to the bracket, the bracket transfers it through fasteners into framing, and the framing carries it onward. Choose the attachment point first. Choose the visible hardware afterward.
Table of Contents
- Which Bracket Type Fits Your Porch Structure
- Code Loads Every Bracket Has to Carry
- Matching the Bracket to What Is Behind the Surface
- Corrosion, Finishes and Fasteners by Exposure Zone
- How to Mount a Bracket Step by Step
- Fixing Brackets That Loosen, Rust or Rattle
- Confirm the Bracket Plan Before You Order or Drill
Which Bracket Type Fits Your Porch Structure
A new porch rail can look straight and finished, then wobble when someone leans a shoulder into it. That often happens because the bracket was chosen for its appearance while the material behind the mounting surface went unchecked.
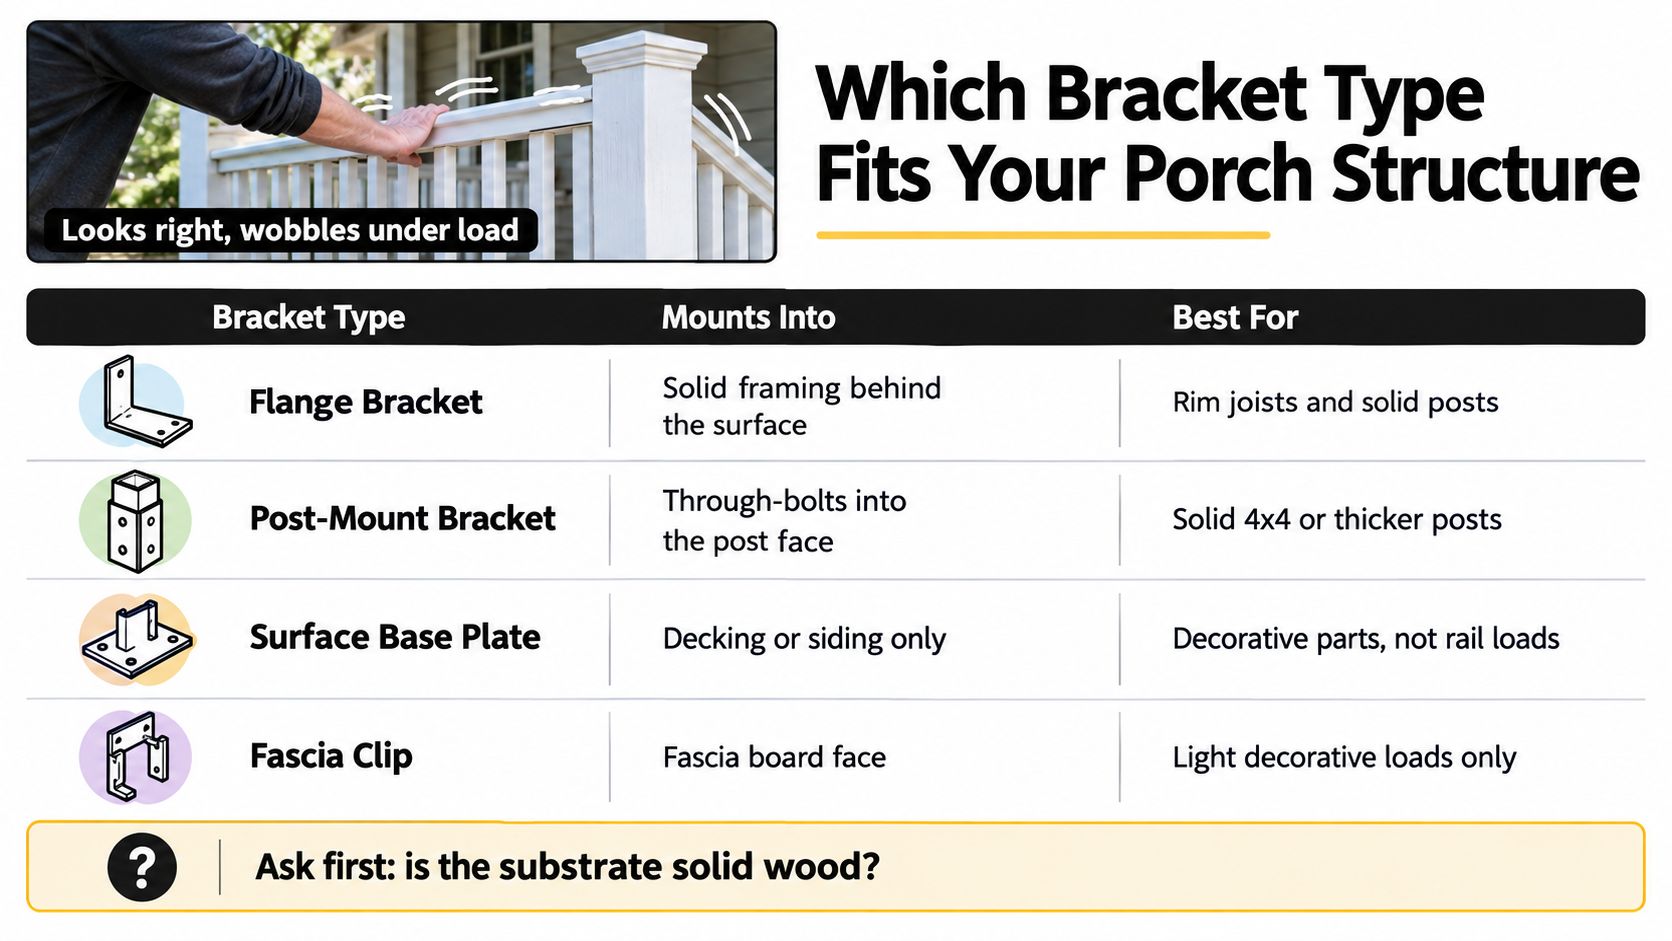
| Bracket type | Attaches to | Best for | Main limit |
|---|---|---|---|
| Surface mount | Face of a solid post, solid rim board, or solid blocking | New porch posts and framed edges with solid backing | Needs solid wood behind it. Bolts into end grain or hollow sheathing won't hold a guard securely. |
| Side mount | Side of a joist, beam, or post, with the bracket bearing on the member | Rails that step off a framed deck or porch edge, and stair posts | The supporting joist must resist rotation. A loose joist can't hold the guard. |
| Fascia mount | Outer fascia or band board, with blocking or framing behind it | Cosmetic top rails, secondary runs, and porch edges without a post | Fascia alone rarely carries guard loads. Verify blocking before relying on it. |
| Adjustable | Slotted or angled base that tilts to match the post or stair pitch | Stair runs, out-of-square posts, and retrofits | Adds joints that must be locked. Check for movement after tightening. |
First, what's behind the surface? A solid post or properly backed rim board can provide a useful mounting point. Fascia, siding, composite trim, and decking may hide framing, but none should be treated as structural backing until you confirm what's behind them. If the bracket fasteners stop at the decorative layer, the rail may move even though the bracket itself is sturdy.
Next, does the top rail also serve as a handrail? That affects the load the guard system must resist. Don't decide based on the bracket's shape. Confirm what the rail is doing and how the complete assembly is meant to be attached.
Finally, does the rail follow a stair or sloped edge? A fixed bracket may not sit flat against an angled post or rail. An adjustable bracket can accommodate the pitch, but every slot or pivot creates another joint to set and lock before the rail is loaded.
For stairs, take care not to use adjustability as a substitute for a sound bearing surface. The bracket should sit firmly against the supporting member, and the fasteners must still reach structural material.
Ultra Modern Rails sells deck-mounted and side-mounted straight sections with pre-drilled posts and mounting bolts. For example, the Cable Railing - Black Metal With Blue Wood Top 8' Deck Mounted Straight Section is a deck-mounted system, so confirm that your framing suits that mount style before ordering.
Code Loads Every Bracket Has to Carry
A porch guard is a loaded assembly, not a bracket by itself. The bracket's appearance says little about whether the force can travel through its fasteners and supporting framing.
Under the 2021 IRC provisions discussed by JLC, a guard without a handrail function must resist a 200-pound concentrated load outward and downward. If the guard also serves as a handrail, it must resist that load in any direction. The same 2021 IRC provisions specify a 50-pound load over a 1-square-foot area for guard infill.
Each load needs a continuous route into the structure. The rail transfers force to its posts or supports, then the bracket and fasteners carry it into a joist, beam, post, or other structural member. The 2021 IRC Section R507.10 requires a continuous load path from the guard system to the deck joists. Related provisions require joists or beams supporting side-mounted guards to resist rotation, and do not allow a connection to rely only on fasteners withdrawing from end grain.
Consider a 10-foot porch rail with brackets at 4-foot centers. That spacing does not reduce the concentrated load at each bracket to a fraction of the full load. Each bracket and its fasteners must handle the load applied at that location, while the framing carries it onward.
Practical rule: Ask for the tested capacity of the installed connector assembly, not just the bracket's catalog description.
Check which code edition and local amendments apply before building. Ultra Modern Rails' deck railing code requirements guide offers an overview of railing requirements. If you cannot trace the force from the guard through the bracket and into structural framing, the mounting connection is incomplete.
Matching the Bracket to What Is Behind the Surface
The substrate matters more than the bracket. A thick stainless connector can still pull loose if its bolts end in thin fascia, hollow material, or damaged framing. Code guidance puts the responsibility on the full connection, including the supporting post, rim board, blocking, or masonry, as discussed in the Perinton deck resource and construction guide.
Start by locating solid backing. Probe the intended fastener line with an awl or small drill bit, and check whether the fastener can pass through enough sound material to make a structural connection. Don't assume that a trim board or a clean-looking surface is attached to a suitable member.
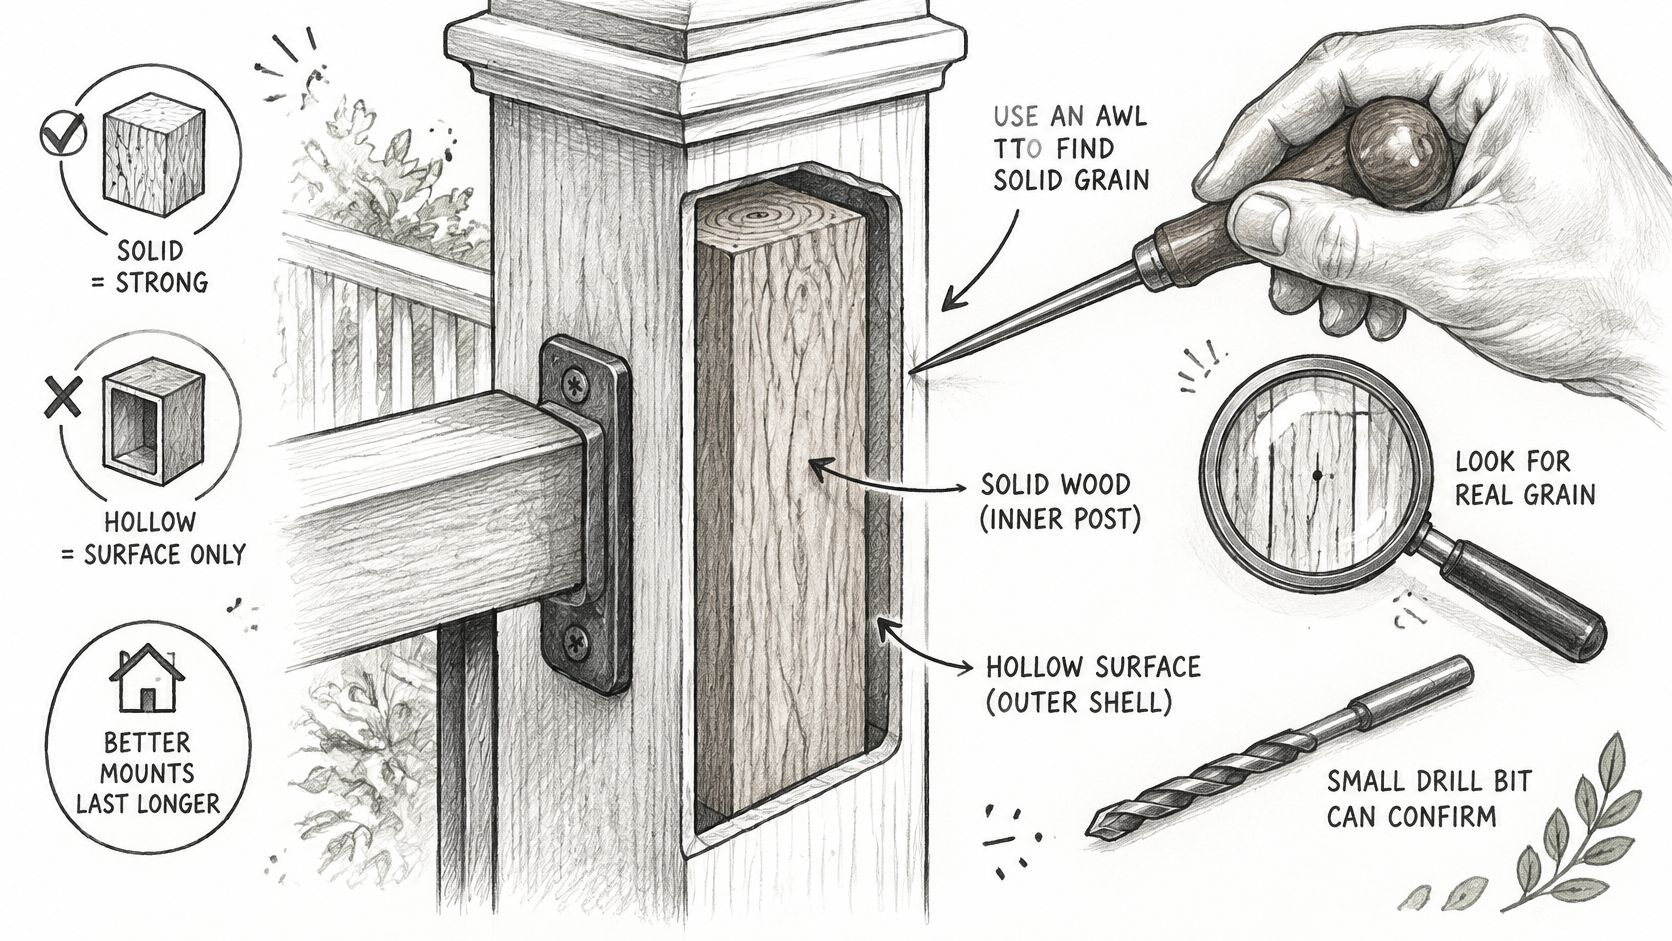
Check the substrate before selecting hardware
Solid lumber posts and sound rim boards are often workable attachment points, particularly when a detail calls for through-bolts. Composite fascia alone is usually a cosmetic surface; use it only when you confirm structural blocking behind the fastener line. A bracket screwed just into fascia may look tight on installation day and still loosen under a guard load.
Hollow masonry and stone veneer need particular care. A masonry-rated anchor must suit the actual material, and veneer shouldn't be mistaken for the structural element behind it. Steel needs a connector and fastener method suited to the steel's thickness, such as properly specified tapped or through-fastened hardware. For an old or rotted rim joist, replace the damaged member or reinforce it before mounting.
Here's the difference: a fascia-only bracket holds the rail against a thin exterior board, while a bracket bolted through the rim into solid blocking transfers the force to framing. The finish may look identical, but the load path isn't.
Before drilling, check three things: solid wood or a suitable structural element at the fastener line, bolt length sufficient to pass through the connection, and no bracket bearing on decking alone.
A mounting plan should identify what the fasteners engage, not just where the bracket sits on the surface. If you're laying out a deck post connection, Ultra Modern Rails' guide to mounting railing posts to a deck can help you think through the attachment point. A stronger-looking stainless bracket can't make up for a weak substrate.
Corrosion, Finishes and Fasteners by Exposure Zone
Choose corrosion protection for the complete connection: bracket, bolts, washers, nuts, and the materials they contact. Exterior connectors and fasteners need corrosion resistance, and the exposure helps determine the specification, as outlined in the ICC-NTA wood deck code guidance.
| Exposure zone | Typical setting | Bracket and fastener spec | Inspection interval |
|---|---|---|---|
| Inland covered or ordinary exterior | Covered porch or inland yard, without salt or pool chemicals | 304 stainless or hot-dip galvanized, with matched fasteners and washers | Once a year |
| Marine or coastal | Within reach of salt spray | 316 stainless throughout, isolated washers, no mixed metals | Twice a year, with a fresh-water rinse |
| Poolside or chemical | Pool deck, chlorinated splash zone, or hospitality cleaning chemicals | 316 stainless, with treated-wood holes sealed | Twice a year, rinsing after cleaning |
| Winter de-icing salt | Porches and stairs beside salted walks or roads | 316 stainless or hot-dip galvanized, with sealed penetrations | Twice a year, including once after winter |
Near salt spray, specify 316 stainless rather than 304. Inland and sheltered porches can use 304 stainless or hot-dip galvanized hardware, provided the fasteners and washers match the bracket and suit the exposure. Keep dissimilar metals from direct contact, since that can accelerate corrosion at the connection.
Pressure-treated wood also affects hardware selection. Use fasteners rated for the exposure and wood treatment, seal penetrations where the substrate requires it, and prevent water from collecting around the holes. A 316 stainless surface still needs intact, compatible fasteners and washers. Use isolation washers when the specified connection calls for them, and follow the connector instructions rather than adding materials that alter the assembly.
Set the bracket so water drains away from the plate instead of sitting behind it. Rinse salt or cleaning residue from exposed hardware as appropriate. Inspect for looseness, pitting, and rust staining. Rust bleeding onto the wood signals that the hardware needs investigation; replace compromised parts rather than painting over the stain.
A finish and the metal underneath it serve different purposes. Black powder-coated metal provides a dark appearance, but damage around drilled or cut areas can expose the metal. Check those areas and maintain the coating. For material compatibility details, see Ultra Modern Rails' guide to stainless steel and steel corrosion.
How to Mount a Bracket Step by Step
A reliable installation starts with the actual framing and exposure, not with the bracket holes. Use the connector maker's specified fasteners and installation details, and stop if the surface doesn't lead to sound structural material.
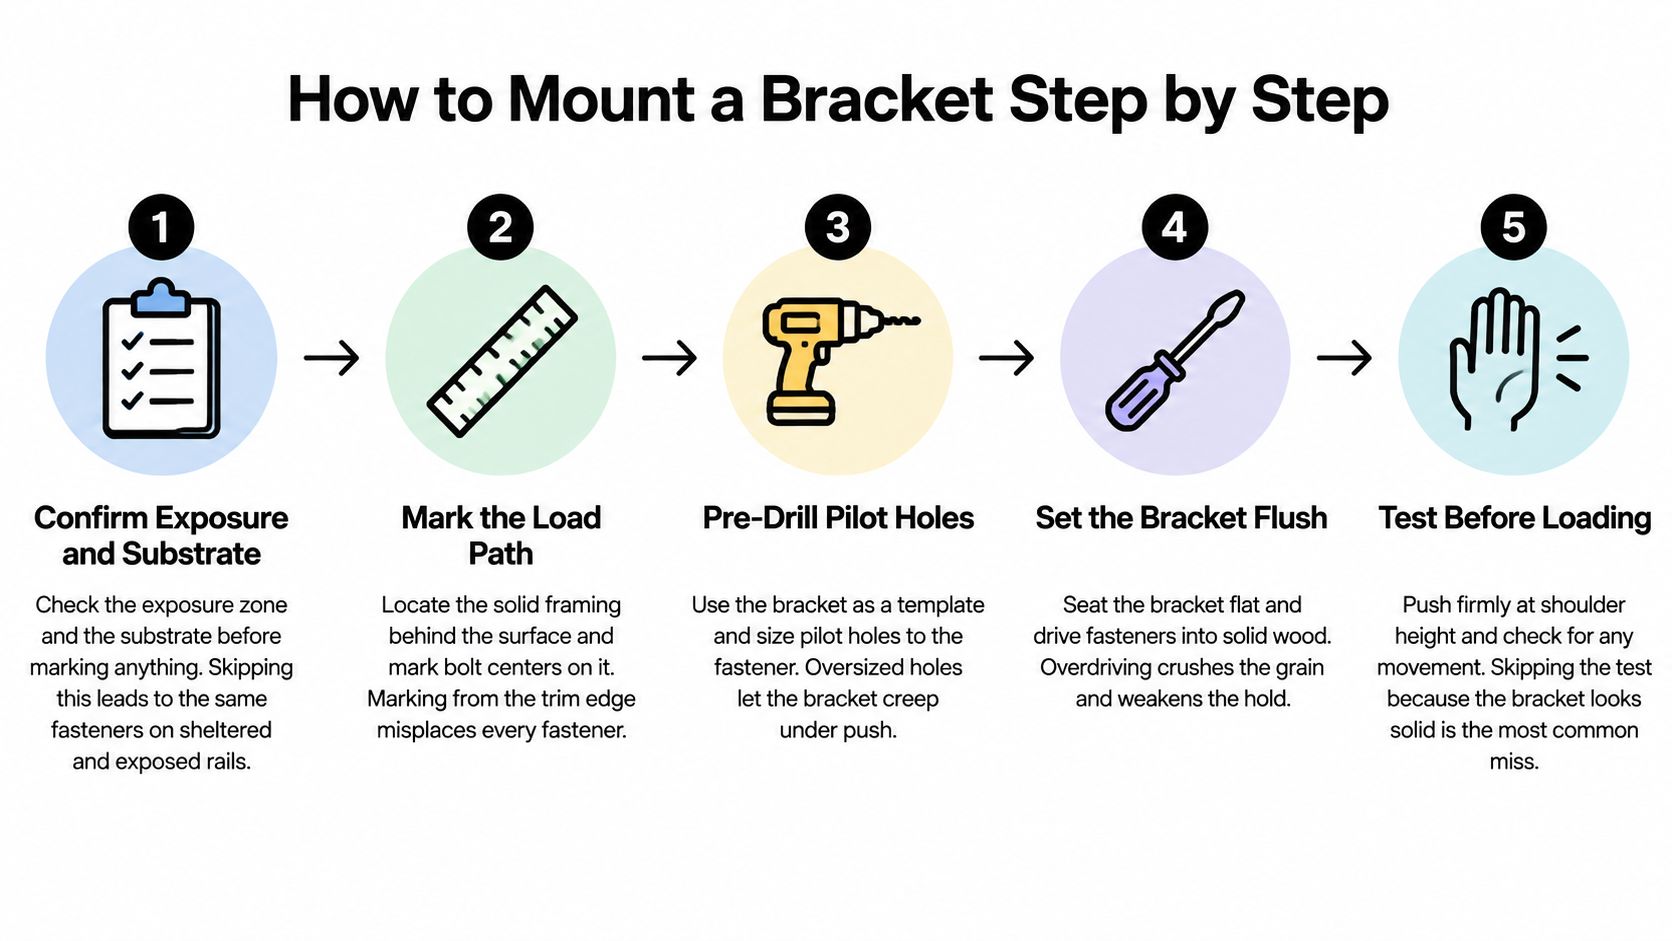
- Confirm the exposure and substrate. Decide whether the location is sheltered, ordinarily exposed, or subject to salt, pool chemicals, or de-icing salts. Identify the structural material behind the finish, then trace how force will pass from rail to bracket to framing.
- Locate the framing. Use a stud finder to find likely framing, then confirm the fastener line with a small drill bit or awl. If the probe finds soft, split, or rotted wood, don't mount into it; repair or replace the supporting material first.
- Mark the positions. Lay out the bracket locations against the rail, and check plumb, alignment, and stair pitch before drilling. Keep fasteners out of end grain and away from board edges so the connection doesn't split the wood or rely on a weak fastening direction.
- Pre-drill pilot holes. Follow the fastener and bracket instructions for hole size, and hold the bracket in place as you transfer the hole centers. A hole that's too large can let the bracket shift; one that's too small can split the wood or make installation difficult.
- Install the specified fasteners. For through-bolts, use the matched bolt, washer, and nut arrangement. Where specified, place washers under both bolt heads and nuts so the load bears across the connection rather than crushing the wood at a small point.
- Tighten and check alignment. Use the specified torque rather than relying on feel, then verify that the bracket sits flush and plumb. Overtightening can crush wood fibers; undertightening can leave movement that becomes more noticeable when the rail is used.
- Seal and preserve drainage. Seal penetrations where the substrate requires it, and keep the bracket from trapping water against the wood. A sound seal won't help if the installed shape holds water around the fasteners.
- Test the rail. Push firmly at the rail and check for movement, then recheck the fasteners after the assembly has been used. FEMA's residential deck guidance includes a benchmark of at least 1,800 pounds of allowable tension for hold-down anchors on a guard up to 36 inches high. That's a reminder to use a tested structural connector, not a decorative angle bracket in its place, as described in the FEMA design guide.
For a visual walkthrough, use this installation video:
Fixing Brackets That Loosen, Rust or Rattle
A porch rail that shifts under pressure may point to loose hardware, an unsuitable fastener, or framing that can no longer carry the load. Trace the movement through the bracket and into its backing before making an adjustment. The visible bracket is only one part of that connection.
| Symptom | Likely cause | Fix |
|---|---|---|
| Rail moves when leaned on | Anchored only into fascia or end grain | Add through-bolts into solid blocking or a joist, or move to a post mount |
| Rust streaks below a bracket | Mixed metals or non-rated fasteners | Replace with matched stainless or galvanized hardware and isolate with washers |
| Bolt heads sink into the wood | Overtorqued or missing washer | Back off, add a washer, and reset to the specified torque |
| Gap widens over time | Crushed wood, undersized bolt, or rot | Probe for soft wood, upsize the bolt, or replace the rotted member |
| Rattle or click under load | Loose nuts or slots without a locking nut | Retorque, secure the adjustment, and check after the first heavy use |
| Water pools behind the bracket | Bracket shape traps moisture | Add a spacer for a drip gap and reslope the top surface |
A washer, replacement fastener, or secured adjustment can stop movement when the framing is sound. For a widening gap, probe the wood and check whether the bolt has crushed or loosened its bearing area. A tighter fastener cannot restore damaged backing.
Consider a porch rail that loosens after two winters. Water may have collected behind the bracket and damaged the rim board, even if the bracket itself remains sound. Replace or reinforce the damaged member, then reinstall the bracket with a detail that lets water drain away.
Weak backing requires a structural repair. More torque will not restore its holding strength.
Rust streaks call for checking the whole connection, not just the stained surface. Replace corroded fasteners with compatible hardware rated for the exposure, and inspect the bracket, washers, and surrounding wood. If the fastener line is damaged, replace the compromised wood or repair the connection, then reinstall the bracket. A cosmetic cover leaves the load path unresolved.
Confirm the Bracket Plan Before You Order or Drill
Stop before drilling if the rail-to-bracket-to-framing load path is unclear, or if the supporting wood is rotted. Have a licensed contractor or local inspector assess the connection before proceeding.
- Measure each run. Record the length of every deck or stair section and the rise along stair runs. Use those dimensions to match the railing layout to the porch.
- Check the plan against earlier findings. Use the substrate and exposure details established in the preceding sections, and keep clear photos of the mounting surface and framing or blocking.
- Choose the closest kit size. Match each run to a kit, rounding up to the nearest size so the railing fits.
- Request a matched quote. Send Ultra Modern Rails the measurements and relevant photos, and ask for a quote based on the actual framing, not just the catalog description. Confirm the posts, mounting hardware, cable, and finish options included for your chosen system.
Visit Ultra Modern Rails to review railing options and request a quote for your measured porch or stair runs. Share the measurements and connection details so the proposed system can be considered alongside the bracket and substrate.