

You've chosen the staircase, approved the flooring, and found the image that captures the look you want: slim black posts, open views, and a handrail that seems to float beside the steps. Then the contractor or building official asks a practical question: where is the graspable handrail, how is the system anchored, and does the proposed design meet local code?
That moment is common because a railing for steps has two jobs that can appear to conflict. It must disappear visually into a minimalist interior while remaining obvious and dependable to someone recovering from a slip. The right system balances appearance, hand comfort, structural capacity, material longevity, and the requirements enforced in your jurisdiction.
Table of Contents
- The Reality of Modern Staircase Design
- Decoding Handrail and Guard Requirements
- Graspability and Structural Load Limits
- Evaluating Materials for Longevity and Style
- Measuring and Specifying Your Railing System
- Balancing Minimalist Aesthetics with Safety
- Finalizing Your Stair Railing Decision
The Reality of Modern Staircase Design
A homeowner recently showed a contractor a staircase with glass beside the open edge and a narrow metal strip along the wall. The reference image looked excellent. It preserved the sightline from the entry to the upper landing and kept the stairwell bright. The problem appeared during specification. The proposed strip was too small to function comfortably as a handrail, the glass edge had no confirmed guard connection, and the installer had designed around the picture rather than around the stair geometry.
That project wasn't doomed. It needed the safety components to be designed at the same time as the visual concept. A revised scheme kept the open appearance but added a properly sized graspable rail, reinforced the post locations, and treated the guard and handrail as separate elements. The final result looked nearly as light as the original reference, but it gave the inspector, installer, and occupants something they could trust.
Practical rule: A minimalist stair railing should look simple because the details were resolved early, not because important details were removed.
Open-plan homes have made staircases more visible. A stairwell often sits beside a living room, kitchen, or entry rather than behind a door, so the railing becomes part of the interior architecture. Designers naturally reach for thin profiles, clear panels, cable infill, concealed fasteners, and dark finishes. Those choices can work, but every reduction in visual mass increases the importance of engineering and installation accuracy.
A useful starting point is the difference between design intent and design performance. Design intent describes the desired view, finish, line, and proportion. Performance describes how a person grips the rail, how the posts transfer force into the structure, how openings behave around children, and how the finish handles moisture and daily contact. The two should be developed together. Guidance on contemporary staircase planning, including the relationship between materials, light, and circulation, is available in this overview of contemporary staircase design.
Why late code reviews create expensive changes
Late changes are especially disruptive on stairs because the railing connects several trades. A post may need blocking inside a framed wall, a landing may need a different mounting surface, and a handrail may have to continue through a transition without an awkward break. If those conditions are discovered after drywall, flooring, or glass fabrication, the team may need to open finished surfaces or reorder custom components.
The safer sequence is straightforward:
- Confirm the jurisdiction: Ask the local building department which residential, commercial, accessibility, and fire-safety provisions apply.
- Draw the complete system: Show handrails, guards, posts, infill, landings, returns, and wall clearances rather than presenting only a finish sample.
- Check the user: A family with young children, an older occupant, a public stair, and a private decorative stair don't present the same practical risks.
- Verify the structure: Identify where posts can be fixed before choosing a thin profile or floating appearance.
- Review the final grip: Make sure the element a person will hold is continuous, smooth, and comfortably graspable.
A beautiful railing that fails inspection is a design problem, not an administrative nuisance. A compliant railing that feels awkward or difficult to hold is also an incomplete design. The strongest modern projects make the safety-critical pieces look intentional.
Decoding Handrail and Guard Requirements
The first code question isn't “Which railing style do you like?” It's “Which parts are handrails, and which parts are guards?” They may share posts or a finish, but their functions differ.
A handrail is the graspable member used for balance and support while someone climbs or descends. A guard is the barrier at an open side that helps prevent a person from falling off the stair or landing. Treating a wide decorative top rail as both without checking its grip, height, continuity, and structural performance is a common source of trouble.
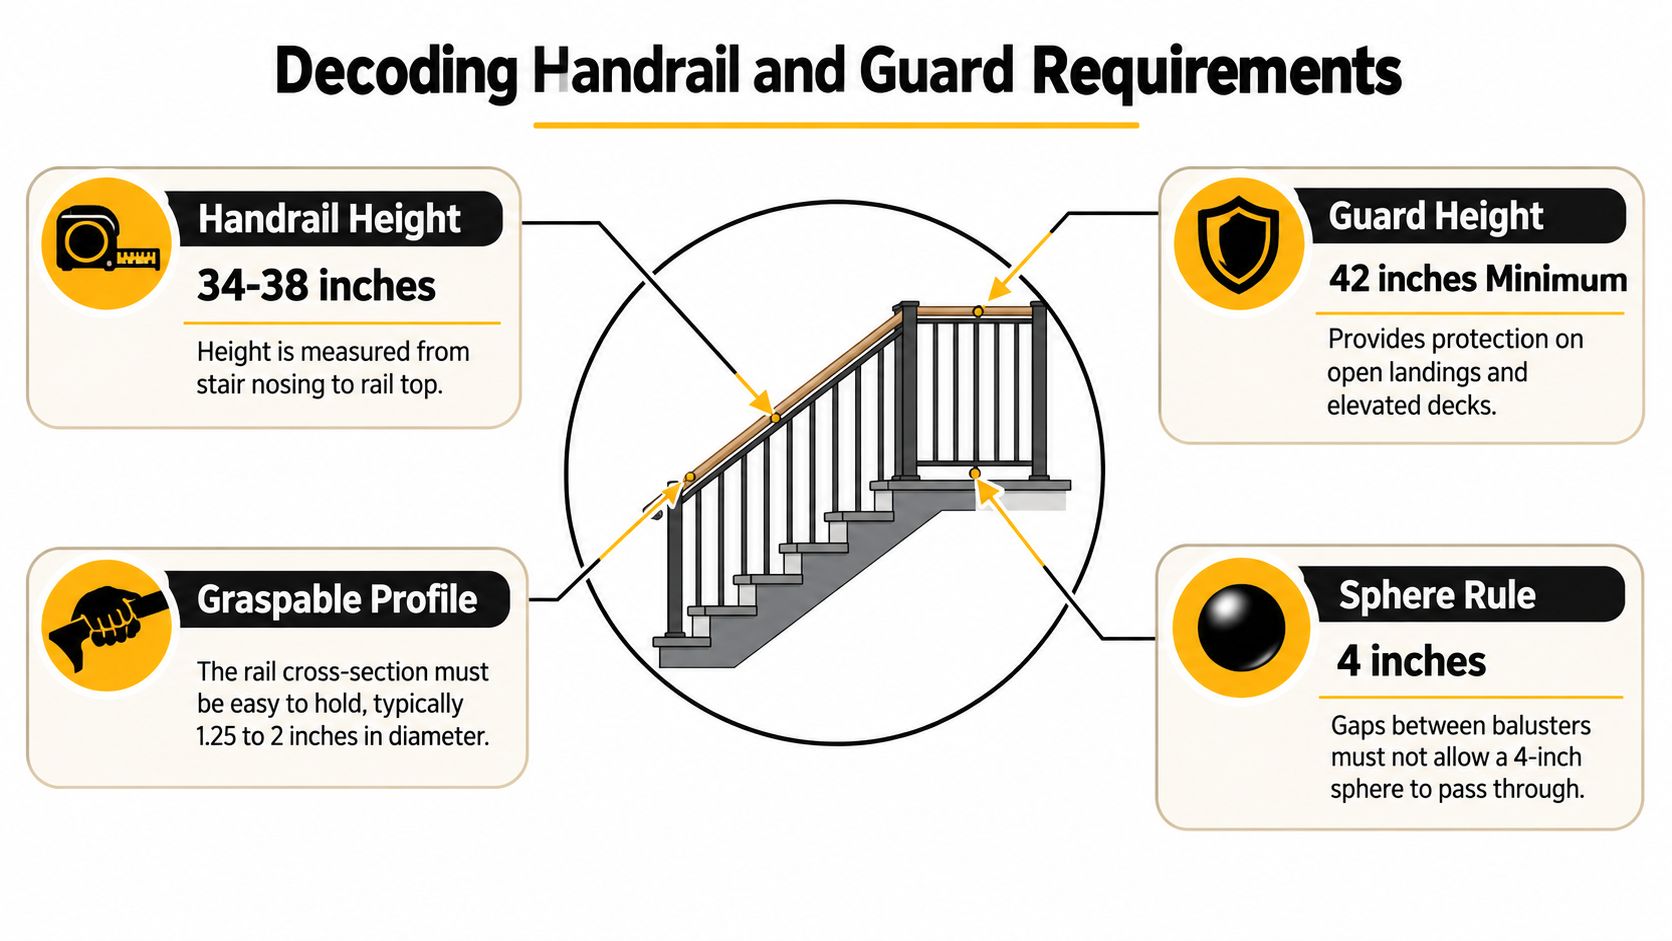
For many residential stair flights, current code summaries require at least one handrail when the flight has four or more risers, with the handrail generally positioned 34 to 38 inches above the tread nosings. The same summaries commonly place residential guards at 36 inches, while public and commercial applications following IBC-style provisions may use 42 inches for guards. These distinctions and dimensions are summarized in this guide to stair railing requirements.
Height is only the starting point
Measure handrail height from the stair nosing line to the top of the rail, not from the finished floor beside the staircase. On an angled run, that means the measurement follows the stair geometry. A rail that looks correctly positioned at the landing can drift outside the permitted range if the installer measures from an unrelated horizontal reference.
Continuity matters just as much. Accessibility-focused guidance from the ADA Access Board's stairway guide describes handrails on both sides of stairs and calls for continuity along the full length of each flight in covered paths. It also addresses extensions, with the rail extending at least 12 inches beyond the top riser and at least one tread depth beyond the bottom where those accessibility provisions apply. A termination that stops exactly at the first or last nosing may look tidy, but it can leave a user without support during the transition onto level ground.
The extension also needs a safe termination. The end shouldn't create a snag point, project into a circulation route, or force the hand around a sharp corner. A returned end, a continuous connection to a wall, or another locally accepted termination may be appropriate, but the authority having jurisdiction should approve the detail.
Openings and guards need their own review
A guard's infill isn't automatically safe because the pattern looks dense. Residential guidance commonly uses a 4-inch sphere limit for openings, meaning the arrangement should not allow a 4-inch sphere to pass through in locations where that rule applies. Cable, picket, glass, and decorative metal systems all need to be checked as installed, including areas near the tread, landing, and post.
Local rules can differ, especially for stairs, guards, and unusual geometries. A design that appears familiar from another state or country may not receive the same interpretation in your project location. Before ordering custom components, provide the local official or qualified code professional with the actual section drawings, not only a product photograph.
Graspability and Structural Load Limits
A handrail can be strong enough to anchor a guard and still be unpleasant or unsafe to hold. Those are separate tests. The first concerns the shape and size that a hand can encircle. The second concerns how the entire assembly behaves when a person suddenly loads it.
For a circular handrail, IRC-based guidance commonly uses an outside diameter of about 1.25 to 2 inches. A non-circular profile generally falls within a perimeter of 4 to 6.25 inches, with a maximum cross-section dimension of 2.25 inches, subject to the applicable code and profile conditions. The purpose isn't to force every project into one visual style. It keeps the rail within a range that a hand can grasp without relying on fingertips or an unstable palm contact. The IRC-based stairway requirements provide the dimensional framework behind these limits.
A broad rectangular shelf may appear elegant beside a floating stair, but it may not perform as a handrail. The same is true of a thin flat bar mounted edge-on. Both can serve as visual or structural components, yet neither should be assumed to provide the dependable grip required during a stumble.
Design the grip and the structure separately
The rail also needs space from adjacent surfaces. OSHA-derived guidance identifies 2.25 inches of minimum clearance from nearby objects and calls for smooth surfaces that don't snag clothing or injure the hand. The HUD handrail inspection standard also reflects the structural requirement for a handrail or stair rail system to resist at least a 200-pound concentrated load applied downward or outward within 2 inches of the top edge.
Those requirements affect more than the handrail tube. They influence:
- Post anchorage: A post fixed only to a finish layer may not transfer force into framing, masonry, or a properly designed stair stringer.
- Bracket selection: Concealed brackets still need a load path. A hidden connection isn't necessarily an engineered connection.
- Post spacing: Longer unsupported runs increase deflection and make cable or top-rail tension more demanding.
- Transitions: Landings, corners, and changes in direction can concentrate force where a simple straight-run detail would be inadequate.
- Clearance: A beautiful rail pressed against a wall can become difficult to grip and difficult to inspect.
A concentrated load isn't the same as a person gently resting a hand on the rail. During a slip, the force can arrive quickly and at an angle. The rail, fittings, posts, fasteners, and supporting structure must work together. Specifying a heavy tube without checking the substrate doesn't solve the problem.
Indoor and outdoor conditions change the detailing
Indoor stairs benefit from a relatively stable environment, but they still experience repeated hand contact, cleaning chemicals, moving furniture, and occasional impact. Outdoor stairs add rain, condensation, ultraviolet exposure, freeze-thaw movement, and, in coastal areas, salt. The correct finish and fastener combination matters as much as the visible rail.
For an exterior installation, prevent water from collecting inside hollow components, isolate dissimilar metals where necessary, and use fastening methods suited to the substrate. For an interior installation, prioritize a smooth hand surface and a finish that won't become abrasive as it wears. Minimalism leaves little visual clutter to hide a failing coating or a loose fitting, so maintenance access should be considered before the final profile is approved.
Evaluating Materials for Longevity and Style
Material selection becomes clearer when the project is judged in two directions: how the railing should look on installation day and how it should behave after years of hands, weather, cleaning, and movement. No material wins every category. Wood can add warmth, metal can sharpen a contemporary line, cable can preserve views, and glass can make an edge nearly disappear. Each choice brings a maintenance and detailing obligation.
Wood and wrought iron
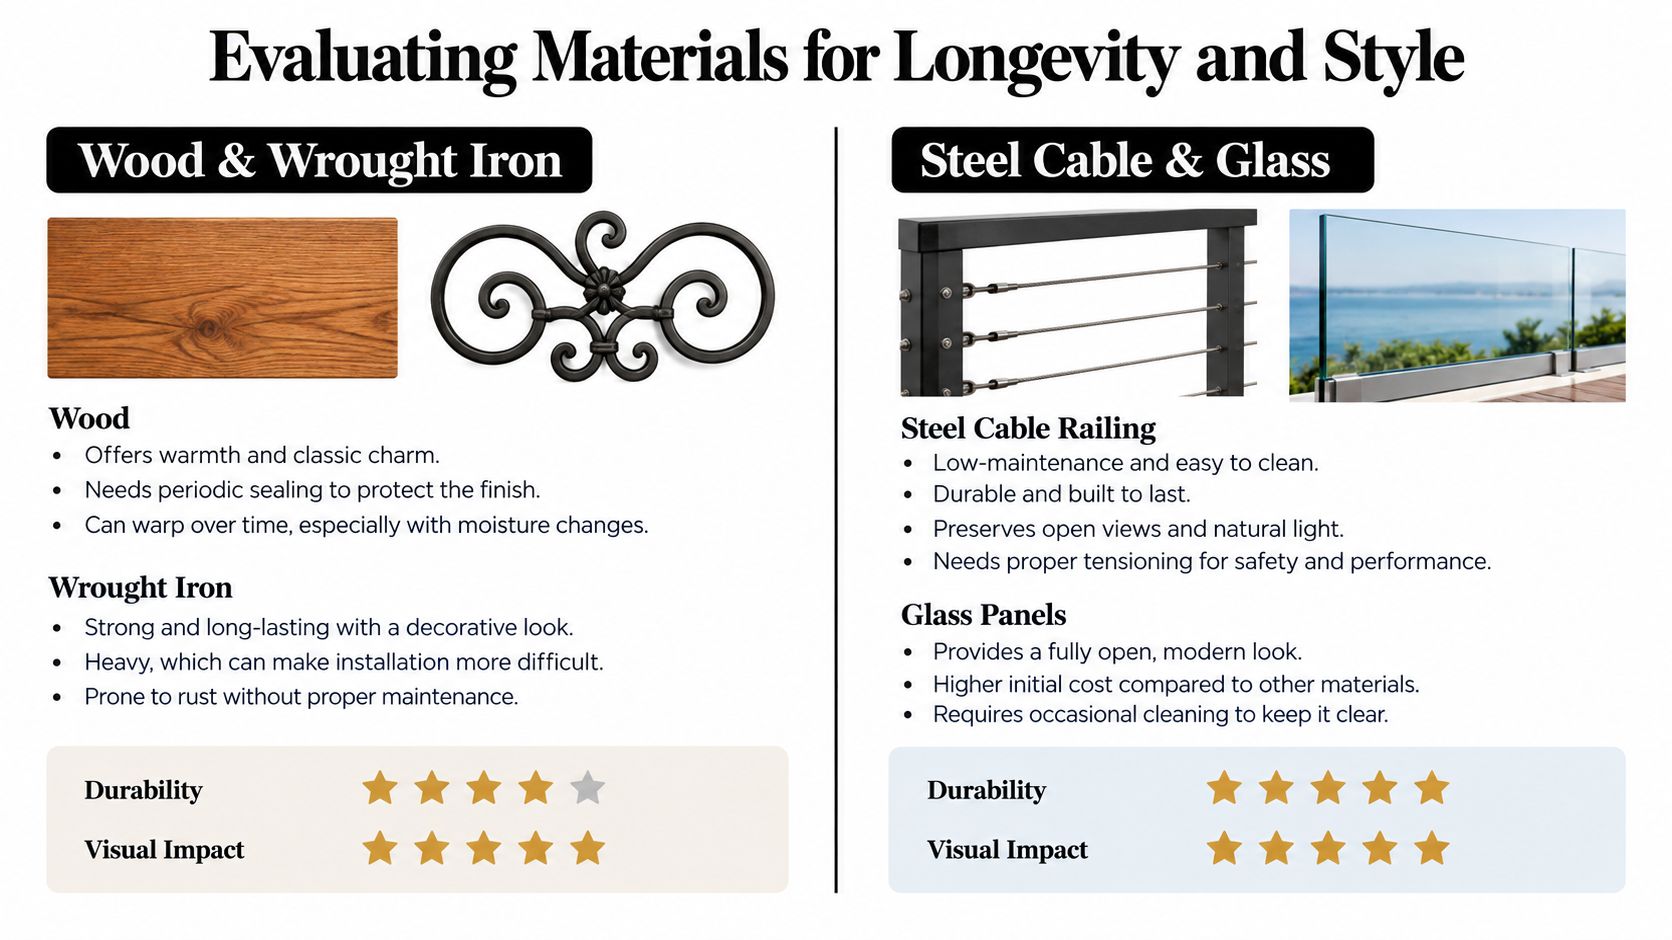
Wood remains compelling where the staircase needs warmth. A timber handrail feels comfortable in the hand, can be stained to complement flooring, and works well in traditional, transitional, and restrained modern interiors. The trade-off is ongoing care. Coatings wear where people grip the rail, moisture can cause movement, and poorly sealed joints can discolor or deteriorate. A wood handrail that looks excellent in a showroom still needs suitable finishing at cut ends, returns, and mounting points.
Wrought iron offers visual weight and decorative character. It can make a stair feel established and substantial, especially with forged curves or traditional pickets. It also needs protection from corrosion, particularly outdoors or in damp spaces. Its mass may work against a light modern interior, and ornate profiles can create more cleaning surfaces than a homeowner expects.
Stainless steel, coated metal, and cable
Stainless steel suits projects that need a crisp line and resistance to routine moisture. It pairs naturally with cable infill, glass, timber, and dark architectural finishes. The precise alloy, surface finish, connection design, and environment still matter. Coastal exposure and aggressive cleaning products can challenge even a well-specified system, so material compatibility should be confirmed rather than assumed.
Powder-coated metal can provide a controlled color and a clean visual block around the stair. It works well when the railing should read as a single architectural element. Inspect edges, drilled openings, welds, and touch points carefully, because damage to the coating can become a maintenance issue if it isn't repaired appropriately.
Cable systems preserve sightlines and use relatively slim infill, but they aren't maintenance-free. Cable must be tensioned correctly, posts must resist the resulting forces, and the installed spacing must satisfy the applicable opening rules. Cable is a good fit for a view-oriented staircase when the owner accepts periodic inspection and adjustment as part of ownership.
Glass gives the most uninterrupted appearance, but it demands careful handling, compatible hardware, and regular cleaning. Fingerprints and dust are more visible on a clear surface than on a dark cable system. Replacement can also be more involved if a panel is damaged.
A practical match looks like this:
| Project condition | Material direction | Main trade-off |
|---|---|---|
| Warm interior with timber floors | Wood handrail with metal or wood infill | Comfort and character require finish maintenance |
| Coastal or exposed exterior | Appropriately specified stainless steel | Higher material and detailing discipline |
| View-focused contemporary stair | Cable or glass | Transparency increases attention to spacing, tension, and cleaning |
| Traditional interior or heritage-style renovation | Wrought iron or stained wood | Decorative presence can reduce visual lightness |
| Commercial stair with frequent contact | Durable metal with a comfortable handrail | Finish and connection details must withstand repeated use |
The right question isn't which material is fashionable. It's which one can deliver the desired visual effect without creating a maintenance routine the owner won't follow. For a closer look at the detailing of stainless steel cable railing, review the system components as carefully as the finish.
Measuring and Specifying Your Railing System
Most ordering mistakes happen before the first post is installed. Someone measures the horizontal distance instead of the stair run, forgets the landing, assumes every post can sit on the finished tread, or orders a rail that ends exactly where the code-required extension begins. A reliable specification starts with the stair as a three-dimensional assembly.
Start with the geometry
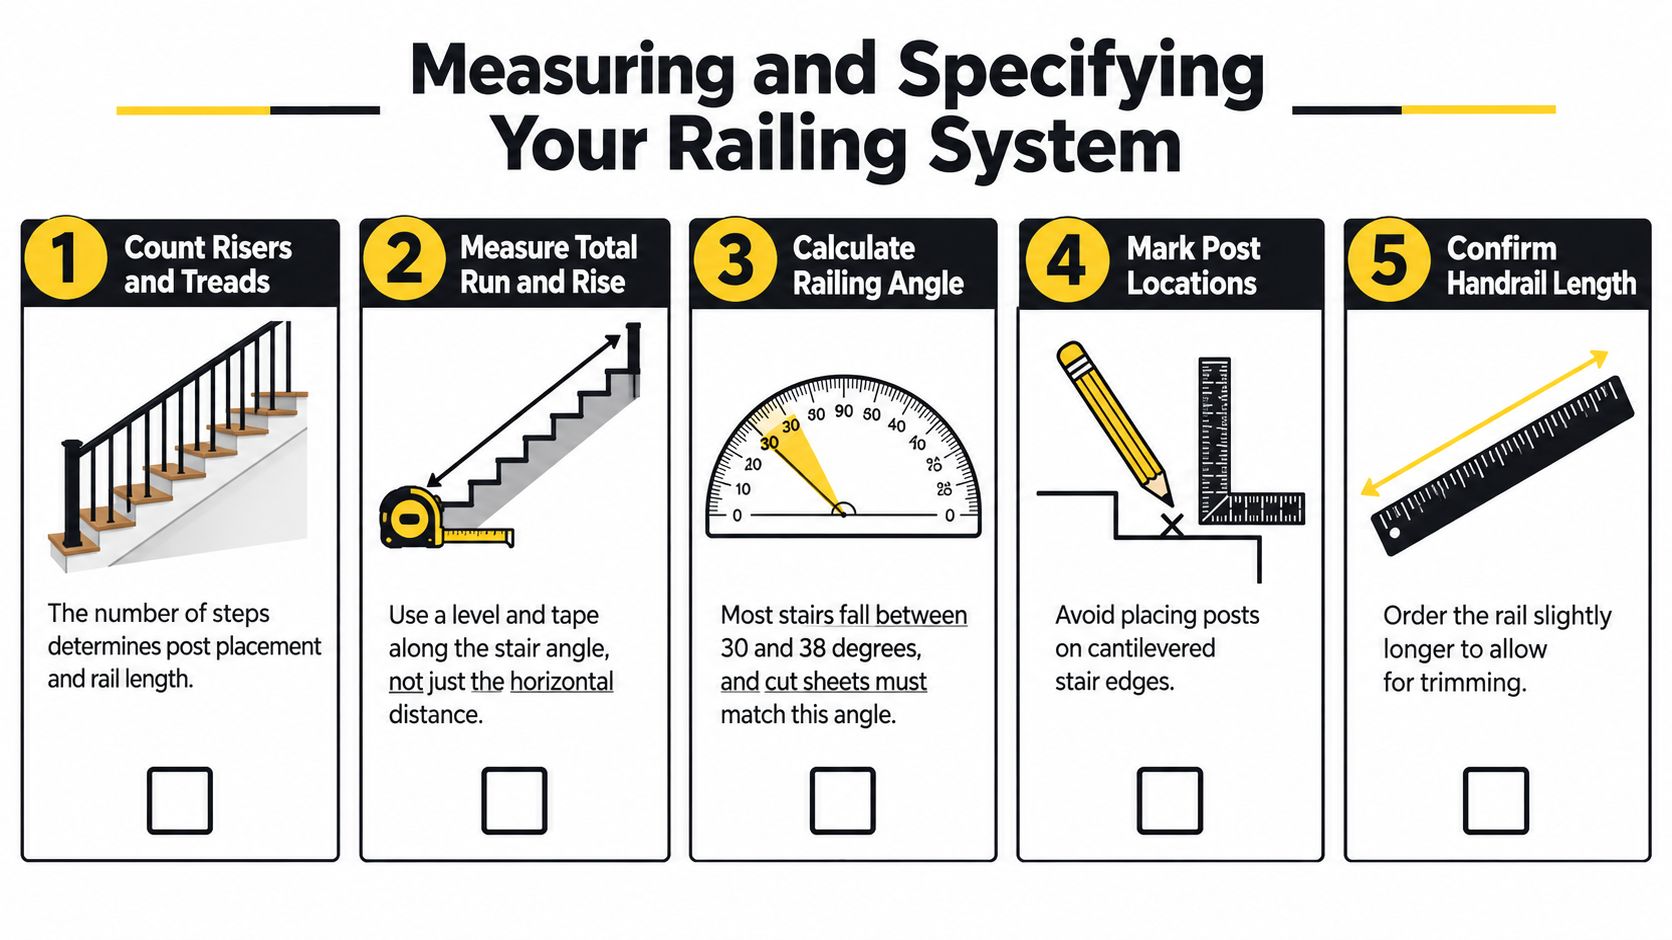
Count the risers and treads. Record the number of risers, the tread depth, the landing positions, and every change in direction. This affects the rail length, post placement, handrail continuity, and the number of transitions.
Measure the actual stair angle. Use a level, tape, and a straight reference along the pitch of the stairs. A horizontal measurement from the bottom nosing to the top landing won't tell a fabricator the length of the sloped handrail. Record the total rise and the sloped run, then confirm the angle required for the cut sheet.
Locate the structural fixing points. Mark the substrate beneath every proposed post. On a framed stair, that may mean identifying stringers, blocking, rim boards, or landing framing. On masonry, confirm the material, edge distances, and appropriate anchors. Don't place a post on a cantilevered edge merely because it makes the elevation look cleaner.
Account for transitions. A stair rail may meet a level landing rail, turn a corner, return to a wall, or stop at an opening. Draw those conditions at full scale where possible. Small errors become obvious when a cable fitting, handrail bracket, or return collides with trim.
Confirm finished dimensions. Measure after accounting for flooring, nosings, wall finishes, and tread overlays. A system designed from the rough framing dimensions can land at the wrong height after the finish materials are installed.
Specify the complete kit
A complete factory-direct package may include posts, top rail, cable or infill, end fittings, tensioners, mounting hardware, and installation instructions. Confirm whether the package includes the tools required to tension and cut the cable, or whether those must be sourced separately. For a stair, also verify that the post bases, handrail brackets, angled fittings, and transition components are designed for the slope rather than assumed to be interchangeable with level-deck parts.
Order length deserves careful attention. A rail or cable that is slightly short may force a visible joint or make the installer move a post. A little extra material can allow trimming, but excessive length doesn't fix incorrect geometry. Ask the fabricator how much adjustment the system provides and which dimensions they need before production.
Measure twice, but submit a drawing once. A dimensioned elevation with post centers, finished tread references, mounting surfaces, and transitions is more useful than a single total length.
Before fabrication, send the supplier:
- A stair elevation showing the pitch and landings.
- A plan view showing wall and open-side conditions.
- Photos of the existing structure and finished surfaces.
- Post centerlines and proposed anchor locations.
- The desired handrail profile, guard treatment, finish, and termination.
- The applicable code direction from the local authority or project professional.
For a contractor or experienced DIY installer, this process prevents missing fittings and reduces field improvisation. It also gives the manufacturer enough information to identify a problem before materials are cut. The embedded installation reference below can help visualize the sequence and component relationship.
The final inspection should include more than a visual walk-through. Check that every fastener is seated, every post is rigid, the handrail is continuous where required, the grip is comfortable, openings meet the applicable rule, and the finished rail doesn't move excessively under hand pressure. If the system relies on cable, inspect tension and spacing after the structure has settled and again after the first period of use.
Balancing Minimalist Aesthetics with Safety
Modern doesn't mean fragile. It means the safety work is often less visible.
Cable railings, slim metal frames, and glass guards can preserve light and views without abandoning protection. The risk appears when a designer treats openness as permission to reduce every dimension. A thin-looking system still needs a properly graspable handrail, secure posts, compliant openings, and a barrier that occupants can't easily climb or dislodge.
Transparency has conditions
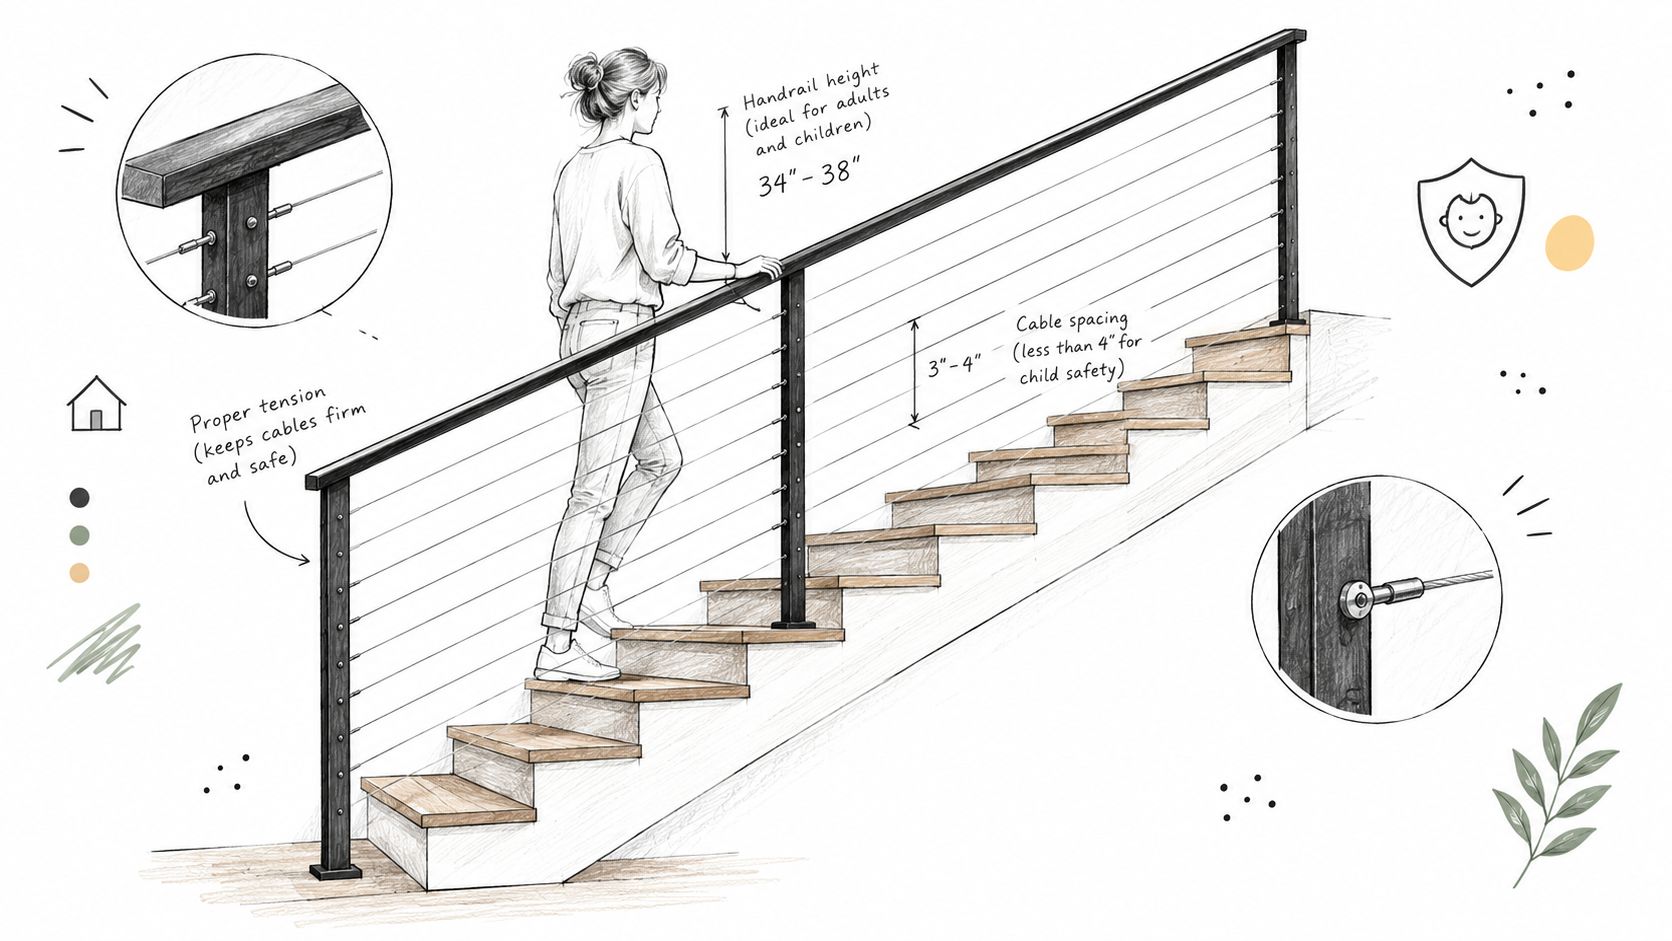
Cable infill works because multiple horizontal lines create a barrier while allowing the background to remain visible. That arrangement must be treated carefully in homes with children. Horizontal members can invite climbing, and an opening that appears small from across the room may not meet the applicable sphere or climbability requirements once the system is installed on a slope.
The 4-inch sphere threshold is a common residential reference for openings, but it isn't the only question. Check the local rule for the precise location, the relationship to the stair treads, and any provisions addressing climbable arrangements. A local code official has the final say, particularly where a project uses an unusual stair profile or combines guard and handrail functions.
Tensioning also changes the performance of a cable system. Cable that is too loose can create excessive deflection or alter opening sizes. Cable that is overtightened can place unnecessary demand on posts, fittings, and the supporting structure. The installer needs the correct sequence, compatible hardware, and access to the tensioning points after the system is assembled.
Keep the handrail visually quiet, not functionally weak
A clean design can use a timber cap over metal posts, a slim stainless steel rail, or a wall-mounted rail that aligns with the guard. The key is to preserve a comfortable grip and a safe clearance rather than forcing the top rail into the narrowest possible shape. A rail can be visually quiet through proportion, color, and alignment. It doesn't need to be physically inadequate.
Households with older adults should pay particular attention to continuity, return details, and hand comfort. Someone descending a stair may need to recover balance quickly, and a sharp termination or interrupted grip can matter more than the overall appearance. Children and pets require a separate review of openings, climbing behavior, and the height and rigidity of the guard.
Minimalism succeeds when the viewer notices the staircase rather than the hardware. Safety succeeds when a user can find, hold, and load the rail without thinking about it. Those goals can coexist, but only when the installer resists the temptation to confuse visual thinness with technical refinement.
Finalizing Your Stair Railing Decision
Choose the system by resolving four questions in order.
First, what does the authority require? Confirm whether the project is residential, commercial, or accessibility-governed, then verify handrail, guard, opening, continuity, extension, and load provisions with the local authority or qualified professional.
Second, what will the stair experience? Interior stairs need a comfortable grip and a finish that tolerates daily contact. Exterior or coastal stairs need material and fastener choices suited to moisture and corrosion exposure. Commercial stairs need details that tolerate frequent use and straightforward inspection.
Third, where can the structure carry the load? Post locations, blocking, stringers, landings, and wall conditions should be established before selecting cable, glass, wood, or a narrow metal profile. A system that can't connect properly to the building isn't a successful custom design.
Finally, what does the owner want to maintain? Wood needs finish care, wrought iron needs corrosion protection, glass needs frequent cleaning, and cable needs correct tension and periodic inspection. Choose the maintenance pattern carefully.
A modern railing for steps doesn't need to look heavy to be dependable. It needs a graspable handrail, a properly supported guard, suitable clearances, compliant openings, and materials chosen for the environment. Ask a specialist for a dimensioned drawing and a code-conscious quote before ordering. That small investment in planning is far less disruptive than rebuilding a finished stair after an inspection or a field failure.
Ultra Modern Rails supplies custom stainless steel and black metal cable railing systems for indoor and outdoor stairs, with options for stair sections, handrails, mounting styles, and wood tops. Request a free custom quote and drawing through Ultra Modern Rails, then provide your stair measurements and project conditions so the proposed system can be reviewed for fit, finish, and installation requirements.