

You're standing on your deck, coffee in hand, and you notice one cable doesn't sit quite like the others. It sags a little, the fitting at the post looks damp, and there's a faint stain where water has been sitting. The cable itself looks fine. That's the moment you realize the small metal parts at each end are doing far more work than they expected. Those parts are stainless steel cable connectors, and they're rarely the simple accessories they appear to be.
Table of Contents
- Why Cable Connectors Deserve Careful Attention
- How Stainless Steel Cable Connectors Work
- Comparing Common Connector Types
- Choosing Grades for Real-World Exposure
- Selecting Connectors for Indoor and Outdoor Railings
- Installing and Verifying the Connector Assembly
- Examples for Decks Stairs and Multi-Rail Runs
- A Connector Selection Checklist
Why Cable Connectors Deserve Careful Attention
A homeowner tightens a loose cable, steps back, and the run looks straight again. A week later the same cable has moved, not because the cable failed, but because the termination at the post wasn't seating cleanly, water was pooling in the fitting, or the hardware on one side didn't match the hardware on the other. That's a common pattern. The cable gets blamed. The connector caused the trouble.
A connector does several jobs at once. It transfers force from the cable into the post. It sets the cable direction as the run leaves the post. On adjustable fittings, it also permits tensioning and later retensioning. If any of those jobs is mismatched to the post, the anchor, or the cable construction, the connector becomes the limiting part of the guard, even when the cable has plenty of strength left.
Matching Diameter Is Only the First Check
It's tempting to shop by cable diameter alone. Two fittings can accept the same cable size and still differ in thread, bore depth, mounting style, and how they'll sit against a post face. Treat the cable, fitting, anchor, post, and mounting method as one assembly, not five separate purchases.
The diagram below shows why detailing matters inside the fitting itself, where you can't see trouble starting.
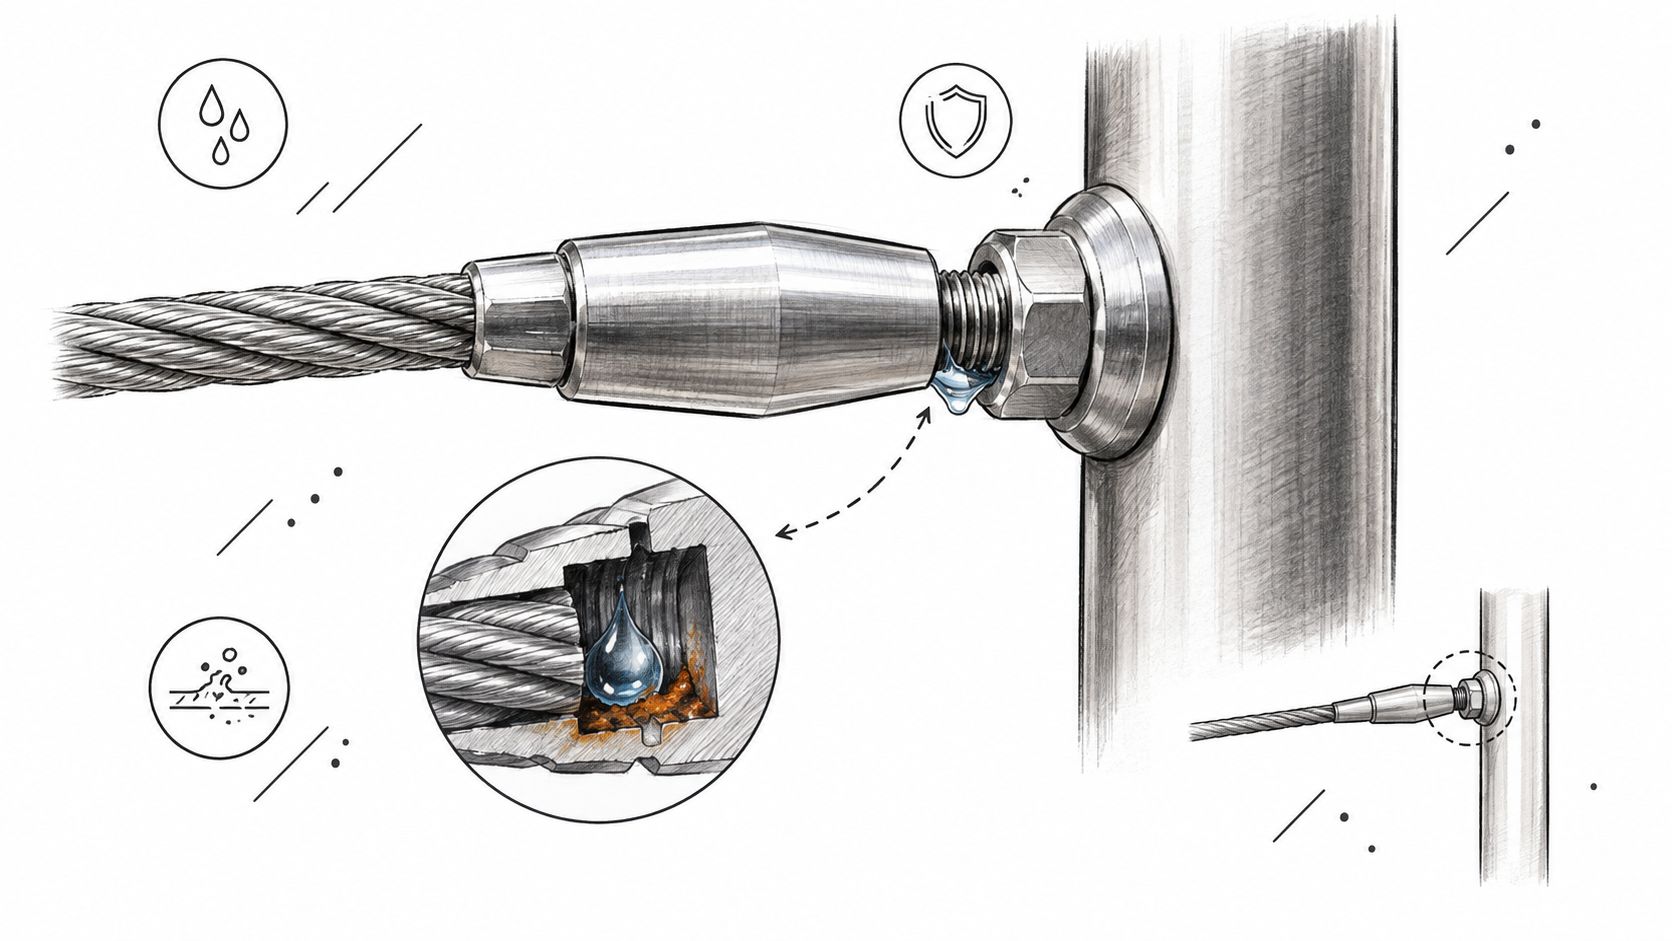
Keep one boundary clear as you read. Architectural railings aren't lifting gear or fall arrest systems, and rules written for those uses don't automatically govern a deck guard. They're useful later in this guide only as engineering context, showing why engineers evaluate the complete assembly rather than the rope alone.
Field observation: When a cable run looks wrong, check the ends before you blame the span.
That habit, looking at the ends first, will guide every decision that follows.
How Stainless Steel Cable Connectors Work
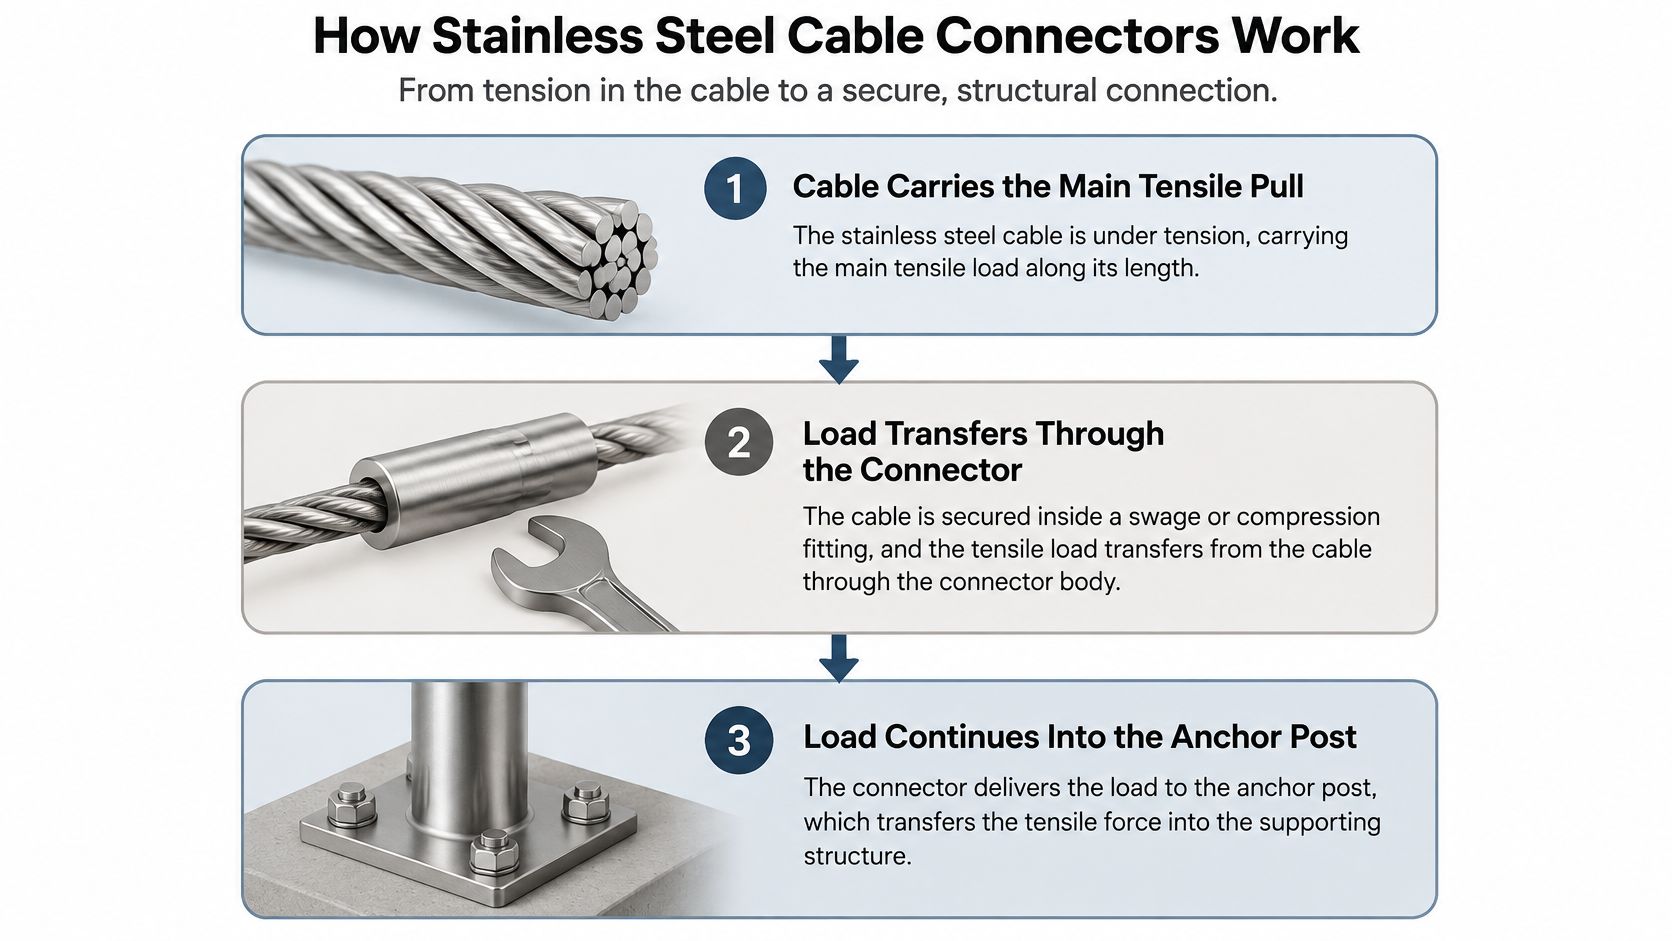
Follow a single cable from the middle of the span toward the post. Out in the open, the cable carries a straightforward pull along its length. When it reaches the fitting, that pull has to change hands. The connector grips the cable, the grip transfers load into the connector body, and the body transfers it into an anchor, a post wall, or a threaded insert, which finally passes the force into the deck or building frame.
Think of it as a relay. The cable runs the longest leg, but the race is lost at a bad handoff.
The Parts in the Load Path
A termination is where a cable ends and connects to something. Some terminations are fixed. They hold the cable end at a set length and don't adjust. Others are adjustable, so the installer can draw the cable tighter or release it later.
- Swage style fittings: The cable inserts into a sleeve or stud, and a press compresses the fitting onto the cable for a permanent grip.
- Threaded studs: One end grips the cable, the other end threads into a receiver or turnbuckle body to allow adjustment.
- Turnbuckles: A body with opposing threads draws two ends together or apart as you rotate it, introducing or relieving tension.
- End fittings: Eyes, forks, and similar shapes connect the termination to a bracket, post, or anchor point.
Compatibility Has Several Dimensions
Readers often confuse five separate measurements. Cable construction describes how the strands are laid up. Cable diameter is the thickness of that cable. Thread or bore size describes the fitting. Mounting hardware connects the fitting to the post. Post attachment describes how that hardware anchors into the structure. A match on one dimension doesn't guarantee a match on the others.
That's why a fitting can thread in smoothly and still be wrong. It may grip a cable construction it wasn't made for, or bottom out before the cable seats fully.
A connector isn't a universal adapter. It's one link in a load path that only works when every link was chosen for the same assembly.
With that mental model, you can read a drawing or a kit list and spot where a fitting is being asked to do more than its designer intended.
Comparing Common Connector Types
No single fitting family wins everywhere. The right choice depends on rail geometry, how much room you have at the post, whether you need field adjustment, and how you'll inspect and replace the part years later.
Common Stainless Steel Cable Connector Types
| Connector Type | Core Function | Adjustability | Water Behavior | Best Considered For |
|---|---|---|---|---|
| Swage terminal | Permanent compressed grip on cable end | None after pressing | Smooth profiles shed water, but the bore can hold moisture if pointed upward | Straight runs with measured lengths |
| Threaded stud | Grips cable and threads into a receiver | Moderate, limited by thread length | Exposed threads need cleaning access | Runs needing modest adjustment |
| Turnbuckle | Draws two ends together to tension cable | High within its travel range | Body joints can trap water if not drained or oriented well | Longer runs and retensioning access |
| Loop and eyelet assembly | Cable forms a loop secured back to itself | Low, mostly set at installation | Loop crevices can retain dirt and water | Simple terminations where space allows a loop |
| Ferrule style fitting | Sleeve compressed to join or terminate cable | None after compression | Compact, but seams can collect moisture | Compact ends where tools are specified by the manufacturer |
Swage terminals need the correct press and die, and the grip can't be undone for a second try. That permanence gives a clean, compact end, but it punishes a measurement error. Threaded studs forgive small errors because the thread absorbs them. Turnbuckles forgive more, and they stay useful later when a cable needs retensioning, though they take up more visual and physical space at the post.
Loop assemblies use more room and create a bend in the cable, so they rarely suit tight architectural posts. Ferrule style fittings are compact and quick where the manufacturer specifies them, yet an undersized or badly compressed ferrule is a weak grip dressed as a finished one.
Two fittings that look alike on a shelf aren't automatically interchangeable. Bore depth, thread pitch, and the cable construction each fitting was designed for can all differ. If you're comparing hardware sets, review the components as a matched system in this guide to cable rail hardware components.
A complete system such as the Cable Railing - Indoor Stainless Steel 36" or 42" System - High End Custom Railing illustrates the kit approach, supplied with pre drilled mounting posts, mounting bolts, a top handrail, and marine grade 316 stainless steel cable and cable hardware. Whether you buy a kit or individual parts, the test is the same. Every component should be specified to work with the others.
Choosing Grades for Real-World Exposure
You'll hear a short rule everywhere. Use 316 stainless steel. It's a reasonable starting point for cable and hardware, especially outdoors, but it isn't a complete selection method. Verify the actual grade and finish of every component, including the small fasteners. A cable in one grade paired with fasteners in another is a mixed assembly, not a uniform one.
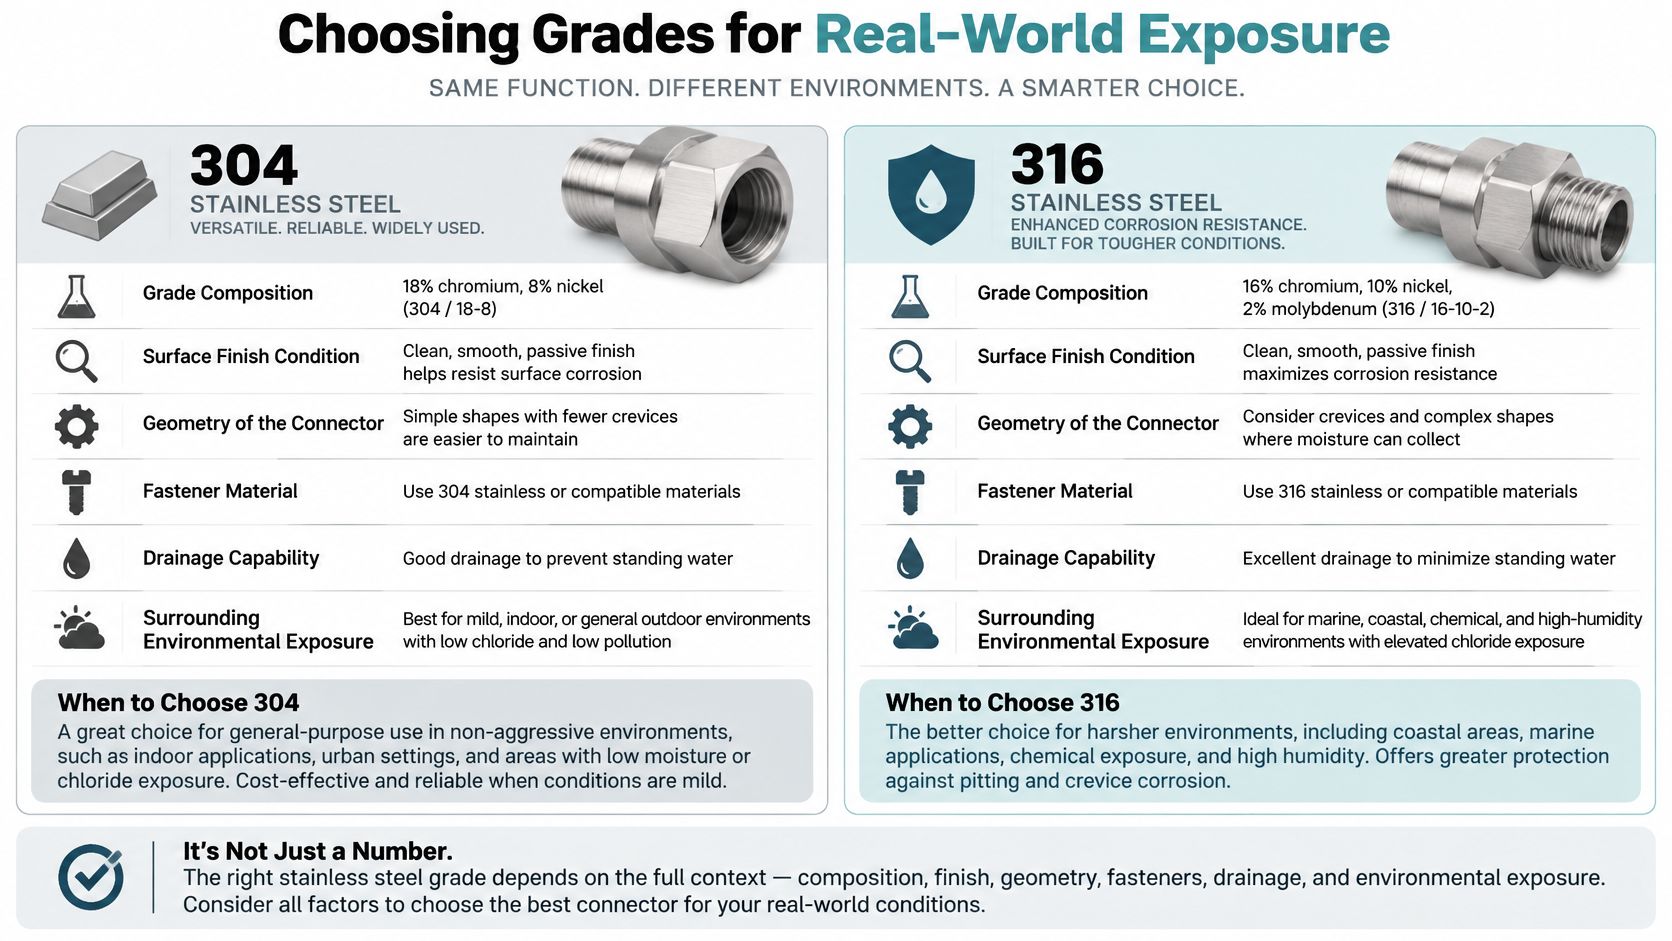
Now compare two fittings of the same grade. One sits exposed where rain washes it and air dries it. The other sits in a shaded pocket where a washer, a post face, and a fitting shoulder create a tight crevice. That crevice holds stagnant water and dirt. Conditions inside it stay wet long after the open surfaces dry.
Why Crevices Change the Answer
Neutral guidance on stainless contact notes that stagnant water, dirt, covered areas, and permanently humid crevices can substantially accelerate galvanic and localized corrosion, and it recommends stainless steel fasteners when joining stainless components, as set out in the worldstainless guidance on contact with other materials. Inside an oxygen depleted crevice, the protective passive film on stainless can't readily repair itself. The bulk metal can look sound while the hidden surface deteriorates.
This explains a frustrating field result. Upgrading from 304 to 316 may not fix a connector failure caused by trapped chloride solution in a badly drained detail. The grade improved. The geometry didn't.
Mixed Metals and Cleaning Access
Where stainless meets aluminum posts or brackets, plan for dielectric isolation so the two metals aren't in direct contact in a wet environment. Use stainless fasteners with stainless components. Then ask a plainer question. Can you reach this fitting with a cloth? A connector you can't clean will hold salt and grime exactly where it's most vulnerable. For background on how corrosion develops on railing metals, see this overview of stainless steel and steel corrosion.
Grade, surface condition, geometry, drainage, and exposure have to be judged together. That's the layered decision, and it beats any single number stamped on a box.
Selecting Connectors for Indoor and Outdoor Railings
Selection gets easier when you start with the room or the weather, not the catalog page. A dry interior run in a stairwell places appearance and compact mounting first, because the fittings stay dry and cleaning is easy. Move that same railing to a covered porch and the priorities shift. The fittings avoid direct rain, which sounds protective, yet they also miss the washing that rain provides, so dust and humidity linger in joints.
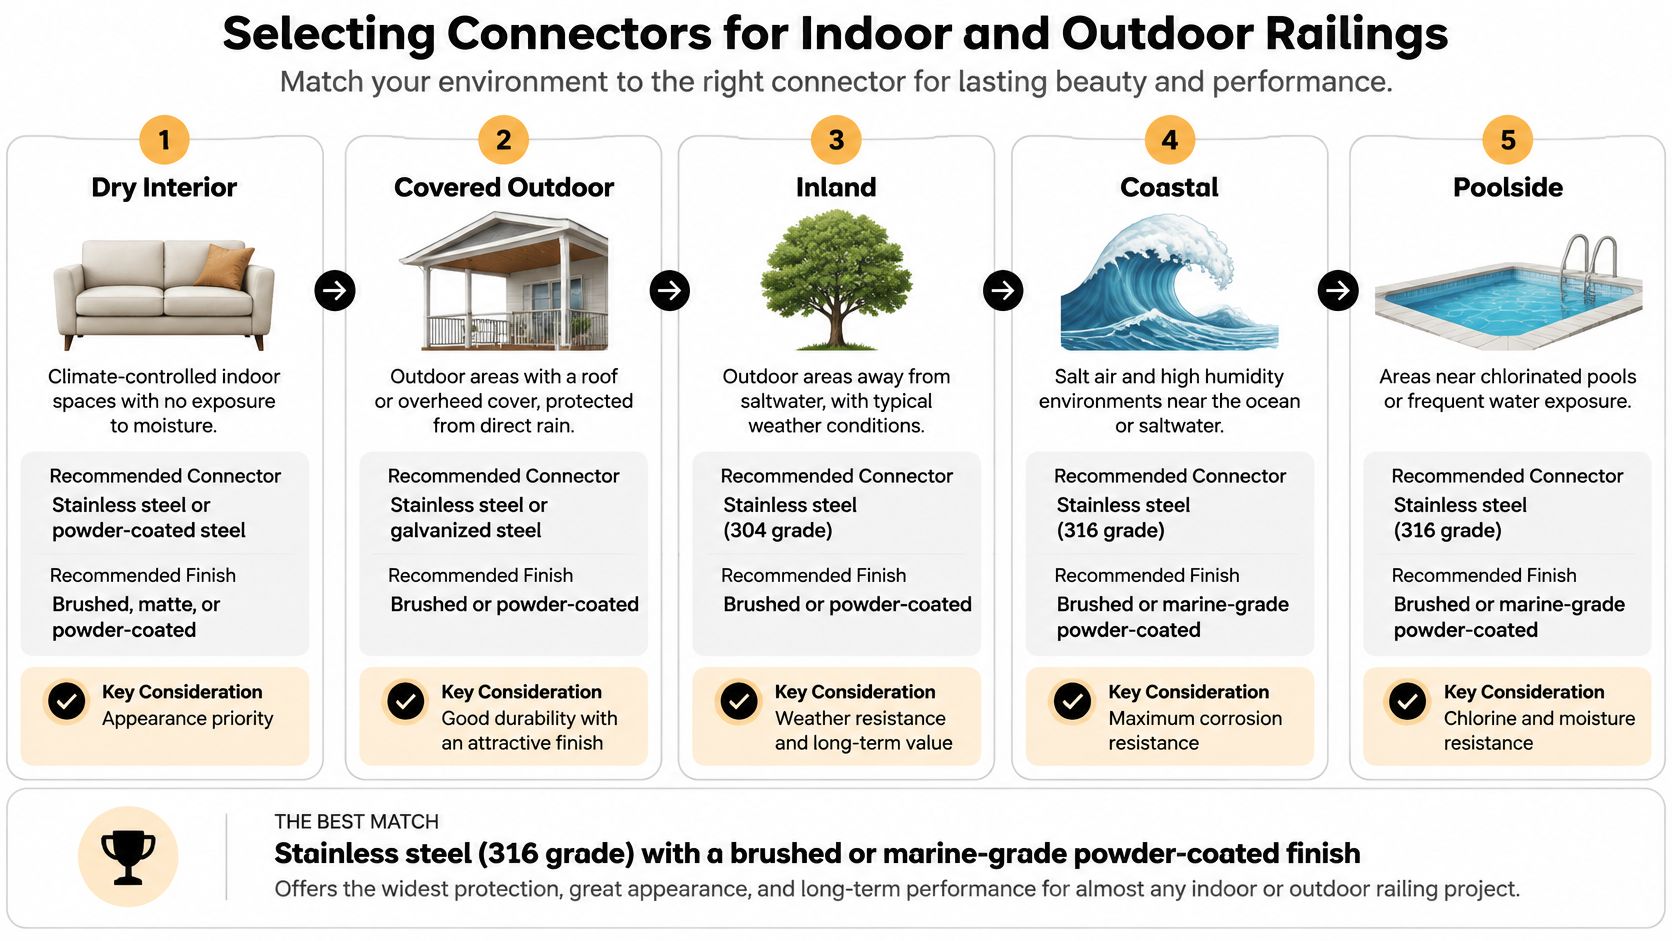
Inland outdoor sites add wet and dry cycles and seasonal movement. Coastal sites add airborne chlorides. Poolside sites combine chlorides with splashing, standing water on horizontal surfaces, and chemicals. In those last two settings, scrutinize crevices, stagnant water, and mixed metal contact even when the cable is labeled marine grade. The cable label doesn't describe the pocket behind a washer.
Five Questions for Any Scenario
- Can it drain: Does the fitting orientation let water escape, or does it form a cup?
- Can you inspect it: Can you see the cable entry, threads, and seating without dismantling the post?
- Can you adjust it: Is the adjuster reachable with tools after the handrail is installed?
- Does it avoid incompatible contact: Are dissimilar metals separated where they'll get wet?
- Does it match the assembly: Do cable construction, post hardware, and anchor type all align with the manufacturer's specification?
Budget belongs in this conversation, but spend it where exposure is harshest. A hidden, cheap fitting in a wet coastal post costs more to replace than a better fitting cost to buy. Ultra Modern Rails systems, for example, use stainless steel cable and hardware across indoor and outdoor applications, which reflects the assembly approach. No single product answers every site. Carry the five questions into your quote or contractor conversation and ask the supplier to answer them in writing.
Installing and Verifying the Connector Assembly
Good installation starts before a cable is cut. Confirm the cable and connector are intended to work together, measure the run including what the fittings will occupy, and read the manufacturer instructions all the way through. Prepare the post and anchor next. A precise termination anchored into a poorly prepared post is still a weak assembly.
Position turnbuckles and other adjusters where you can reach them later, not buried behind trim. Work through cables in a sequence that keeps spacing even as tension builds. If you tension one cable fully while its neighbors hang loose, the post and the spacing both distort, and you'll chase that distortion across the run.
Follow the Specified Method, Not a Generic One
Drilling, cutting, and compression are preparation steps that depend on the connector method you've selected. Use the tools, dimensions, and procedures the manufacturer specifies, because there's no universal compression setting across fitting brands. This practical guide to crimping stainless steel cable shows why tool and fitting pairing matters.
Broader safety practice supports the same discipline. OSHA's 2004 interpretation concerning wire rope clips on horizontal lifelines stated that the system must be designed, installed, and used under a qualified person's supervision and maintain a safety factor of at least 2, and it emphasized that the number, type, and location of clips must withstand anticipated forces, per the OSHA standard text at 1926.1414. A railing isn't a lifeline, but the principle transfers. Attaching a part isn't the same as proving an assembly.
Equal looking tension doesn't mean equal performance. Cables can appear straight while fittings carry very different loads.
Related occupational rules make a similar point with a minimum design safety factor of 5 for common sizes of running wire used as falls or in light load slings, and they require following manufacturer ratings kept available for inspection, under the OSHA cargo handling gear rules at 1917.42. Again, that's lifting context, not railing law. It shows why ratings and documentation aren't paperwork for its own sake.
Commissioning the Finished Guard
Check alignment, connector seating, post behavior under tension, uneven spacing, exposed threads, and your access for future retensioning. Architectural guidance identifies ASTM E985 and ASTM E935 as relevant railing performance standards and recommends specifying cable construction and fastening components, as summarized in the continuing education course on cable railing systems. You're not just tightening a fitting. You're commissioning a guard.
Examples for Decks Stairs and Multi-Rail Runs
A straight deck run is the forgiving case. Cables run level, spacing repeats predictably, and the installer can place an accessible adjuster at one end of each run and a fixed termination at the other. Inspection is simple. Sight down the run and look for the cable that breaks the pattern, then check its ends.
Stairs change the geometry. Cables meet posts at an angle, so a fitting designed for a straight pull may bear against a post hole edge or exit at a bend it wasn't shaped for. Stair posts, cable ends, and the handrail line have to be checked together, because a termination that clears the post beautifully on a level run can foul the handrail transition on a rake. Angled or swivel capable details exist for this reason, and the manufacturer's stair instructions should drive the choice.
Corners create a third condition. A run that turns needs either a termination at the corner post or a deliberate pass through detail, and each choice changes tension behavior on both sides. Tension one side without accounting for the other and the corner post tells you about it.
Multi rail projects in hotels, restaurants, bars, and other large environments add a management problem to the geometry problem. A project manager should compare a supplier's system components, mounting styles, measurements, and included hardware across every section, straight and stair, before approving the order. Consistency matters. One substituted fitting type midway through a large job creates two inspection routines, two adjustment methods, and a maintenance team that has to remember which is which.
The transferable lesson is simple. The same connector family behaves differently when the run is straight, angled, or turning. Select for the condition in front of you, and keep the inspection method consistent across the project.
A Connector Selection Checklist
Use this sequence before you buy, before you install, and after the tools are put away.
Before Purchase
- Verify the pairing: Confirm cable construction and diameter against the connector specification, not the product photo.
- Confirm grade and finish: Check every component in the assembly, including fasteners and washers.
- Check the post and anchor: Make sure the mounting method suits your post material and structure.
Before Installation
- Review drainage and crevices: Orient fittings so they don't hold water, and separate incompatible metals.
- Plan maintenance access: Place adjusters where you'll reach them in five years, not just today.
- Document the instructions: Keep manufacturer procedures, ratings, and torque or compression guidance with the project records.
After Installation
- Inspect the assembly: Look at seating, spacing, alignment, post movement, and uneven tension across the run.
- Schedule follow up checks: Seasonal movement can change tension, so plan a post installation review rather than assuming the first setting is permanent.
Your local requirements and the authority having jurisdiction govern the installed guard. The OSHA lifting and lifeline examples in this guide are engineering context only, not railing approval. Treat stainless steel cable connectors as critical guard system components, and they'll stop being the parts that surprise you.
If you're planning a deck, stair, balcony, or commercial railing and want the cable, connectors, posts, and hardware specified as one matched assembly, Ultra Modern Rails offers custom made stainless steel cable railing systems for indoor and outdoor use with a free custom quote and drawing. Share your measurements and exposure conditions, including coastal or poolside locations, and get a system built to your sections, mounting style, and handrail choices.