

You're usually standing at the same point when this question comes up. The posts are in, the cable has been cut, the fittings are on the bench, and the job feels almost done. That's when people rush the crimp.
A bad stainless steel cable crimp rarely announces itself right away. It can look straight, feel snug, and still be wrong. Then the cable slips later, the end fitting loosens under tension, or corrosion starts where the compression was off and nobody noticed because the railing still looked clean from six feet away.
That's why I treat the crimp as the termination, not the last little step. If the joint is wrong, the rest of the system doesn't matter much.
Table of Contents
- Understanding Stainless Steel Cable Crimps
- Essential Tools for Cable Railing Termination
- Step-by-Step Crimping and Termination Techniques
- Testing Tension and Inspecting for Integrity
- Maintaining Stainless Steel Cable Systems
Understanding Stainless Steel Cable Crimps
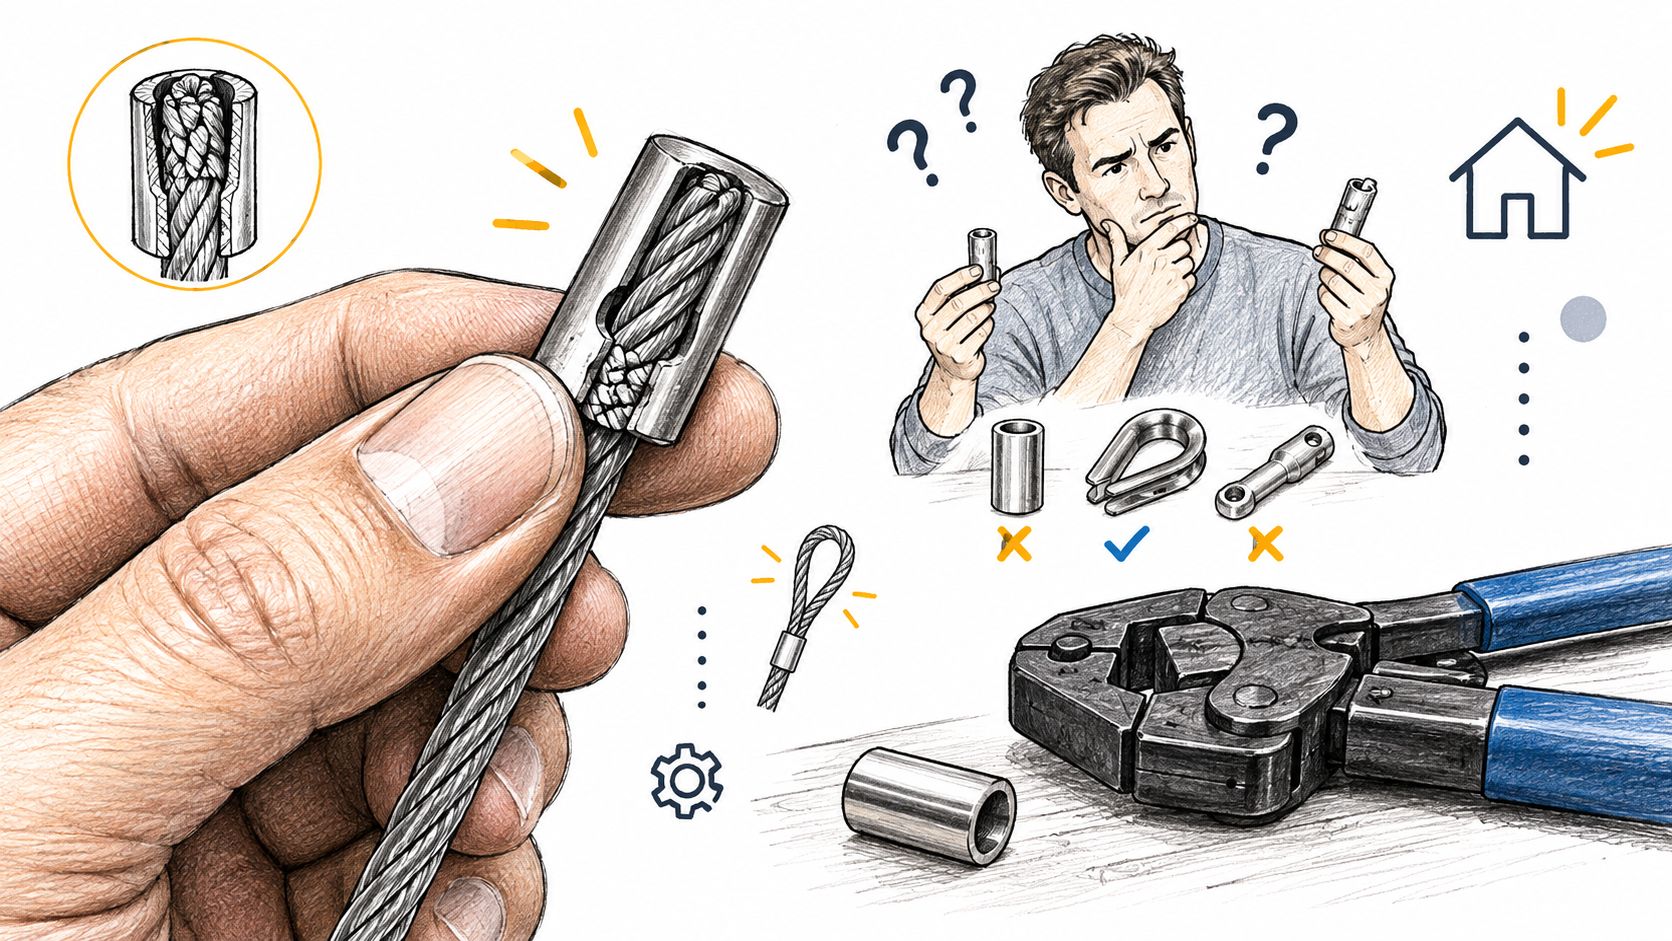
A stainless steel cable crimp is the permanent compressed joint that locks wire rope to a sleeve, ferrule, lug, or terminal so the cable can transfer load into the rest of the assembly. In railing work, that usually means stainless wire rope terminated into a fitting that anchors inside or against a post.
People mix up the terms all the time. They'll call every end fitting a swage, every sleeve a ferrule, and every compression step a crimp. In practice, what matters is simpler than the vocabulary. You have cable, you have a fitting or sleeve sized to that cable, and you have a tool that permanently compresses one into the other.
What the crimp actually does
The crimp is the load-transfer point. It's where the cable stops being a loose strand assembly and becomes part of a structural connection. If the compression is correct, the cable and fitting act like one unit under pull. If it's wrong, the termination can fail even while the cable itself is still perfectly good.
That's why I tell installers to stop thinking of crimps as hardware accessories. They're joints. Permanent ones.
Practical rule: If you're uncertain whether you're buying a fitting, a sleeve, or a complete crimped terminal, stop and match the cable diameter, fitting type, and tool requirement before ordering anything.
A lot of confusion starts with two different project styles:
- Pre-formed terminal systems use factory-made or purpose-made end pieces designed for a specific post connection.
- Continuous wire spool work starts with raw cable and creates the termination on site with a ferrule or swaged fitting.
Both can work. The difference is who controls the final joint. If you're crimping on site, you own the result.
Why this matters before you ever squeeze the tool
In high-reliability applications, crimping isn't treated as a casual deformation step. The ECSS crimp standard for spacecraft wire connections requires the crimped assembly to achieve 75% of the intrinsic wire strength and reflects a process-driven approach to crimp integrity. That same standard also shows how mature crimp tooling has become, with tools covering 0.75 to 400 mm² for stainless-steel tubular lugs and connectors.
Railing work isn't spacecraft work, but the lesson carries over. Good crimps are engineered joints with measurable outcomes, not guesses.
If you're sorting through fittings and trying to understand what belongs together, a good starting point is this guide to stainless steel cable railing hardware.
The most common misunderstanding
Homeowners often focus on the visible hardware and ignore the hidden compression point. Contractors who know better do the opposite. The visible fitting can be beautiful and still be attached to a bad crimp.
That's why the failure is often silent. The cable doesn't need to snap for the termination to be wrong. It only needs to be compressed off-spec, partially inserted, or matched to the wrong die.
Essential Tools for Cable Railing Termination
The right tool kit doesn't make you careful, but it does remove a lot of avoidable failure points. Most bad crimps come from one of three things: the wrong cut, the wrong compression, or no real inspection after the squeeze.
The core kit
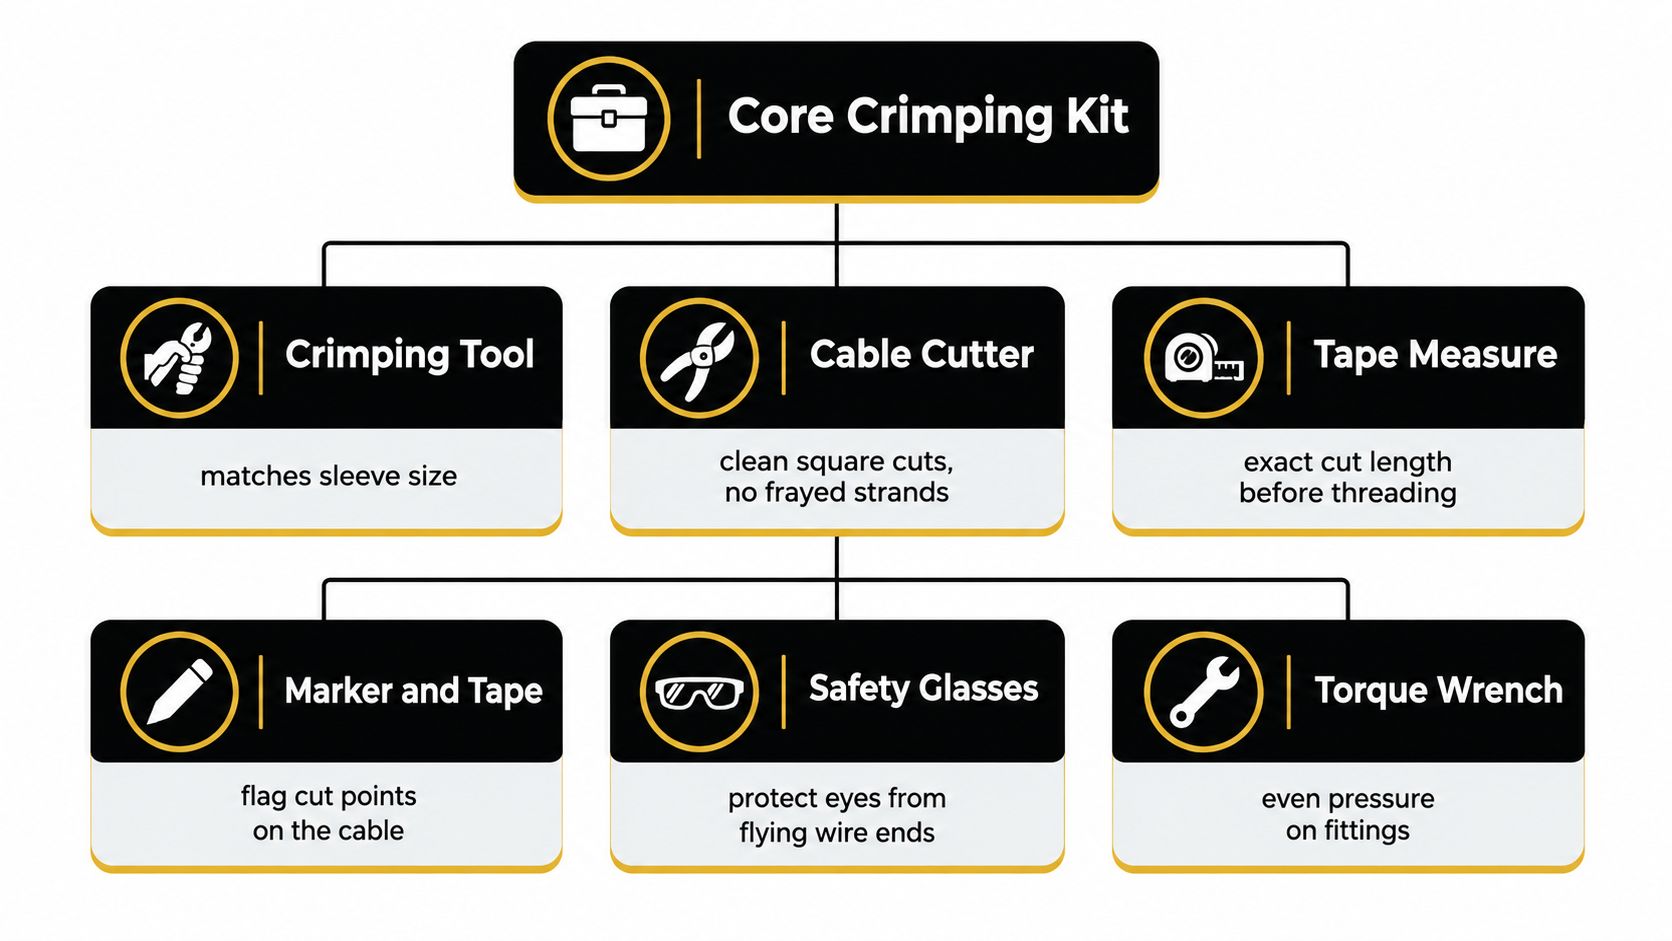
For most cable railing terminations, this is the minimum setup that gives you control.
- A matched crimping tool. Hydraulic crimpers are usually the smarter choice for repeatable compression on stainless fittings because they apply force more evenly than improvised hand tools.
- A true cable cutter. You want a clean, square cut. Flattened or frayed cable ends make full insertion harder and hide strand damage.
- A tape measure and marker. Crimping mistakes often start at layout, not at the tool.
- Safety glasses. Fresh-cut wire ends can kick strands unexpectedly.
- Go or no-go gauge, or the fitting maker's dimensional check method. If you don't verify the finished crimp profile, you're trusting appearance too much.
If you're still building your setup, this overview of stainless steel cable cutters helps separate proper wire rope cutters from general-purpose snips that deform the strands.
Manual versus hydraulic
A manual hand crimper can work for light-duty jobs if it's built for the exact fitting system you're using. The problem is consistency. Stainless hardware isn't very forgiving, and hand pressure varies more than people think, especially late in the day or on overhead work.
Hydraulic tools solve that by reducing operator variation. You still need the correct die and the correct sequence, but the tool does a better job delivering repeatable compression.
Here's the trade-off in plain terms:
| Tool type | What it does well | Where it falls short |
|---|---|---|
| Manual crimper | Works for smaller jobs and tighter budgets | Easier to undercrimp or apply uneven pressure |
| Hydraulic crimper | Better repeatability and cleaner production workflow | Requires correct dies and more setup discipline |
Tools that get skipped too often
The most overlooked tools aren't expensive. They're the verification tools.
- Dimensional check tools matter because a crimp can look centered and still be wrong.
- Calibration records or at least a calibration habit matter because a worn tool lies.
- Pull test setup matters because some failures only show up when the cable sees load.
The expensive mistake isn't buying the right crimper. It's building a whole run with the wrong one.
One practical option in the market is ordering a railing package that already matches cable and hardware specifications. Ultra Modern Rails supplies custom stainless steel cable railing systems that pair cable and termination components within one system, which can reduce mismatches during procurement. That doesn't replace tool discipline, but it does simplify material coordination.
What doesn't work
I've seen people try to finish stainless steel cable crimps with generic pliers, bench vises, and off-brand dies that “look close enough.” That approach usually leaves one of two problems. Either the sleeve never reaches the intended compression, or it gets crushed into a shape that damages the strands.
Neither is acceptable. Stainless isn't soft, and the margin for guesswork is small.
Step-by-Step Crimping and Termination Techniques
Most failed terminations don't fail because the installer skipped every step. They fail because one step looked good enough and wasn't. A cable can be measured right, cut cleanly, and still end up with a bad crimp because the insertion stopped short or the die profile didn't match the sleeve.
That's why the process has to be deliberate from the first mark on the cable.
Start with layout, not force
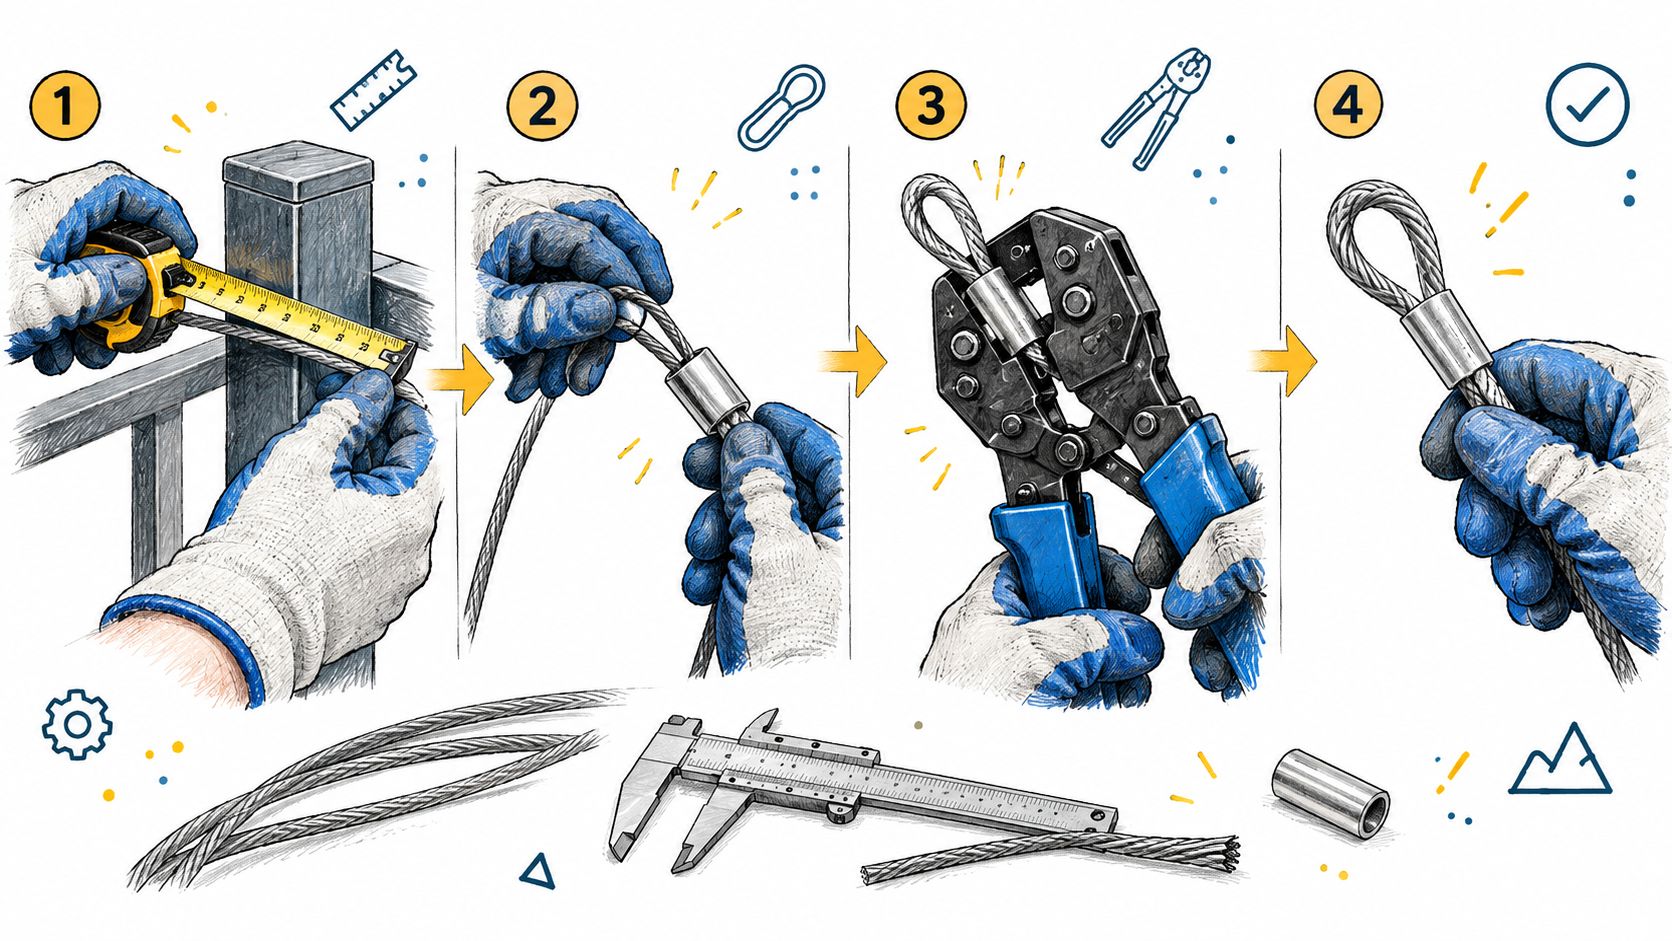
Before the tool comes out, confirm your end condition. Are you terminating into a threaded stud, a lag receiver, a turnbuckle body, or a plain ferrule loop? The answer changes how much cable you need and where your finished fitting will land relative to the post face.
Then mark the cable carefully. Not vaguely. Carefully.
A short miss at this stage turns into a long problem later. If the cable ends up too short, the fitting won't engage correctly. If it's too long, some installers try to “take it up” at the hardware, which often leaves a cramped or misaligned termination.
Make a clean cut and preserve the strand shape
Cut the cable with a proper wire rope cutter so the end stays as square as possible. Stainless wire rope likes to spring and splay if you use the wrong cutter. Once the strands open up, insertion gets harder, and some people start twisting or forcing the end into the barrel. That's not a clean termination anymore.
A proper cut gives you two things:
- Full insertion potential.
- A better chance of keeping the strand lay intact.
The workmanship side matters here. The NASA and ECSS workmanship guidance for crimped connections calls for pre-inspection of the wire for nicks, broken strands, untwisted lay, and damaged base material, followed by 100% visual inspection after crimping. It also calls for magnified QA inspection at at least 7× linear magnification for detailed review.
That standard is aimed at critical connections, but the takeaway for railing work is obvious. Damage that starts before the crimp won't improve after the crimp.
Insert fully and check orientation
Once the cable is cut, insert it fully into the ferrule or fitting barrel. Full insertion isn't something you assume. You verify it. If the fitting has an inspection hole, use it. If it doesn't, use your mark or depth reference before compression.
A tight-looking crimp on a partially inserted cable is still a bad crimp.
I've seen this most often when someone is rushing to finish a stair run and the cable tip catches inside the barrel. The fitting still enters the die, still gets squeezed, and still looks done. But the grip length is shorter than intended, so the termination has less holding power than it should.
If you're comparing permanent swaged ends against adjustable alternatives, this guide to wire rope swageless fittings helps clarify where each style fits.
Swage in sequence, not at random
The actual compression step should follow the fitting maker's sequence and die profile. Don't jump around. Don't freehand the spacing. Don't guess whether one hit is enough.
For stainless wire rope ferrules and swaged terminations, properly executed swages can achieve roughly 90–100% strength efficiency when the sleeve, rope diameter, die profile, and tool are correctly matched, according to this practical guide to crimping stainless steel wire rope. The same guidance points to the usual failure causes: wrong ferrule size, incomplete insertion, and nonmatching tools or dies.
That tells you what the field already shows. Stainless performs well when the system is matched. It punishes improvisation.
Watch the crimp, then watch the cable
During compression, pay attention to physical cues:
- Centered fit in the die so the sleeve isn't being pushed sideways
- Even sleeve deformation rather than a twisted or offset shape
- No barrel splitting or edge cracking
- No stray strand movement at the cable entry point
Then stop and inspect the finished piece before moving on to the next one.
A short visual pause here saves a lot of rework later.
For a live look at the hand process, this walkthrough is useful before you crimp your first full run:
Treat every crimp as one-time work
Once swaged, the joint is generally non-adjustable. That's one reason stainless steel cable crimps produce a clean, permanent finish. It's also why careless work becomes expensive fast.
If you're not certain a termination is right, cut it off and do it again. Hoping it will “probably hold” is how silent failures get built into finished railings.
Testing Tension and Inspecting for Integrity
The biggest mistake after crimping is assuming the hard part is over. It isn't. The crimp only becomes trustworthy after inspection and verification.
That matters because many bad terminations don't fail as dramatic breakages. They fail as movement, slippage, misalignment, or hidden weakness that shows up later when the railing cycles through tension, vibration, temperature changes, and regular use.
What to reject immediately
Inspection has to be more specific than “looks good.” Independent workmanship guidance for crimped connections calls out clear rejection triggers, including undercrimps, overcrimps, mis-crimps, damaged plating, burrs, and corrosion, as noted in the earlier NASA and ECSS workmanship standard.
In field terms, reject a termination when you see:
- A barrel compressed in the wrong location
- A visibly distorted profile that doesn't match the intended die shape
- Sharp edges or burrs at the crimp
- Cracks or splits in the sleeve or terminal body
- Cable not fully visible where the fitting design allows visual confirmation
- Any sign of slippage after initial loading
The crimp that worries me most is the one that looks neat but measures wrong.
Why silent failure is so common
A bad crimp often survives the first look because the cable stays in place without immediate load. That creates false confidence. Installers move on, tension the run, and only later notice one line is loosening faster than the others or sitting slightly off compared to the adjacent cables.
The issue is geometry. A termination can feel secure and still be undercompressed, overcompressed, or misplaced. That's exactly why visual standards reject more than obvious damage. They reject wrong form.
Verification methods that actually help
Most public advice stops at “use the right tool.” That's not enough. The bigger gap is proving consistency after the tool leaves your hand.
Independent guidance focused on stainless cable systems puts the emphasis on process control, tool calibration, and checks such as go or no-go gauging and pull testing, as described in this stainless cable systems FAQ on verification and consistency. That's the part too many crews skip because it slows them down.
Here's the practical order I use:
-
Visual check first
Look for form defects, cable damage at the entry point, barrel splitting, offset compression, and rough edges. -
Dimensional check second
Compare the finished crimp profile against the fitting manufacturer's expected result or gauge method. -
Controlled pull check third
Apply load in a controlled way and watch for any movement between cable and fitting. -
System tension check last
Once multiple lines are installed, compare behavior across the run. One cable that settles differently from the rest deserves a second look.
What a simple pull check should tell you
You're not trying to “prove” the whole life of the railing in one quick field test. You're looking for early evidence that the fitting is gripping the cable correctly and behaving consistently with the other terminations in the system.
If the cable slips, if the sleeve rotates strangely, or if one termination reacts differently from the others under similar loading, stop there. Don't re-tension over the problem. Cut it off and rebuild the end.
A properly made crimp should act boring. No movement, no surprises, no visible distress.
Maintaining Stainless Steel Cable Systems
A good crimp isn't a lifetime excuse to ignore the railing. Stainless systems last because somebody installs them correctly and somebody checks them before small problems turn into hardware replacement.
The maintenance side is straightforward. Keep the cable clean, keep the tension consistent, and inspect the terminations with the same skepticism you had on installation day.
What to monitor over time
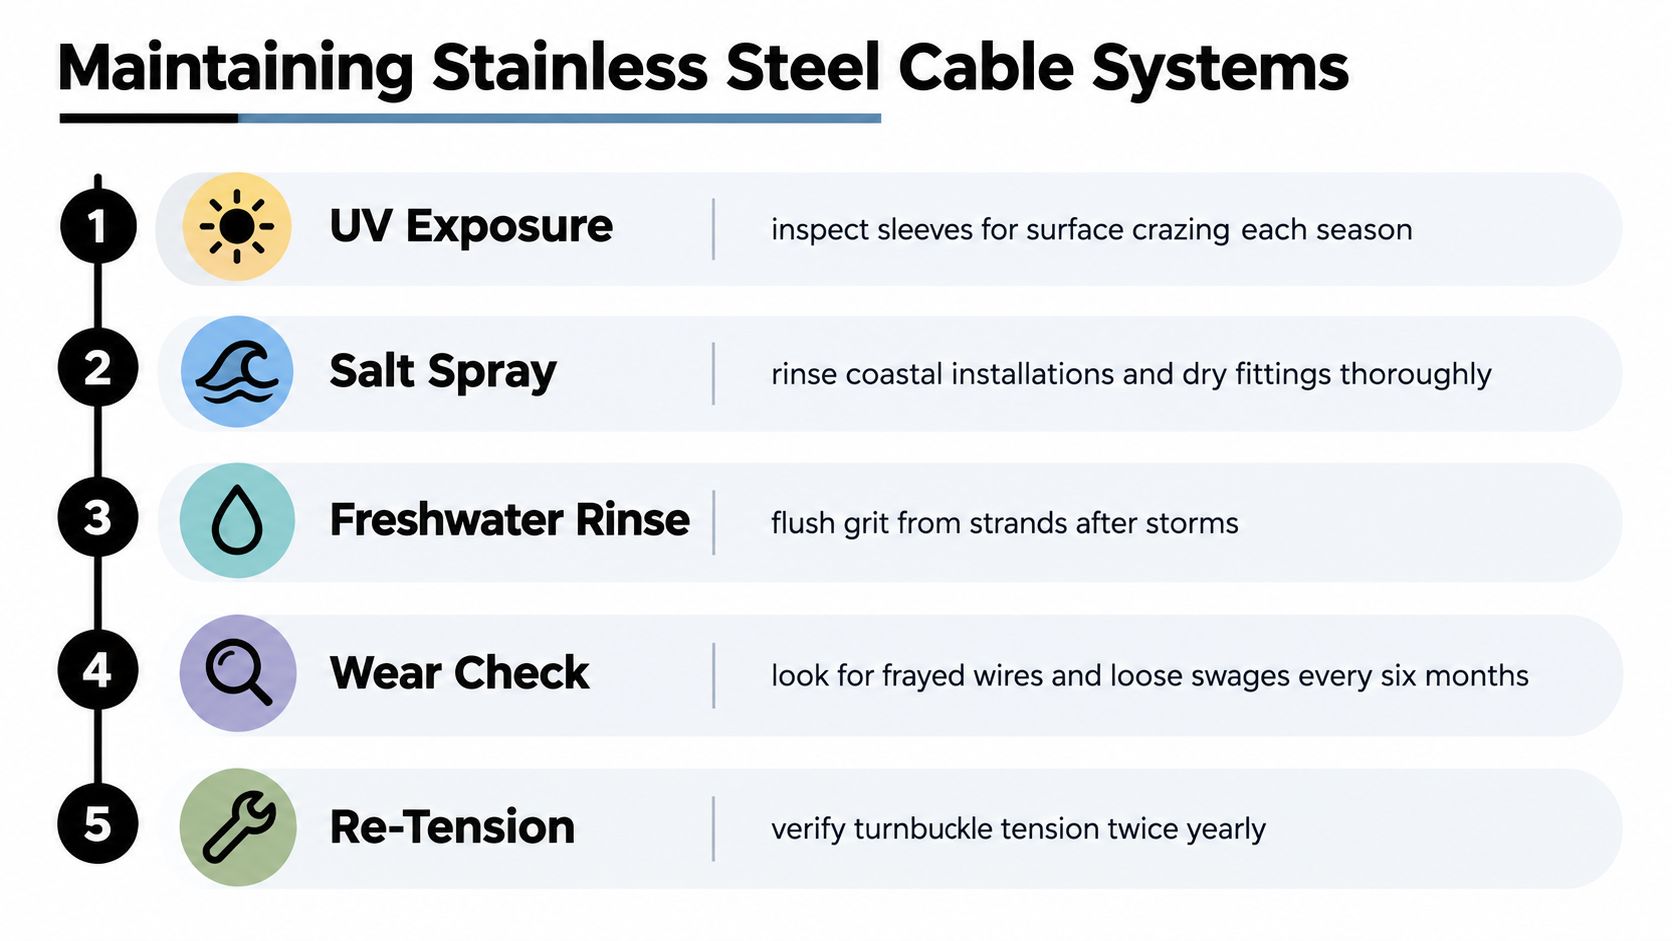
A stainless cable system usually tells you what it needs if you look closely enough.
- Watch the cable line. A line that no longer tracks evenly may be settling, slipping, or reacting to post movement.
- Check end fittings and sleeves. Look for surface staining, pitting, cracking, or any change around the compression zone.
- Feel for roughness. Frayed strand ends and burrs often show up before bigger failures.
- Re-check tension after seasonal movement. Wood movement and general settling can change how the run behaves, even if the crimp itself is sound.
Stainless steel is durable. A poorly made termination is not.
Why material choice still matters
In harsh environments, especially coastal and exposed outdoor installations, 316 stainless is usually the safer call for terminations and related cable hardware. In neutral salt-spray testing under ASTM B117-11 and ISO 9227, 304 stainless-steel fittings showed red rust spots after 72 hours, while 316 stainless-steel fittings showed no red rust after 672 hours and the 316 sample passed UL 514B testing, according to this neutral salt-spray corrosion summary.
That difference is why many installers reserve 304 for milder conditions and lean toward 316 where salt, wash-down, and long-term exposure are part of the job. The crimped area is often the most failure-sensitive part of the assembly, so it makes sense to be conservative there.
When to replace instead of reuse
A permanent crimped fitting isn't the place for second chances. Replace the termination if you find cable slippage, distorted compression, corrosion in or around the crimp zone, broken strands near the entry point, or any doubt about whether the original die and sleeve matched.
What works is simple. Clean the system, inspect it routinely, and treat questionable crimps as disposable, not repairable. Stainless steel cable crimps do their job when they're done right. When they're done wrong, they also fail. That's why maintenance starts with suspicion, not optimism.
Ultra Modern Rails supplies custom stainless steel cable railing systems for decks, balconies, stairs, and commercial spaces, with stainless cable and hardware designed to work as complete assemblies. If you want a system built around clean terminations and durable materials instead of piecing parts together from mixed sources, visit Ultra Modern Rails.