

“Buy stainless and choose IP68” isn't enough advice for an outdoor cable entry. A stainless steel cable gland is a sealing system, not just a corrosion-resistant fitting. The body can look sound while an unsuitable seal, poorly matched cable or incorrect enclosure connection lets water inside.
Choose the assembly around the exposure and the installation. That means checking the alloy, elastomer, cable diameter, thread, temperature limits and bonding requirements before ordering. Paying for better metal won't correct a badly specified entry.
Table of Contents
- Choose the Grade That Matches Your Environment
- What a Stainless Cable Gland Does for a Cable
- Matching Cable Diameter, Thread and Clamp Range
- Reading IP and Temperature Ratings Without Overtrusting Them
- How to Install a Stainless Cable Gland Step by Step
- Maintenance Checks That Keep Outdoor Glands Sealed
- Confirm the Spec Before You Order Your Glands
Choose the Grade That Matches Your Environment
Match the grade to the harshest exposure the gland will see, not to its finish. Use the environment as the starting point, then check every material in the assembly.
Grade choice by environment
| Environment | Recommended grade | Why | Watch for |
|---|---|---|---|
| Dry indoor or sheltered outdoor, inland air | 304 | General corrosion resistance without the premium for a more resistant grade | Reconsider where salt or aggressive cleaning is present |
| Coastal homes, pool areas | 316 | Better suited to chlorides and salt air | Check nearby cleaning chemicals |
| Marine, offshore, salt spray | 316L | Appropriate starting point for aggressive exposure | Verify elastomer and accessory compatibility |
| Food processing, caustic washdown | 316L | Suitable body material for demanding wet service | Confirm the complete gland has the required washdown rating |
| Chemical areas with solvents or oils | 316L body, subject to compatibility review | A candidate for corrosive industrial conditions | Check the exact chemical against both body and seal |
| Budget A2/AISI 303 or unspecified stainless | Don't accept without an exposure review | It isn't equivalent to an acid-resistant grade | Specify the required alloy explicitly |
For ordinary atmospheric exposure, 304 can be a sensible choice. Moving to 316 makes more sense when saltwater or aggressive chemicals become part of normal service, rather than an unlikely accident.
The commercial trade-off is real. MarketIntelo's food-grade cable-gland analysis estimates that 316 products cost about 30% more than 304 products and can retain structural integrity for roughly 15–20 years under repeated water, caustic-cleaner and temperature exposure. Treat that as market context, not a service-life warranty for an individual gland or its seals.
Specify an alloy, not a description
For marine, offshore and aggressive washdown work, put 316L into the specification where that's the required material. Don't allow a supplier to substitute an unidentified stainless fitting just because it has the same thread and appearance.
The distinction between stainless steel and steel corrosion is useful background when comparing outdoor hardware. The publisher's guide to stainless steel and steel corrosion provides that wider context, but the gland manufacturer's material declaration remains the purchasing document.
Before choosing a row, answer these questions:
- Contaminant: Is the exposure ordinary rain, salt, pool chemicals or a process chemical?
- Cleaning: Will someone use a hose, pressure cleaner or caustic solution?
- Consequence: Would failure mean a straightforward repair, lost production or a safety-critical outage?
A more resistant alloy is worth considering when exposure is severe or access for replacement is difficult. It still needs a compatible seal and enclosure interface.
What a Stainless Cable Gland Does for a Cable
A cable gland works like the watertight collar where a rope passes through a boat's deck. The rigid parts hold the line; the seal closes the water path. Neither job replaces the other.
The illustration separates those functions.
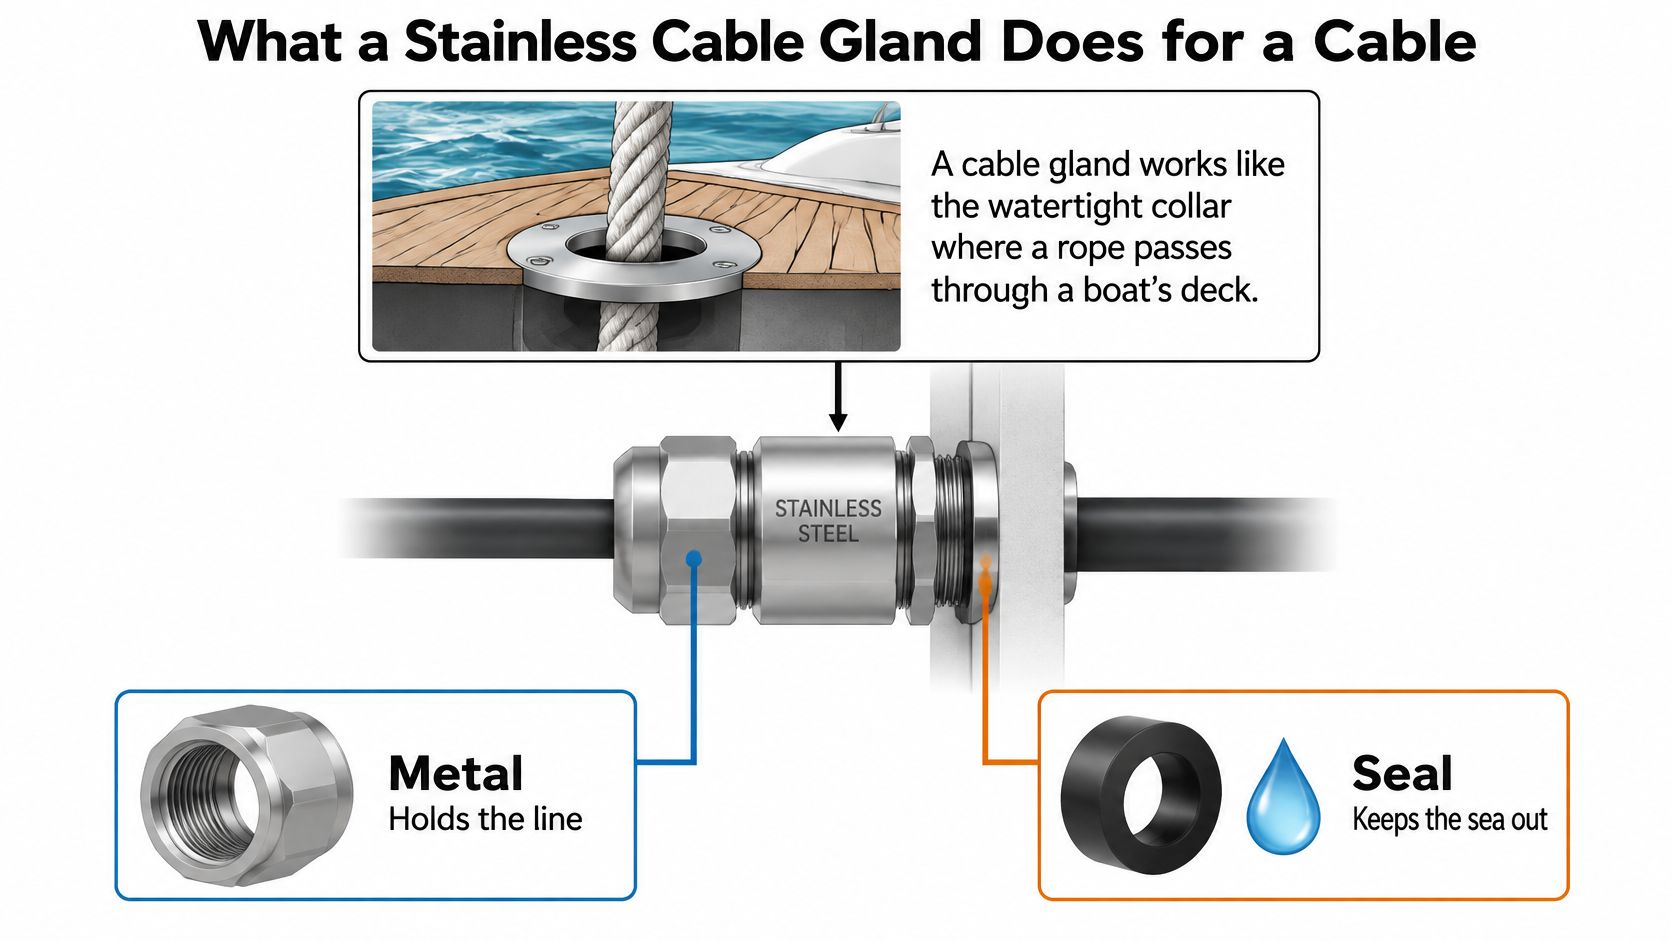
The threaded body fixes the assembly into the enclosure entry. A clamping insert or claw grips the cable jacket. The sealing element compresses around the cable, while a compatible gasket seals the body against the enclosure wall. Where the design uses one, the locknut secures the assembly from inside.
Retention and sealing are separate jobs
Strain relief prevents an external pull from loading the electrical terminals directly. The environmental seal limits ingress through the cable entry. A cable can feel firmly held without every sealing surface being correctly assembled, so a hand tug isn't proof of water resistance.
ABB's stainless steel SCG series documentation identifies IP66 and IP68 protection with the specified gasket and locknut, with NEMA 4 coverage for hose-directed water. Its listed temperature envelope is −20°C to +100°C continuously, with −30°C to +150°C short-term exposure.
Those are assembly conditions, not promises made by the metal alone.
Practical rule: The gland body doesn't establish the enclosure rating by itself. Correct thread engagement, the specified gasket and proper tightening make the sealing system work.
Keep the accessories identified on the product drawing together during procurement. A washer or locknut that happens to fit isn't automatically an approved replacement.
For equipment supplied across different markets, EN 62444 and applicable UL 514B/CSA approvals are useful screening criteria identified for the ABB family. They help narrow the selection, but you still need the correct model, cable range and installation method.
Matching Cable Diameter, Thread and Clamp Range
Thread size and cable capacity are different specifications. Match the thread to the enclosure entry and the clamping range to the measured cable sheath.
Metric thread size and typical clamping range
| Thread | Typical cable OD range | Common use |
|---|---|---|
| M16 | Model-dependent, obtain the datasheet | Signal and small power cable selection |
| M16, narrow model | 7–8 mm for the listed MOVET gland | A tightly defined cable diameter |
| M20 | Manufacturer-specific | Power and control cable selection |
| M40 | Manufacturer-specific | Larger multicore cable selection |
The model-specific entry matters more than a generic sizing chart. A thread designation tells you about the enclosure connection, not how far the insert will compress or which cable constructions the gland accepts.
Measure the part the seal will touch
Use calipers on the outer sheath, not the exposed conductors or the size printed for conductor cross-section. Take readings at several positions around and along the intended sealing area.
An average can help describe a round cable, but don't average away an oval shape or a damaged patch. Check that the actual measured variation remains within the manufacturer's permitted range and cable-shape requirements.
Use this sequence before releasing an order:
- Identify the sealing surface: Find the intact jacket that will sit inside the insert.
- Record the diameter variation: Include any noticeable ovality instead of recording only the smallest reading.
- Select the range: Prefer a suitable model with working margin rather than relying on its absolute limit.
- Check the enclosure drawing: Confirm thread standard, pitch, entry type and available panel thickness.
The narrow MOVET model in the table shows why ordering by thread alone fails. A cable below its listed range is outside the stated sealing specification; a cable above it is outside its stated capacity. Extra tightening isn't a legitimate way to expand that range.
Cable shape changes the selection
- Flat cable: Ask for a gland or insert intended for that profile. Don't assume a round opening will seal its edges.
- Separate cables: Use an approved multi-hole arrangement rather than packing several jackets into an ordinary single-cable seal.
- Armored cable: Select for the cable construction and the dimensions required by the armor termination, not just the visible jacket.
- Metric or NPT: Order the thread that the enclosure and installation approval require. Don't force one standard into another.
For readers also specifying stainless steel wire rope, keep the applications separate. Structural railing cable and jacketed electrical cable require different fittings and selection criteria.
Reading IP and Temperature Ratings Without Overtrusting Them
An IP code describes tested protection under stated conditions. It isn't permission to use the gland in every wet location. Read the test conditions and the assembly instructions before treating a rating as suitable for the site.
What each IP code tests
| Rating | What it covers | Reference test or condition | Where it matters |
|---|---|---|---|
| IP66 | Dust and water-ingress protection | Confirm the product's jet-test conditions and assembly requirements | Outdoor enclosures and hose exposure |
| IP67 | Temporary-immersion classification | Obtain the applicable test details | Locations at risk of brief flooding |
| IP68 | Immersion protection under specified conditions | Manufacturer-defined pressure, depth and duration | Pits or potentially submerged entries |
| IP69K | Washdown protection designation | Confirm the particular product's high-pressure cleaning conditions | Washdown equipment and food-processing areas |
The codes don't remove the need to check exposure. Rain on a sheltered cabinet, standing water around a junction box and direct pressure cleaning are different service conditions.
OEM's stainless gland documentation illustrates the variation within a rating: one stainless model lists IP68 at 10 bar for smaller sizes and 5 bar for larger sizes, together with IP69 protection for high-pressure cleaning. That's why “IP68” without the model's conditions is incomplete information.
Check what the installation changes
The cable entry has several interfaces: cable to insert, insert to body, body to gasket and gasket to enclosure. Check the condition and assembly of each rather than concentrating only on the cap nut.
The ABB example already discussed also shows why the accessory list matters. Its NEMA designation provides separate information about hose-directed water; don't treat NEMA and IP markings as interchangeable labels.
A higher-looking rating isn't a substitute for a test condition that matches the job.
Sheath hardness, cable geometry, panel thickness and tightening affect the assembled seal. If the product instructions don't cover the actual configuration, ask the manufacturer to confirm suitability before installation.
A moving cable needs a different temperature check
Cabac's 316L gland datasheet specifies a PA66 clamping claw and NBR O-ring, with −40°C to +100°C static service and short-term exposure to +120°C. Its dynamic service range narrows to −20°C to +80°C.
That distinction matters on a swinging gate or vibrating machine. Don't select from the stationary rating when the cable will move at the entry, and don't assume the stainless body determines the allowable temperature.
The same documentation identifies seal compatibility as a procurement concern. Oils, solvents, ozone, ultraviolet exposure and process chemicals may require a different elastomer even where the body remains suitable.
For an exposed gate installation, request confirmation of dynamic service suitability and outdoor seal compatibility, then arrange cable support so the entry isn't carrying uncontrolled movement.
Before accepting the rating:
- Read the condition: Obtain pressure, duration and assembly requirements.
- Match the exposure: Separate weather, flooding and cleaning duties.
- Apply the relevant limit: Use the temperature envelope for the actual service, including movement.
How to Install a Stainless Cable Gland Step by Step
Use the manufacturer's sequence and torque values, not a universal tightening rule. Isolate electrical equipment and use a suitably qualified installer wherever the work requires one.
The opening checks and panel preparation deserve as much attention as tightening the cap.
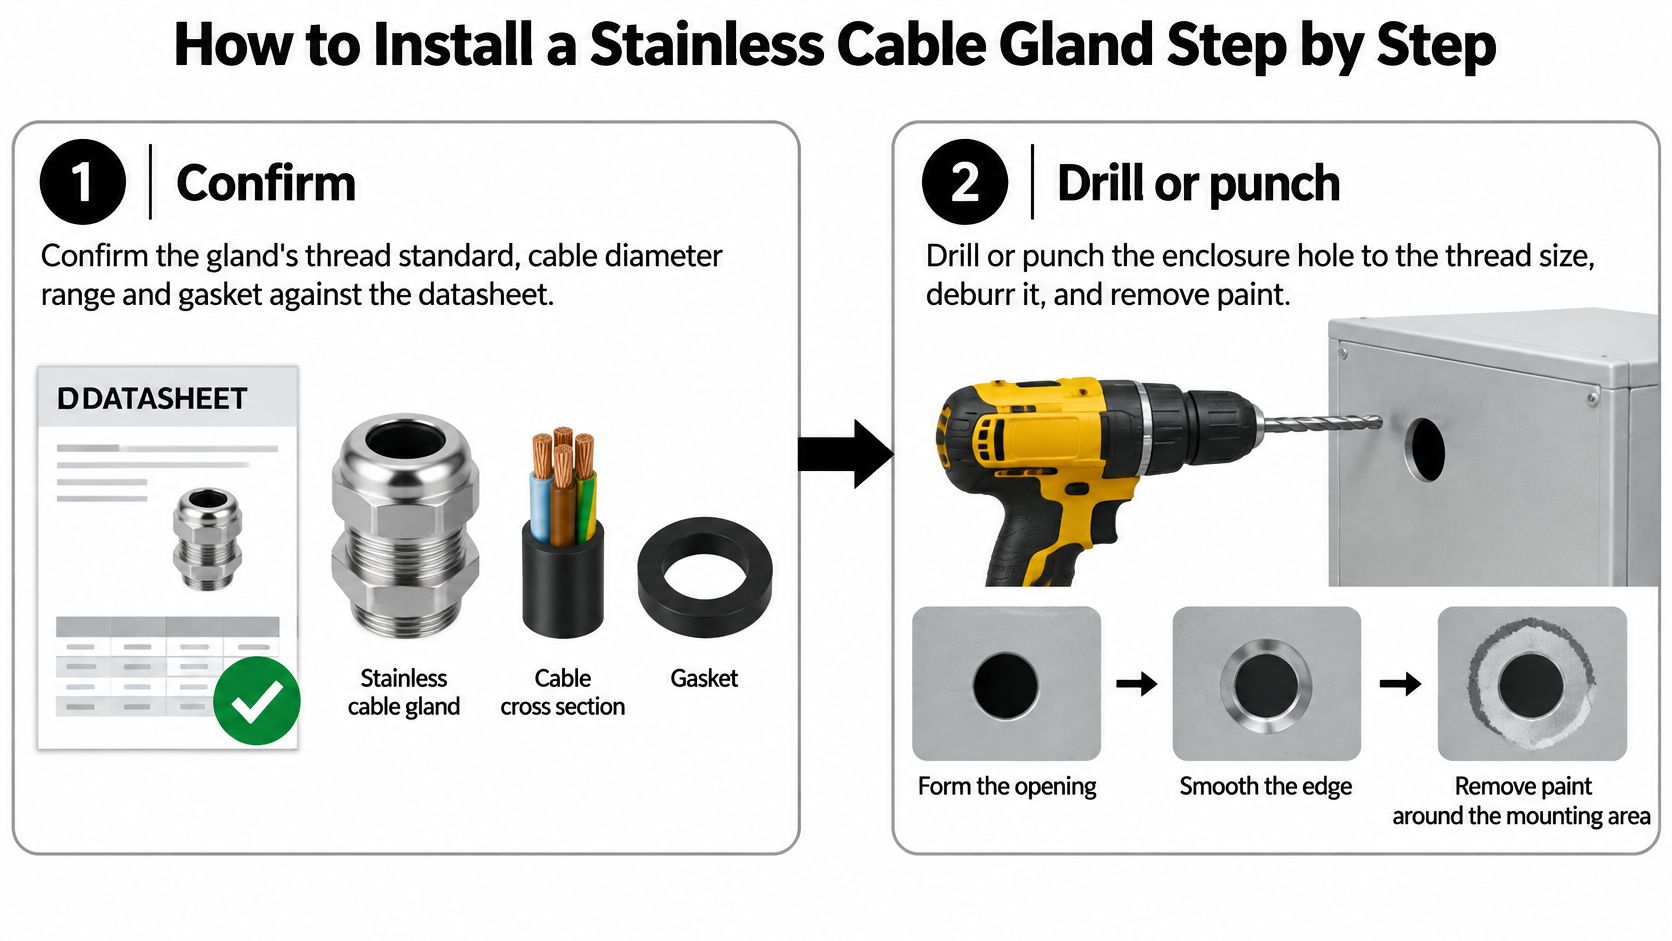
Prepare the entry and termination
- Confirm the complete assembly. Compare the cable, gland, gasket and enclosure entry against the datasheet before dismantling anything. The common mistake is finding that the thread fits and assuming every other requirement follows.
- Prepare the mounting hole. Drill or punch to the enclosure and gland instructions, deburr the edge and clean the sealing face. Remove coating only where the specified bonding arrangement requires metal contact, then address exposed surfaces as the enclosure instructions require; indiscriminate paint removal can compromise the enclosure finish.
- Prepare the cable jacket. Strip only the length required by the termination drawing and leave the sealing area intact. A nick beneath the insert or exposed conductors inside the seal defeats careful gland selection.
- Terminate armor or shielding where applicable. Arrange it around the specified cone or clamp within the manufacturer's preparation dimensions. Don't improvise the strip length or assume an ordinary unarmored gland provides the required EMC contact or protective bond.
Rockwell Automation's installation guidance addresses cable preparation, grounding-cone positioning, bonding and hazardous-location requirements. For certain Class I/II Division 2 applications, it specifies NPT threads or at least 10 metric threads of engagement. That is an application-specific requirement, not a blanket rule for every outdoor gland.
Tighten and verify
- Start the body by hand. Confirm that it runs freely before applying a tool, then tighten according to the specified mounting arrangement and torque. Stop if it binds early; forcing a cross-threaded fitting isn't a repair.
- Position the cable and insert. Place the seal over the intended jacket surface and tighten the cap nut to the manufacturer's requirement. Don't keep turning until the sheath visibly deforms or splits, and don't assemble outside the permitted installation temperature.
- Secure the enclosure connection. Where a locknut is required, fit and tighten it in the manufacturer's sequence while preventing unwanted body rotation. Check the gasket position and fit any specified earth tag; a metal body alone doesn't prove earth continuity.
- Inspect and test the finished entry. Perform the specified retention check, inspect the jacket and gasket, and complete any required bonding and ingress checks before energizing. If the project calls for a water test, use its approved method rather than an improvised spray near live equipment.
Site check: Record the torque requirement and the tool used. “Tight enough” doesn't tell the next installer whether the assembly followed its instructions.
A torque wrench or suitable torque tool only helps when you have the correct value for the exact component being tightened. Body mounting torque and cap-nut torque shouldn't be treated as interchangeable.
For hazardous locations, verify both ingress protection and explosion-protection integrity against the applicable certification and local rules. Neither a stainless body nor an IP marking establishes that the installation is approved for that location.
Use the installation video as supporting material, not as a replacement for the drawing supplied with your gland.
Maintenance Checks That Keep Outdoor Glands Sealed
Inspect according to exposure and condition, not the appearance of the body alone. The schedule below is a practical inspection framework, not a manufacturer-backed replacement interval.
Maintenance schedule for outdoor glands
| Interval | Check | Action if it fails |
|---|---|---|
| Routine visual inspection | Salt deposits, staining and visible thread damage | Clean appropriately and investigate pitting or damaged parts |
| Planned seal inspection | Cracks, hardening, swelling or gaps | Replace the approved seal components and inspect the entry |
| Scheduled enclosure service | Locknut security, cable support and chafing | Correct support and tighten only to the specified requirement |
| After storms or flooding | Water inside the enclosure and possible ingress paths | Isolate, investigate and repair before returning equipment to service |
| Manufacturer's replacement point, or earlier deterioration | Clamp insert and seal-set condition | Install the specified replacement parts or replace the gland |
Inspect the seal, support and entry together
Don't assume staining identifies the failed material. Clean the area sufficiently to inspect the gland, accessories and enclosure interface, then decide whether the issue is superficial contamination or physical deterioration.
As a maintenance practice, use fresh-water cleaning after salt exposure where the equipment instructions permit it. Avoid abrasive methods that damage the sealing face or leave contamination on the stainless surface.
- Retighten selectively: Follow the datasheet rather than giving every nut another turn during each inspection.
- Replace matched parts: Don't fit an unidentified O-ring because its diameter looks close.
- Increase inspection frequency: Check sooner where salt, cleaning chemicals or cable movement are persistent.
Railing hardware near the enclosure needs its own maintenance checks. For example, the Cable Railing - Outdoor Stainless Steel 36" or 42" System - High End Custom Railing lists marine-grade 316 stainless steel cable and cable hardware.
Keep those structural inspections separate from electrical gland checks. A railing terminal is not an electrical cable gland, and a cable gland must not be used as a substitute for a structural railing fitting.
Confirm the Spec Before You Order Your Glands
- Name the alloy. State the required grade, not just stainless steel, and identify the materials of exposed accessories.
- Specify the thread. Include the standard, size and pitch, together with the enclosure entry arrangement.
- Record the cable measurement. Give the jacket dimensions, cable construction and acceptable clamping range.
- Identify the elastomer. Request confirmation that it suits the actual chemicals, sunlight and operating conditions.
- State the protection requirement. Include the relevant ingress test conditions rather than accepting an unexplained rating.
- List the temperature duties. Separate continuous, short-term, static and dynamic requirements where applicable.
- Require the applicable approvals. Confirm the product documentation, bonding arrangement and any hazardous-location installation conditions before purchase.
Check the whole order
Ask the supplier to return a marked datasheet confirming the selected model and accessories. Resolve any substitutions before delivery, particularly changes to the seal, locknut or declared material.
For a project that also includes railings, review the stainless steel cable railing hardware separately against its structural duty. Use the environment table to review material choices and the cable-sizing table to check the electrical entry, without treating those two applications as interchangeable.
Order the system you can verify, not the fitting that looks closest. A complete specification gives the installer something definite to build and the maintenance team something definite to inspect.
Ultra Modern Rails offers custom indoor and outdoor cable railing systems with stainless steel cable and hardware. Visit Ultra Modern Rails to discuss your railing layout and exposure conditions, and keep the electrical gland specification separate so each component is selected for its actual job.