

You're comparing cable railing hardware for a deck or stair, and the cable looks reassuringly substantial. Then you reach the small fittings at the posts. One listing gives a tensile strength, another says marine grade, and neither tells you whether the connection will work with your framing.
That's where stainless steel cable anchors deserve more attention than their size suggests. Treat the anchor connection as the likely weak link until the complete assembly proves otherwise. A strong cable can't make up for a slipping termination, an unsuitable bolt, or a post base attached to inadequate structure.
Table of Contents
- Cable Anchor Types and What Each One Connects To
- Choosing a Stainless Grade and Controlling Corrosion
- Reading Load Ratings Without Mistaking Breaking Strength
- Matching Anchors to Cable Railing Components
- Specification and Inspection Checklist for Code Compliance
- Confirm Your Anchor Spec Before You Order
Cable Anchor Types and What Each One Connects To
Cable anchor types by mounting surface and adjustment
| Anchor type | Mounts to | Tension adjustment | Best fit |
|---|---|---|---|
| Stud or threaded terminal | Post hole or fascia plate, tapped or through-drilled | Turnbuckle or threaded adjuster | Standard deck and balcony runs that may need retensioning |
| Swaged sleeve end | Post through-hole | Adjusted at the opposite end | Permanent, factory-pressed terminations on fixed runs |
| Eye bolt or hook | Wall, fascia board or stair stringer | Turnbuckle at the far end | Walls and stairs where a post isn't practical, subject to assembly approval |
| Surface-mount base plate | Deck framing or concrete, bolted | Set by the post-end adjuster | Post base connections on decks and patios |
| Turnbuckle or tensioner | Between cable and post | Built into the assembly | Long runs and any run where tension must be reset |
On a coastal deck, the cable end, tensioner, and post base all face the weather. They also have different jobs. The termination grips the cable, the adjuster controls tension, and the post connection transfers that pull into the structure.
Calling all of them anchors can hide those differences. Before ordering, identify whether you need a cable-end fitting, a post attachment, or both. The guide to stainless steel cable connectors helps distinguish the fittings at the cable end.
Fixed grips and adjustable ends
A factory-swaged sleeve creates a permanent grip on the cable. It suits a measured, fixed termination, but the sleeve itself doesn't provide later adjustment. A threaded end permits adjustment through its mating receiver or tensioner.
These aren't mutually exclusive features. A terminal can have a swaged cable grip and a threaded adjustment end. Specify what holds the cable separately from what tensions the run.
Stud terminals are a sensible shortlist for conventional deck and balcony layouts. Eye fittings may suit walls, fascia, or stair stringers, but only when the attachment and fitting are approved for that application. An open hook shouldn't be treated as interchangeable with a captive connection.
Base plates belong to the post connection, not the cable termination. Turnbuckles belong where the installer can reach them after the railing is complete.
Practical rule: Choose the connection by what it attaches to, not by how closely it resembles the fitting in a product photograph.
Shortlist by the installation
Ask these questions before choosing a fitting family:
- What receives the load? Identify the post, fascia plate, wall connection, or structural base.
- Where will adjustment happen? Keep the tensioning device accessible for commissioning and later checks.
- What is the mounting material? Wood, steel, and masonry require different attachment details.
For a straight deck run, that usually narrows the discussion to a fixed termination paired with an accessible threaded adjuster. Stairs and wall attachments need closer attention to connection geometry before that shortlist becomes an order.
Choosing a Stainless Grade and Controlling Corrosion
Identify chloride exposure first, choose the grade second, then select the finish. A polished surface or black coating doesn't tell you what alloy is underneath.
Stainless grade by exposure and chloride guideline
| Grade | Typical exposure | Chloride guideline | Railing use |
|---|---|---|---|
| 304 / 304L | Interior, dry, low-salt | About 100 ppm with crevices present | Interior runs and sheltered decks away from salt |
| 316 / 316L | Coastal, pool surrounds, de-icing salt, commercial exteriors | About 2,000 ppm under comparable conditions; PREN about 24.2 | Starting specification for outdoor and coastal anchors |
| 2205 duplex | Severe marine exposure | No comparable guideline established here | Specialty option for demanding marine projects |
| 2507 super-duplex | Severe marine exposure | No comparable guideline established here | Specialty option where conventional marine stainless is judged insufficient |
| Black powder-coated stainless | Depends on base grade | Determined by the underlying alloy | Verify the base grade and provision for coating damage |
The numerical screening benchmarks in this comparison are approximately 100 ppm chloride for 304, 2,000 ppm for 316 under comparable conditions, and PREN values of approximately 19.0 and 24.2, respectively, as identified in the stainless material-selection data. They aren't acceptance limits for every railing environment.
What the alloy difference means
Molybdenum in the more corrosion-resistant alloy improves resistance to chloride-driven pitting and crevice corrosion. That matters at cable anchors because the vulnerable area may be a small, sheltered joint rather than the exposed cable span.
For a dry commercial lobby, lower chloride exposure can make the interior grade a reasonable option. Move the connection to a coastal deck, pool surround, salted entrance, or exposed commercial terrace, and the material specification needs to change.
Don't describe a project merely as indoor or outdoor. An indoor pool can present a more demanding material-selection problem than a sheltered inland deck. Ask where salt, chemical residue, moisture, and heat can reach the hardware.
The chloride figures are screening tools, not a promise that a fitting will remain unaffected below a particular concentration. Temperature, deposits, oxygen access, surface condition, and joint geometry also influence performance.
Why marine grade isn't a lifetime rating
A natural-seawater immersion study measured weight loss over 36 months of 323.56 g/m² for 316L, 8.78 g/m² for 2205 duplex, and 2.15 g/m² for 2507 super-duplex. Those results demonstrate substantial alloy differences under the study conditions, not expected railing lifetimes.
You can't turn an immersed specimen's weight loss into a replacement date for an anchor on a deck. Exposure, geometry, and loading differ. The useful conclusion is narrower: severe marine work may justify specialist alloy selection rather than assuming the familiar marine grade is always enough.
Duplex and super-duplex options also require a complete hardware review. Specifying a specialty anchor body while leaving the terminal, nut, or washer unspecified doesn't resolve the assembly's exposure problem.
A better alloy doesn't excuse a joint that holds salt water.
Control corrosion at the joint
Consider a thin film of salt water behind a washer. The visible face can dry while moisture remains trapped against the post. That's the sort of detail to examine before choosing a finish.
The discussion of stainless steel and steel corrosion provides useful background, but the installation decision is practical: make the connection drainable, cleanable, and inspectable.
- Drainage: Avoid details that retain stagnant chloride-bearing water around the fitting.
- Cleaning access: Leave room to rinse and wipe cable entries, washers, and exposed threads.
- Hardware consistency: Specify compatible stainless anchors, terminals, nuts, and washers rather than leaving small parts to substitution.
- Inspection access: Make staining around a washer or fitting shoulder visible without removing permanent finishes.
Schedule freshwater cleaning according to exposure and the manufacturer's instructions. A protected connection still needs attention if salt can collect there. Don't mistake low maintenance for no maintenance.
Warm halide environments combined with tensile stress require particular caution. Ordinary marine stainless shouldn't be assumed immune to pitting or stress-corrosion cracking in those conditions. Get material advice for the actual environment rather than relying on a marine-grade label.
Treat the finish as a separate decision
Black powder-coated stainless describes a finish system, not an alloy. Ask for the base-metal grade in writing because scratches or coating damage can expose it.
Satin and mirror finishes are appearance choices that still need a suitable substrate and maintainable connection detail. Approve the grade before approving the sample board. Otherwise, an attractive finish can distract from the material decision that matters underneath.
Reading Load Ratings Without Mistaking Breaking Strength
A cable railing behaves like a chain, but the links don't look alike. The cable may be strong enough while the sleeve, anchor, post, or bolt limits the assembly. Shopping by cable diameter alone misses that distinction.
Minimum breaking strength isn't working load. It describes a failure-related test benchmark, not permission to apply that load repeatedly in service.
The following values use the published minimum breaking strengths and the manufacturer's 40% working-load ceiling, with rounded calculations shown in the final column, from the ANSI 316 wire-rope engineering reference.
Breaking strength and working load by stainless cable size
| Cable size and construction | Minimum breaking strength (lb) | Working load at 40% (lb) |
|---|---|---|
| 1/16 in, 1x19 | 427 | About 171 |
| 3/32 in, 1x19 | 819 | About 328 |
| 1/8 in, 1x19 | 1,869 | About 748 |
| 3 mm, 1x7 | 2,205 | About 882 |
| 3/16 in, 7x7 | 3,293 | About 1,317 |
Read the limits around the number
The working-load column is a conservative planning benchmark for the listed rope. It isn't a tested rating for your railing, your terminal, or your post base. Don't apply that percentage to an unrelated product's headline strength and call the result an approved design load.
Construction matters alongside diameter. A fitting intended for one cable construction shouldn't be assumed suitable for another just because the cable enters the bore.
Likewise, a material specification doesn't prove an installed connection. It helps identify the rope, but it doesn't establish the capacity of the swage, threaded receiver, mounting bolts, or supporting structure.
Ask the supplier: What is the working load of the installed assembly, and what test or engineering basis supports it?
Separate component strength from system performance
When a supplier quotes tensile strength, ask which component was tested. Was it bare cable, a cable with terminals, the fitting body, or a complete railing assembly? Those answers aren't interchangeable.
Then check the conditions surrounding the rating:
- Connection efficiency: Does the termination retain the capacity assumed in the design?
- Mounting geometry: Are hole sizes, edge distances, and attachment positions within the approved detail?
- Tension control: Does the assembly account for its specified installation tension?
- Movement and fatigue: Has the design addressed the service conditions rather than only a single pull?
- Governing requirements: Does the evidence support the applicable railing requirements?
The cable figures are useful for rejecting an obviously unsuitable pairing. They can't establish that every other component is adequate.
The number to request is therefore the working load for the installed assembly, with the test basis stated. If the supplier can provide only an isolated tensile figure, the structural question remains unanswered.
Matching Anchors to Cable Railing Components
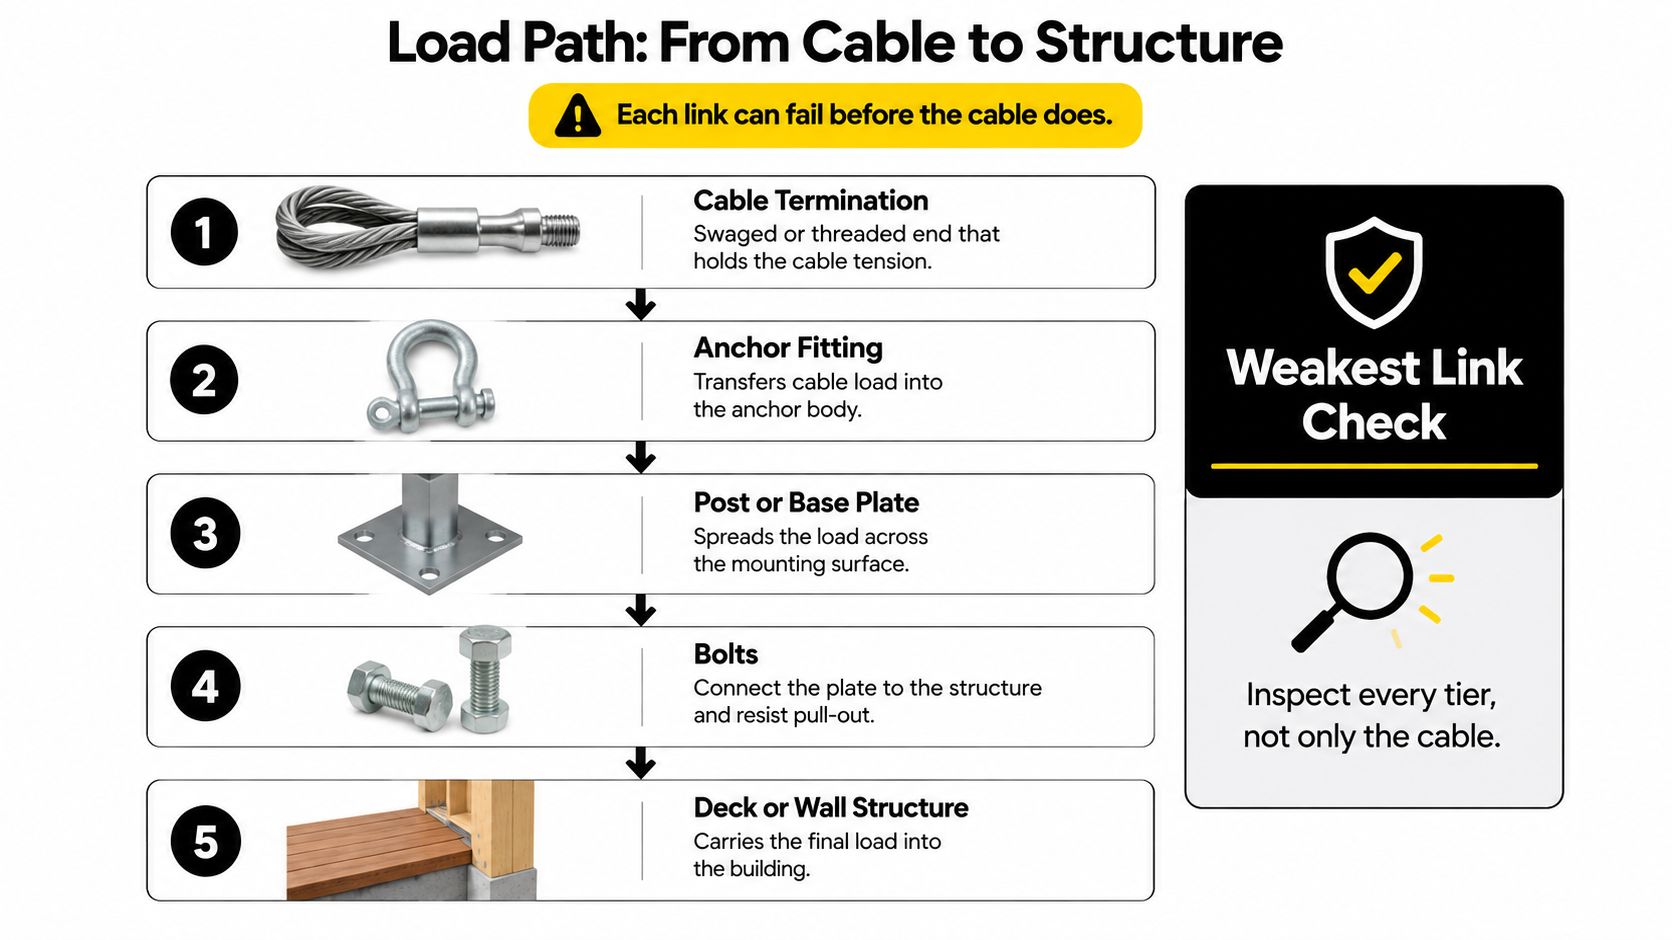
Trace the connection in order: cable termination, anchor fitting, post or base plate, bolts, then deck or wall structure. Each connection must transfer load to the next without slipping, distorting, or pulling out.
Use this diagram to check that no attachment has been omitted from the hardware schedule.
Specify the termination method
The indicative retention figures below come from the wire-rope termination and material-compatibility guidance: correctly produced factory swages retain 95–100%, properly installed grips approximately 80–90%, and kinked or incorrectly clipped terminations 50% or less of minimum breaking load. These are installation benchmarks, not substitutes for the manufacturer's tested assembly rating.
Termination retention by method
| Termination method | Retention of minimum breaking load | Note |
|---|---|---|
| Factory swage sleeve, correctly produced | 95–100% | Permanent; specify sleeve and press tool |
| Wire-rope grip, properly installed | 80–90% | Depends on installation quality |
| Kinked or incorrectly clipped termination | 50% or less | Reject defective work rather than compensating with extra tension |
A pressed sleeve can look finished without having been produced correctly. Specify the sleeve, press tool, and inspection procedure together. Follow the fitting manufacturer's process rather than borrowing compression instructions from a similar-looking product.
Material pairing matters too. The same guidance warns that copper ferrules on stainless cable can promote localized galvanic attack in damp conditions and recommends compatible stainless or aluminum ferrules for the specified marine stainless rope.
The accompanying installation video is supplementary. The selected system's instructions must control the work.
Check the complete pairing before ordering
Compare the kit's stated cable diameter and construction against the anchor specification. Then verify the post-hole detail, terminal seating, thread compatibility, washers, and nuts. A fitting that passes through a hole hasn't necessarily been matched to it.
Ask the supplier to identify the cable and hardware grades separately. Don't assume a marine-grade cable description covers every small fitting in the package.
Inspect for wire distortion, sleeve movement, corrosion staining, exposed crevices, and lost tension. Require proof or pull testing when the project engineer or governing requirements call for it. A clean-looking anchor is useful evidence of condition, but it isn't proof of retained capacity.
Specification and Inspection Checklist for Code Compliance
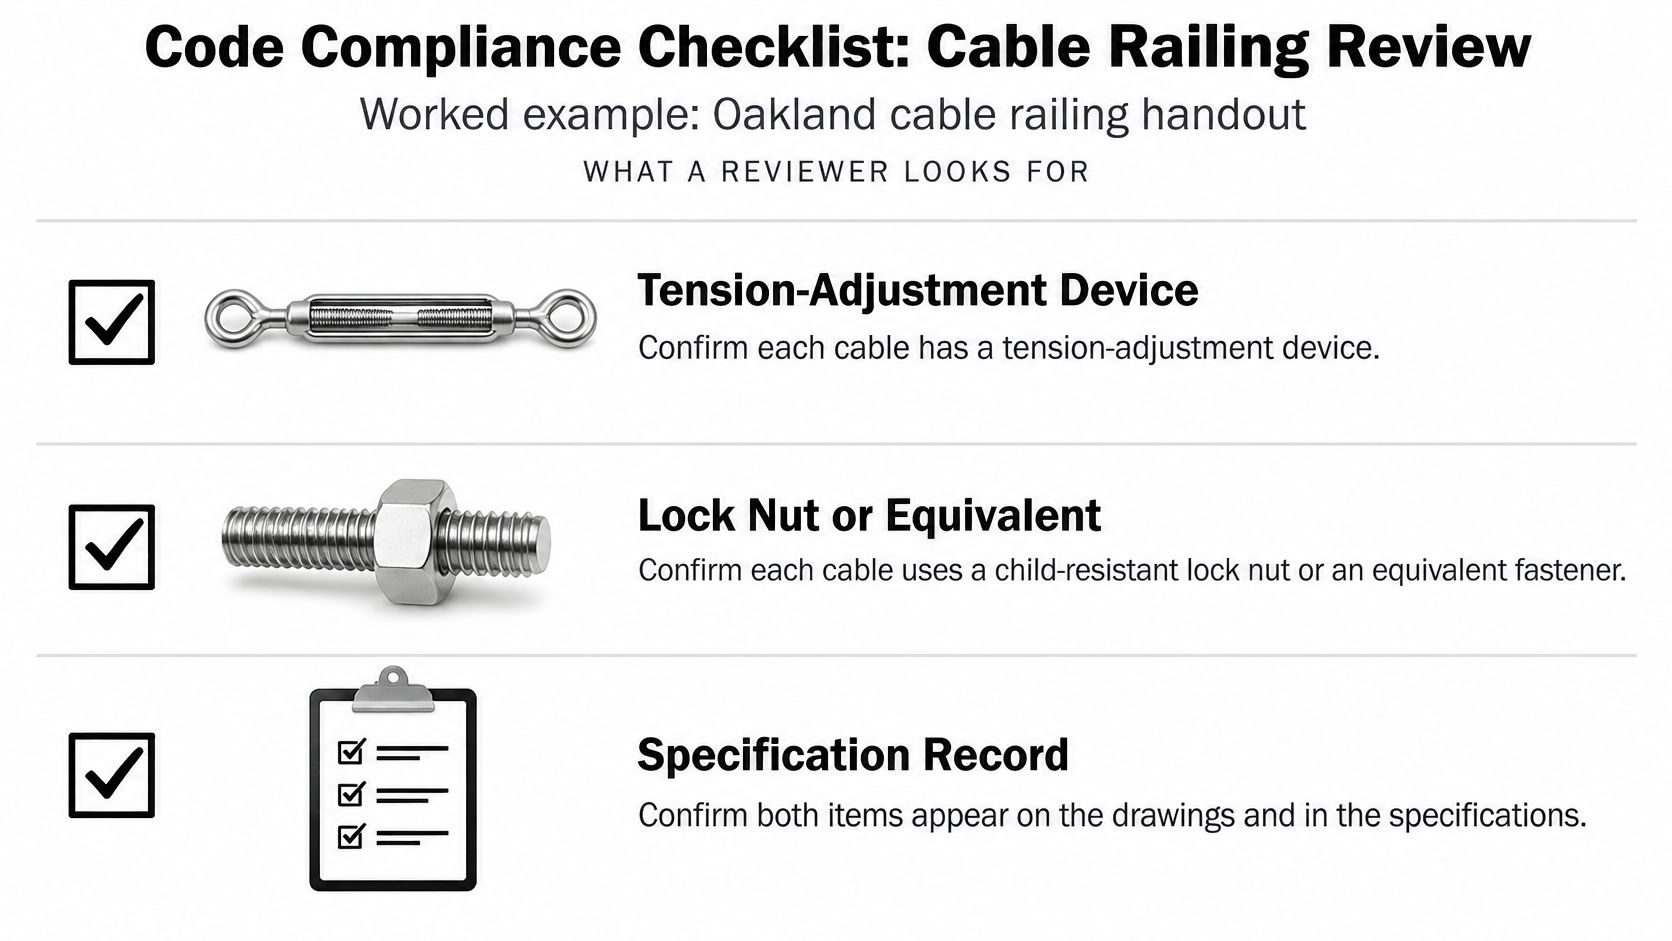
Oakland provides a useful worked example of an authority asking for more than straight-looking cables. Its cable-railing handout requires a tension-adjustment device on each cable, a lock nut or equivalent child-resistant feature, minimum cable tension of 200 pounds, and testing equipment or engineering documentation for an alternate design.
That's a jurisdiction-specific example, not a universal installation target. Confirm the governing requirements and approved system before setting tension.
Use this visual as a review prompt, then retain the actual project records.
Record the conditions behind the rating
A pull-out rating means little without the substrate and installation conditions. An oversized hole, inadequate edge distance, or unverified mounting surface can put the installation outside the conditions supporting that rating.
Keep a reusable specification and commissioning checklist:
- Substrate: Record the structural material receiving the anchors, not merely the visible decking or finish.
- Embedment: Document required and installed engagement or embedment depth.
- Edge distance: Record the attachment position relative to structural edges.
- Bolts: Identify diameter, material, and the approved anchor or fastening system.
- Washers: Record dimensions and material required by the connection detail.
- Torque: Retain the specified value and installation record where applicable.
- Cable tension: Record measured values using the approved verification method.
- Post deflection: Document observations and any measurements required by the engineer.
- Inspection interval: Assign the follow-up schedule and responsibility for maintenance.
Use cable railing code requirements to prepare questions, but obtain project-specific acceptance criteria from the local authority and system documentation. Generic bolt-size advice isn't a substitute for the approved connection schedule.
Commission with measurements
Tightening until a cable feels firm isn't repeatable verification. Use the manufacturer's specified tension gauge or approved measurement method, and record the result for each run.
Don't confuse anchor-bolt torque with cable tension. They describe different installation conditions and need separate records.
Commissioning standard: Leave evidence that another installer or inspector can check, not just a railing that looked straight when the tools were packed away.
After retensioning, document what changed and check the associated connections. Repeated adjustment shouldn't become a substitute for investigating sleeve movement, post movement, or deterioration in the supporting structure. The commissioning record gives the next inspector something meaningful to compare against.
Confirm Your Anchor Spec Before You Order
For a homeowner replacing a deck or balcony railing, begin with the exposure assessment and the actual mounting structure. Then choose the termination and adjustment arrangement. Leave finish selection until those decisions are settled.
For a hospitality terrace or commercial lobby, include the approval documents, commissioning method, and maintenance responsibility in the specification from the start. A facilities team needs a repeatable inspection process, not just a box of spare fittings.
Choose a coordinated package or document every interface
DIY installers can reduce compatibility questions by choosing pre-drilled posts and matched hardware. That doesn't remove the need to verify the structure below the posts, but it avoids treating unrelated fittings as universal parts.
One catalog example is the Cable Railing - Stainless Steel With Blue Wood Top 8' Deck Mounted Straight Section, which lists pre-drilled posts, mounting hardware, a wood handrail, marine-grade stainless cable and cable hardware, and installation tools. Its listed package contents are a starting point for review, not evidence that every possible substrate is covered.
Confirm whether satin, mirror, or black powder-coated finishes are available for the selected configuration. Keep the underlying material requirement intact when changing appearance.
Send enough information for a useful drawing
Measure each deck and stair side separately. Where the catalog instructs you to round up to a listed kit length, follow that ordering method and have the supplier confirm the final layout before fabrication.
Include the following with the request:
- Site conditions: Exposure, pool proximity, salt contact, and mounting substrate.
- Layout: Side lengths, stairs, corners, post spacing, and proposed mounting style.
- Hardware requirements: Cable diameter, termination arrangement, and adjustment access.
- Approval needs: Code jurisdiction, required drawings, and requested performance documentation.
Resolve missing information before ordering. It's easier to revise a drawing than to make an unsuitable anchor work after drilling.
Ultra Modern Rails offers custom-made cable railing sections with coordinated posts, cable hardware, mounting options, and handrail choices. Visit Ultra Modern Rails to request a custom quote and drawing, and send your measurements, exposure conditions, substrate details, and code jurisdiction so the anchor connections can be reviewed as part of the complete railing.