

You're standing beside the open stair with a tape measure, trying to decide whether the cable railing kit on your screen will fit. The finish looks right, but the stair has a landing, the stringer is partly hidden, and the gap beside the bottom tread looks nothing like the level-deck examples.
Staircase cable railing kits need to fit the structure and the people using the stair, not just the measured length. Start with the occupancy and mounting surface, then resolve the guard height, graspable handrail, and cable layout. The detail that deserves the closest look is often the lower stair triangle, especially when cable movement enlarges an opening that looked acceptable at rest.
Table of Contents
- Which Staircase Cable Railing Kit Fits Your Stair
- Stair Guard Heights and Strength Rules
- Cable Spacing on the Lower Stair Triangle
- How to Install a Stainless Stair Cable Kit
- Checks That Keep the Stair Safe
- Order the Stair Kit That Matches the Run
Which Staircase Cable Railing Kit Fits Your Stair
Start with the mount: the stringer has to carry the post before you pick a finish. A stair that looks simple in a product photo usually hides the decision that matters, which is what the hardware fastens into. Take this shortlist into the quote process before choosing a color.
Stair kit match by occupancy and mount
| Situation | Guard height | Handrail | Mount to specify |
|---|---|---|---|
| Home interior open stair | Adopted residential stair-guard requirement | Guard top may serve if its height and graspability qualify | Deck mount or fascia mount into structural stringer |
| Home exterior deck stair | Adopted residential requirement for the stair and landing | Combined only where permitted and graspable | Deck mount into framing, not trim |
| Hotel, restaurant, or other commercial stair | Applicable commercial guard requirement | Plan for a separate graspable handrail unless the approved design establishes otherwise | Posts engineered into structure |
| Workplace stair subject to current OSHA requirements | Applicable workplace stair-rail requirement | Separate handrail where required | Structural anchorage with the specified connections |
A guard helps prevent a fall from an open edge. A handrail gives someone a surface they can grasp while moving, recovering balance, or negotiating a transition. A broad wood cap can finish a guard neatly without being a suitable handrail.
No amount of cable tension changes that. A properly tensioned cable still deflects under a sideways push, so the rail a hand can close around, plus decent light on the treads, does work the cable never will. On a commercial stair, that may mean brackets, clearance, and post details for a separate rail that a residential configuration doesn't include. Square and rectangular metal handrail profiles, including straight-cut versions, exist for exactly this job on interior staircases and raised walkways.
Choose the mount before the finish
Deck-mounted posts sit on the tread or landing surface. Their base plates need room, and their bolts must connect to structural material beneath the finished surface. Check walking clearance and bolt access before deciding where the posts look best.
Fascia or side-mounted posts can preserve walking width. The visible outside board isn't automatically a suitable attachment surface, so confirm what's behind it, where the fasteners will land, and whether the connection needs reinforcement.
Say your split-level stair has an open side, a landing, and a wood stringer covered by painted trim. The first decision is whether the stringer and its connections can support a side mount without relying on the trim. Silver versus black comes after that.
Practical rule: Choose the connection you can build and inspect, then choose the appearance around it.
Match the components to the actual slope
Specify cable, posts, terminals, tensioners, and handrail as compatible parts. Our stainless steel cable railing hardware guide can help you identify the components to discuss when preparing a stair layout.
For exterior stairs, describe exposure to weather, pool chemicals, or salt when selecting the metal and finish. Indoors, compare a metal top with a wood top by grip and finishing work, not appearance alone.
Measure each sloped run separately and record the landing as a distinct part of the layout. Rotating a level-deck kit in your sketch won't make its holes, fittings, and rail connections accommodate the stair angle. Confirm the usable section length and cutting allowance before rounding an order upward.
Stair Guard Heights and Strength Rules
A residential stair and a hotel stair can require different guard heights, so confirm the occupancy before a single post is cut. The 2021 International Building Code guard-height provision generally requires guards at least 42 inches high, while allowing an open-side stair guard to serve as the handrail at 34–38 inches in Group R-3 occupancies and within individual dwelling units in Group R-2.
On stairs, that measurement starts at the tread-nosing line, the imaginary line connecting the leading edges of the treads. Measuring from a point behind that line, toward the back of a tread, makes a short rail read taller than it is, so a guard can look compliant on the tape while failing the actual reference.
Workplace stairs need a separate check. OSHA's general-industry railing standard requires stair-rail systems installed on or after January 17, 2017, to have a top rail at least 42 inches high and a separate handrail 30–38 inches above the tread. Separate means graspable: a flat cable or a wide cap can top a guard without giving the hand anything to wrap around.
Heights and loads that change the kit
| Rule | Applies to | Number | Measured from |
|---|---|---|---|
| IBC 2021 guard, general | Most guards, including many commercial stairs | At least 42 in (1,067 mm) | Nosing line on stairs |
| IBC residential stair exception | Group R-3 and dwelling units in Group R-2 | 34–38 in (864–965 mm) when the guard serves as the handrail | Nosing line |
| OSHA stair rail installed on or after Jan 17, 2017 | General-industry workplace stair-rail systems | Top rail at least 42 in (1,067 mm) | Surface of the stair tread |
| OSHA separate handrail | Applicable general-industry workplace stairs | 30–38 in (762–965 mm) | Above the stair tread |
| Older OSHA stairrail systems | Workplace stairrails that predate the current rule | Height set by the provision in force at installation | Tread reference under the legacy rule |
| Design-load benchmark | Complete assembly: cable, terminals, posts, anchors | Concentrated load set by the adopted standard | Point and direction the standard specifies |
Treat the height entries as separate rules that apply to different occupancies. A hotel guest stair, a restaurant service stair, and a stair inside a dwelling each call for an occupancy decision before a kit specification.
Specify a complete load path
The guard works like a chain: a tight cable still fails the assembly if a terminal pulls free or a post rotates at its base. A push on the top rail travels through terminals, posts, base plates, anchors, and the framing beneath, and the weakest connection sets the limit for the whole run.
Someone stumbling into the rail at the stair entry puts a sideways load on the nearest post. That load is only as safe as the anchor under the base plate, so specify hardware for the substrate that will carry it. Ask for documentation that matches the proposed post spacing, mount, substrate, and hardware; a cable-strength statement alone says nothing about how a base plate behaves when someone pushes against the finished railing.
Give the inspector a specific proposal
Our stair railing requirements guide organizes the questions to raise, but your building department determines which provisions apply to your project.
Bring a section drawing that marks the nosing line, guard top, handrail, and attachment. For replacement work, show the existing condition and the installation history if known, because a rail that has stood for years can still sit at the wrong height. Resolve these details before drilling: swapping a handrail bracket costs far less than reordering every post for a different guard configuration.
Cable Spacing on the Lower Stair Triangle
Measure the bottom triangle first. A mid-run gap check will not reveal the opening that fails, because the troublesome space often sits beside the bottom tread, between the tread and riser, or where a sloping cable approaches a post.
Use the stair detail below to identify those separate spaces before making cable marks.
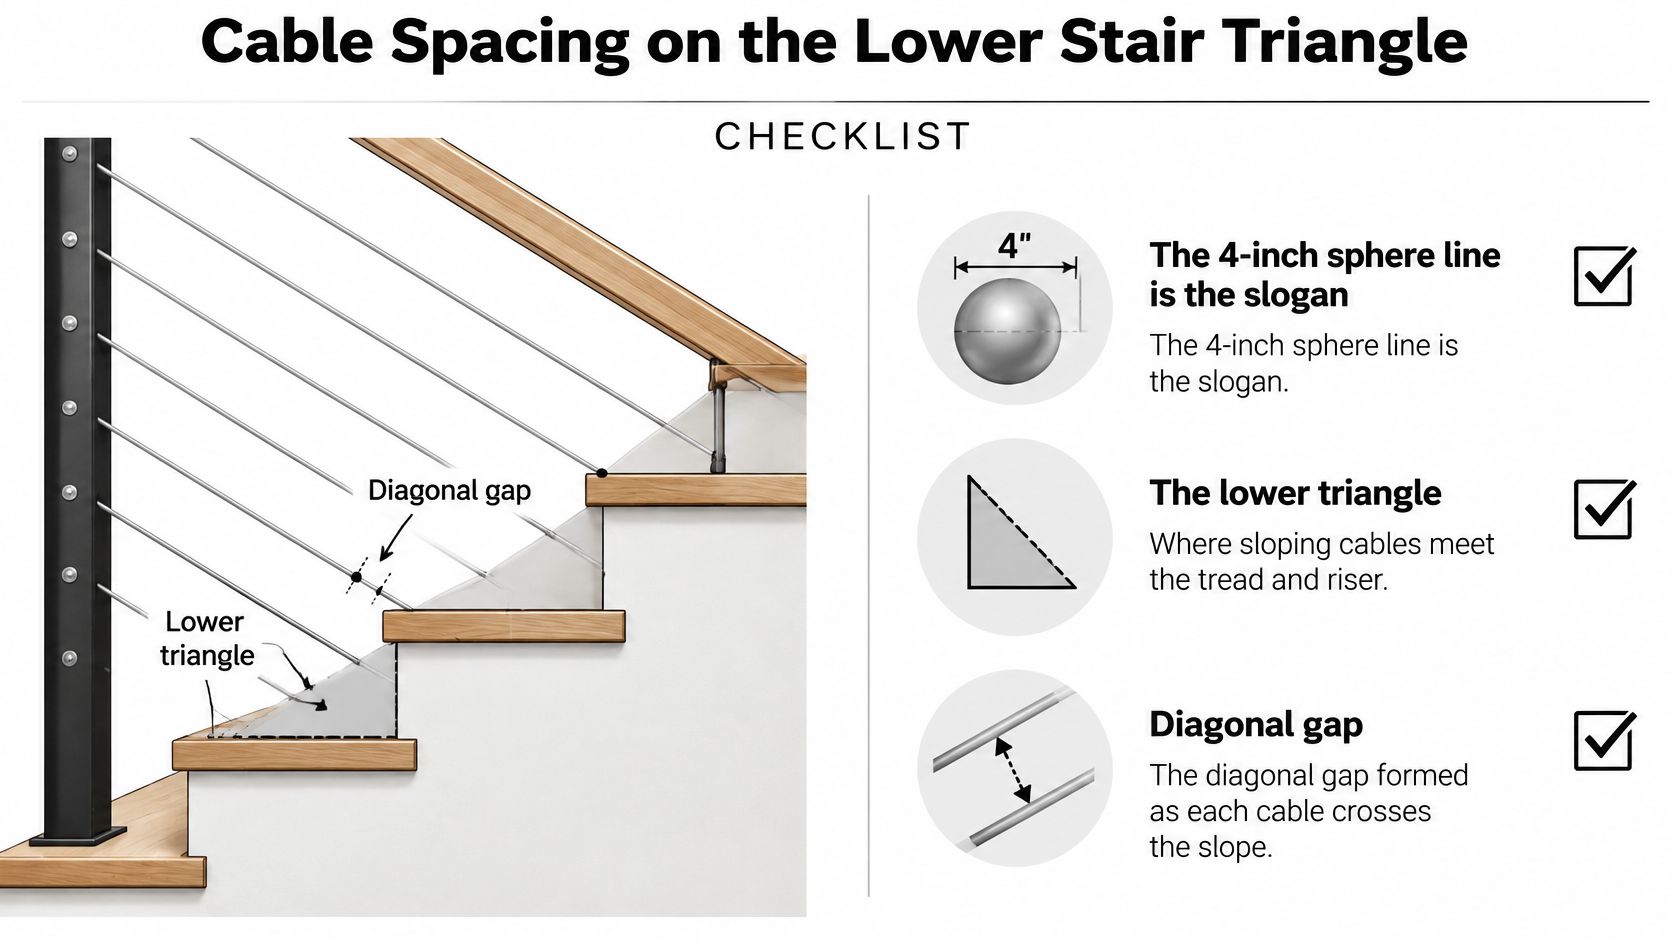
The Inso Supply cable-railing code summary describes the commonly cited 4-inch sphere limit, a 4⅜-inch open-side stair exception, and a 6-inch lower-triangle allowance, while recommending approximately 3 inches on center as a practical cable-layout margin. Use these figures to find the locations to verify against the adopted code for your project.
Stair opening limits versus a practical cable target
| Opening | Commonly cited limit | Practical target | When it fails |
|---|---|---|---|
| Gaps between cables | 4 in sphere must not pass in typical residential guards | About 3 in on center, subject to system approval | Cable deflection enlarges the opening |
| Open side of a stair | 4⅜ in sphere exception in some summaries | Confirm the adopted stair provision | Wrong exception or measurement location |
| Lower triangular area at tread and riser | 6 in allowance in some summaries | Gauge the actual triangle | Bottom cable or rail sits too high |
| OSHA general-industry stair-rail opening | Separate workplace opening rule | Don't use workplace opening criteria to lay out a home guard | Workplace requirements are copied onto residential work |
| Loaded opening | Nominal spacing alone doesn't establish compliance | Use the approved gauge and deflection-check method | Flexible posts or cable movement enlarge the gap |
Lay out the stair plane, not just the post face
Establish the upper and lower cable boundaries first. Then divide the space consistently and project the marks across the posts along the intended slope.
On-center spacing describes the distance between cable centerlines. The clear opening is what remains once cable diameter, slope, adjacent surfaces, and movement are accounted for, so two cables at 3 inches on center leave a smaller clear gap that a firm push enlarges further. That deflection under a push is exactly what the post-tensioning gauge check is meant to catch.
At the bottom of the stair, examine the complete shape bounded by the tread, riser, and lowest railing element. A convenient mid-run gap can pass while the triangular opening beside the bottom step does not.
A neat row of cable marks proves consistency. It doesn't prove the finished openings remain acceptable when the infill moves.
Keep terminals aligned with the cable path. If the layout forces a cable sideways through a post or around an unsuitable transition, correct the detail rather than trying to straighten it with extra tension.
Check the installed opening
Use an appropriately sized sphere gauge at the cable field, post edges, and lower triangle. Repeat the check after tensioning, and have the installer or inspector verify deflection using the method accepted for that system.
A tight cable also does only part of the safety work. The graspable handrail is what a person holds on the stair, and no cable tension compensates for a rail that is hard to grip or a tread edge that disappears in low light.
Don't improvise a structural proof test by throwing your weight against the cables. An informal push can reveal movement, though it certifies neither load resistance nor compliance.
Watch the installation detail with the lower opening and cable alignment in mind.
How to Install a Stainless Stair Cable Kit
Build only after the mounting detail, approved rail configuration, and cable marks are settled. Set out a tape measure, level, straightedge, angle finder, drill guide, appropriate bits, torque tool, cable cutters, and the terminal tools specified for the kit.
Use the sequence below as a preparation guide alongside the manufacturer's assembly instructions.
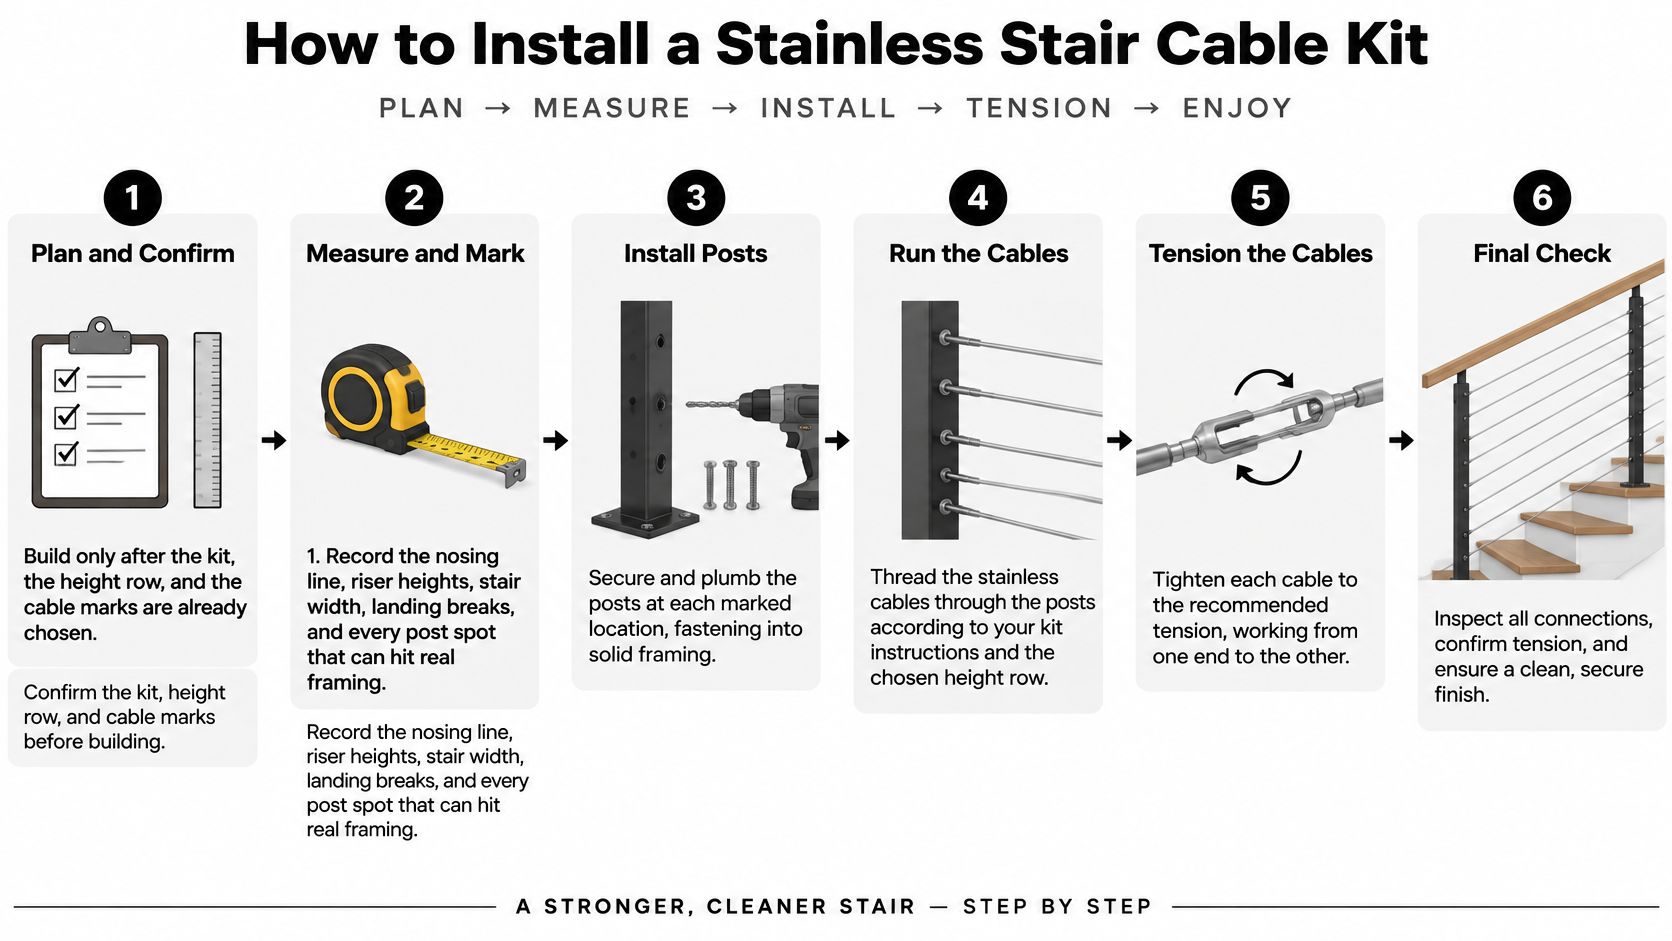
Prepare and anchor the structure
- Record the stair geometry. Mark the nosing line, riser heights, stair width, landing breaks, and proposed post locations. Photograph concealed-framing access before covering it, and distinguish finished surfaces from load-bearing material.
- Transfer the approved rail heights. Use the requirement selected for this occupancy and application, rather than a dimension printed on a generic installation sketch. Check the proposed handrail path through the landing and at its ends before fixing post elevations.
- Anchor posts into structural framing. Follow the approved fastener type, embedment, edge distances, and reinforcement detail. Decorative fascia, unsupported trim, and thin decking are not substitutes for a structural connection. For side mounting, verify the actual stringer or rim condition instead of assuming the visible board represents the full assembly.
- Plumb and align the posts. Check from both directions with a level and sight along the run. Correct the base connection now; do not expect the cables to pull an incorrectly installed post into a stable position.
- Install the sloped top rail. Confirm that it tracks the intended line and meets the landing detail without an awkward step or unsupported joint. Keep enough access to inspect fasteners and fit the cable terminals.
Fit and tension the cables
- Prepare the cable holes. For field-drilled posts, use the manufacturer's hole pattern and an angle guide suited to the stair pitch. For predrilled posts, verify their orientation before anchoring, since a post drilled for a flat run will not line up on a slope. Do not enlarge holes casually to compensate for a layout error.
- Seat the terminals and route the cable. Match the cable to its fittings, protect cut ends from fraying, and use the specified crimping or fastening procedure. Tension progressively from the center outward in small increments, following the kit's sequence rather than finishing each cable independently.
- Stop if a post leans or the rail bows. Check alignment throughout tensioning. Visible movement can indicate a connection, post-stiffness, or layout problem. Adding tension to a moving end post can worsen the condition instead of correcting the loose-looking cable.
- Finish the contact surfaces and inspect. Remove burrs, cap cut ends, and check that sleeves, clothing, and hands will not catch on fittings. Confirm terminal seating, then arrange the required inspection before putting the stair into service.
The OSHA construction stairway standard requires handrails and top rails to withstand a 200-pound (890 N) downward or outward force applied within 2 inches of any point along the top edge without failure. Treat this as a design requirement; do not run a homeowner load test to verify it.
For a concrete kit example, the Cable Railing - Stainless Steel With Blue Wood Top 8' Deck Mounted Stair Section pairs stainless posts and cable with a wood top rail in a deck-mounted stair configuration. Confirm the drilling pattern and supplied components against the approved stair drawing before assembly.
Our cable railing installation guide provides additional preparation guidance. A workplace load standard and a kit's hardware both sit inside the larger residential permit and inspection process, so follow the approved drawing and let the inspector verify the finished stair.
Checks That Keep the Stair Safe
Walk the stair in the dark before you call it finished. A guard can look orderly in daylight while the people using it still struggle to see the edge, hold the rail, or read where the landing ends.
A study of acceptable stair-fall prevention interventions identifies improved lighting, education or skill training, and additional handrails among the most acceptable measures. Treat those as part of the stair decision, not optional accessories after the cable work is complete.
After install symptoms and fixes
| What you see | Likely cause | What to do |
|---|---|---|
| Cable loosens after initial use | Settling, terminal seating, or connection movement | Inspect fittings and anchors before making small tension adjustments |
| Brown tea stains | Surface contamination or exposure to salt and chlorides | Rinse with fresh water and use a stainless-compatible cleaner; skip bleach |
| Sphere passes when the cable moves | Excessive deflection or an unsuitable opening layout | Have the installer evaluate post stiffness, supports, and spacing |
| Sleeve or hand snags | Burr, projecting fitting, or exposed cut end | Smooth the contact surface and cap the termination |
| Wood top grays in patches | Uneven exposure or an unfinished surface | Prepare and finish the wood with a suitable exterior coating |
Walk the stair as people will use it
Test the grip with an open hand moving along the rail. You shouldn't need to pinch a wide cap, release your grip at an awkward bracket, or reach around a post to continue. A tight cable cannot do that work; a graspable shape does it.
Walk the stair after dark with the lights you will leave on. Look for shadows at the first and last treads, glare from polished surfaces, and a landing that becomes difficult to distinguish from the next step.
Consider the users. An older adult may need a continuous rail more than an unobstructed view. A guest carrying bags may approach from an unfamiliar direction. Children, wet footwear, and hurried movement all deserve a pass during the walkthrough.
Safety check: Stand at each approach to the stair and identify what you can see, what you can grasp, and where your foot will land.
Keep the route clear of planters, loose mats, and furniture that narrows the approach. Make sure an added handrail does not create a new obstruction at a door or landing.
Maintain without hiding a defect
Inspect after the system has settled, after an impact, and whenever a cable changes noticeably. Follow the manufacturer's maintenance schedule rather than repeatedly tightening a fitting that will not hold its setting.
Push firmly on the mid-span cables and watch how far they travel. Wide movement traces back to post stiffness, intermediate support, and spacing, the same trio that decides whether a sphere passes on the lower stair triangle.
For outdoor stainless, rinse away deposited dirt and salt, and use cleaning products labeled for the finish. Protect surrounding wood while cleaning, and keep water from sitting around concealed mounting details.
Finish unfinished wood before weather exposure using a coating appropriate to the location. Leave access to terminals and base connections so maintenance does not require dismantling the rail.
Ask whether the people using the stair can see clearly, grip comfortably, and move without catching a sleeve. When the dark walkthrough answers yes to all three, the stair is done.
Order the Stair Kit That Matches the Run
A stair kit order succeeds or fails at the lower triangle: the sloped edge where cable spacing, post stiffness, and a firm grip matter more than a flat-deck opening slogan. Build the order from a measured sketch and photographs of the actual stair. A hallway picture explains the appearance, but a close view of the stringer, rim, underside, and finished surfaces establishes what can be anchored and reached.
Send enough information to distinguish a sloped stair section from its landing and any adjacent level guard. Label uncertain dimensions rather than guessing.
Prepare a quote-ready checklist
- Occupancy and use. State whether the stair serves a home interior, exterior deck, hotel, restaurant, or workplace. Identify public access and any intended change of use.
- Guard and handrail. Give the approved target heights and say whether the guard top must function as the handrail. Show any separate wall-mounted or post-mounted rail on the sketch, because a tight cable does not replace a graspable rail or adequate light on the treads.
- Mounting condition. Choose the proposed deck, fascia, or side mount. Include photographs of the stringer, rim, underside, and accessible framing, with trim identified separately from structural material.
- Run geometry. Supply sloped length, total rise, horizontal run, landing dimensions, turns, and post locations. Mark where the slope changes instead of combining everything into an overall length.
- Finish and access. Specify the cable and frame finish, metal or wood top, planned wood coating, and access for drilling and tightening. Note nearby walls or finished surfaces that limit tool clearance.
Ultra Modern Rails lets customers choose height, cable finish, handrail, length, run shape, and mounting, with the price shown instantly. That configuration process is most useful when the drawing already identifies the structural and inspection requirements.
Confirm the drawing before fabrication
Request a custom quote and drawing with the stair information attached. Check that the drawing shows the intended post positions, slope transitions, mounting arrangement, and handrail relationship. Ask which opening dimension governs the lower stair triangle, how far a cable may move under a hand push at the widest point, and which post or fitting controls that movement.
Compare the drawing with the stair itself, not just your original sketch. Confirm which posts arrive predrilled, what field cutting remains, and how the installer will reach the anchors and tensioning hardware.
Ultra Modern Rails supplies IRC / IBC-compliant railing kits for residential and commercial applications. The finished installation still needs the correct configuration, supporting structure, and local approval. The kit designation does not approve the lower triangle or attachment detail on its own.
Before fabrication is released, settle the questions a quote cannot infer: anchor locations, the controlling opening size, whether a separate graspable rail is required, and how terminals stay accessible after finishes are installed. Keep the approved drawing available during installation so an on-site adjustment does not change the accepted design.
Ultra Modern Rails offers custom cable railing systems and drawings for residential and commercial stairs. Visit Ultra Modern Rails with your measured sketch, mounting photos, and handrail requirements to request a stair-kit quote that matches the run you're building.