

The deck is framed, the view is worth preserving, and the railing supplier wants a measurement before anyone can price the job. You measure the outside edge, then measure it again because the corner post, stair transition, and cable terminations can turn a seemingly simple run into an expensive reorder.
That's the part most steel cable railing kit guides skip. The kit isn't just a box of posts and wire. It's a complete job that has to move from accurate measuring, to code-aware ordering, to structural installation, then to tension checks and maintenance after the crew has left. A good-looking system can still create trouble if the posts are too far apart, the cables are cut short, or the fittings don't match the cable grade.
Table of Contents
- What a Steel Cable Railing Kit Actually Does on a Project
- What's Inside the Box and Why Each Part Matters
- Measuring Your Space the Right Way Before You Order
- Installing the Kit From Posts to Tensioned Cable
- Matching the Kit to Your Environment and Budget
- Troubleshooting the Problems You Will Actually Hit
- Final Checklist Before You Buy and After You Build
What a Steel Cable Railing Kit Actually Does on a Project
On a hot afternoon, the most common question on a deck is rarely about the finish. It's usually, “Is this opening between posts too wide?” The answer affects the cable length, the intermediate post count, the tensioning plan, and whether the finished guard will satisfy the applicable building code.
A steel cable railing kit packages those decisions into a coordinated system. Typical packages combine structural posts, stainless steel cable, end fittings, intermediate supports, tensioners, and hardware. The value isn't only convenience. The parts have to work together as a guardrail that resists loads, maintains its height, and keeps the infill openings within the permitted limit.
Residential guardrails commonly use a 36-inch guard height, while commercial applications may require a 42-inch height, depending on the applicable code and occupancy. The International Residential Code and International Building Code use the guardrail logic that openings must block passage of a 4-inch sphere, and industry guidance commonly places cables at about 3 inches center-to-center to allow for deflection under load. Those requirements and engineering limits are summarized in this cable railing safety and engineering guide.
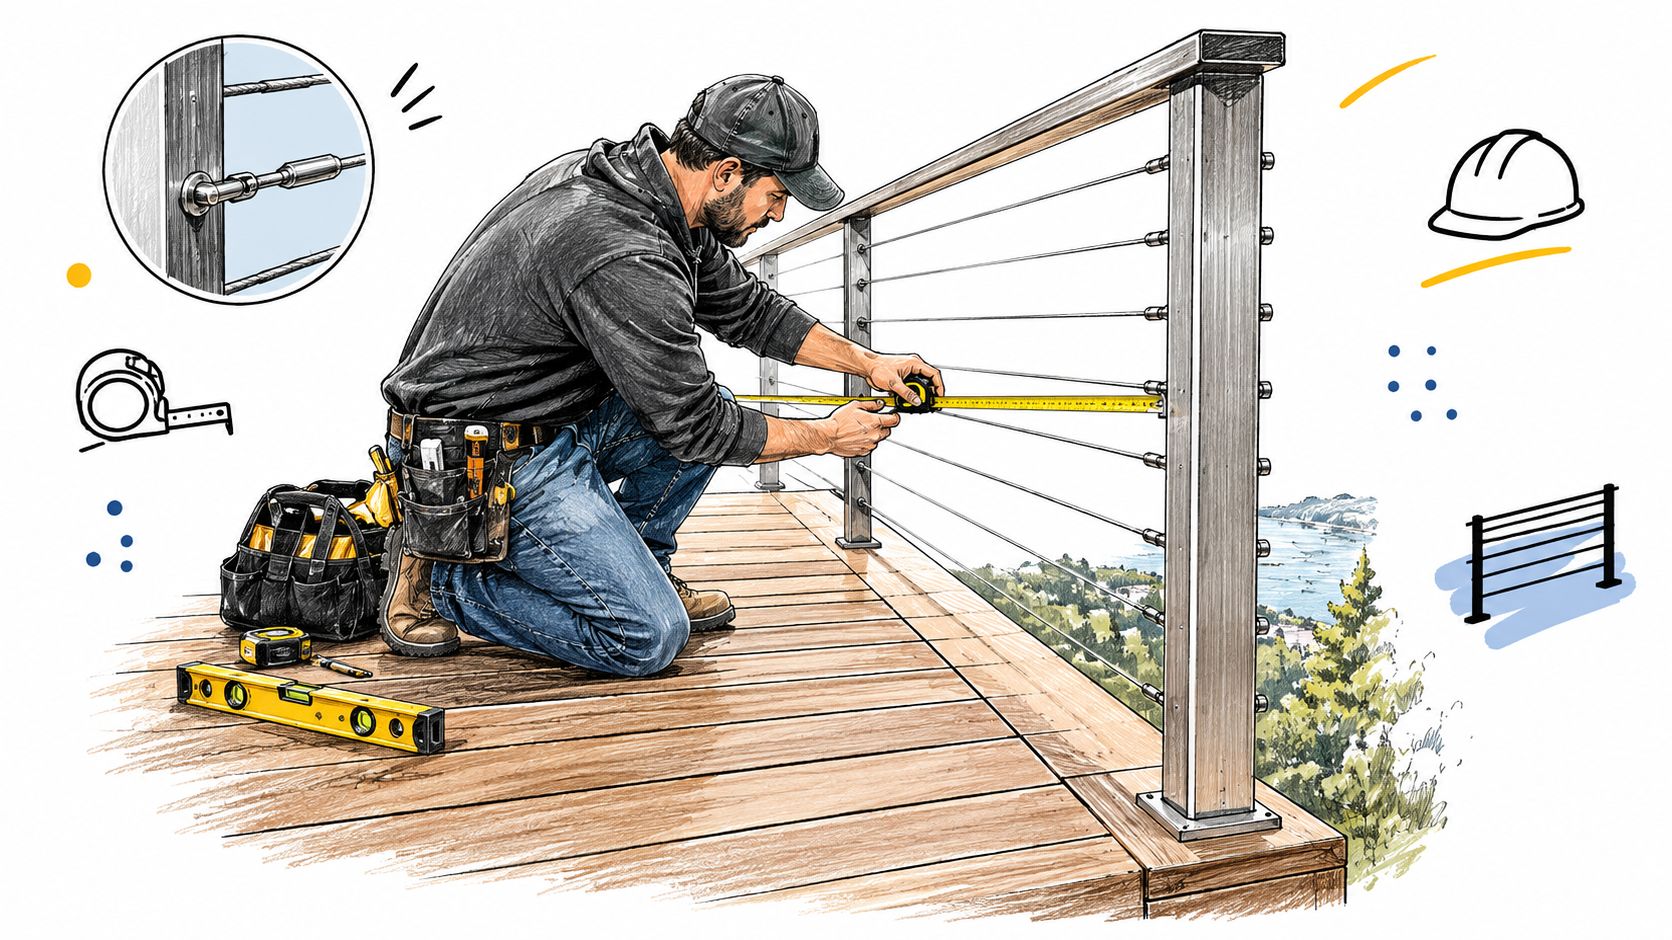
The kit is an assembly, not a parts bundle
End posts carry cable tension. Intermediate posts keep the infill aligned. Fittings transfer tension into the posts, and the top rail or handrail stabilizes the frame while providing a graspable edge where required. Changing one component can change how the entire assembly behaves.
That's why a factory-matched kit is usually easier to defend during inspection than a mix of posts from one supplier, cable from another, and generic tensioners from a hardware store. Some systems also have independent compliance documentation. For example, one cable railing assembly was tested in 8-foot by 42-inch level and stair configurations against 2018 IRC design-load requirements, using a criterion of resisting 2.5 times the design load. The manufacturer's instructions, applicable code, and compliance report were required to remain available during installation, as stated in the cable railing compliance report.
Practical rule: Choose the kit as a tested system first, then choose the finish and accessories. A visually compatible part isn't automatically structurally compatible.
For project planning and design inspiration, the cable railing system guide is a useful reference. The important question remains the same on every job: will the assembled railing stay secure, correctly spaced, and serviceable after installation?
What's Inside the Box and Why Each Part Matters
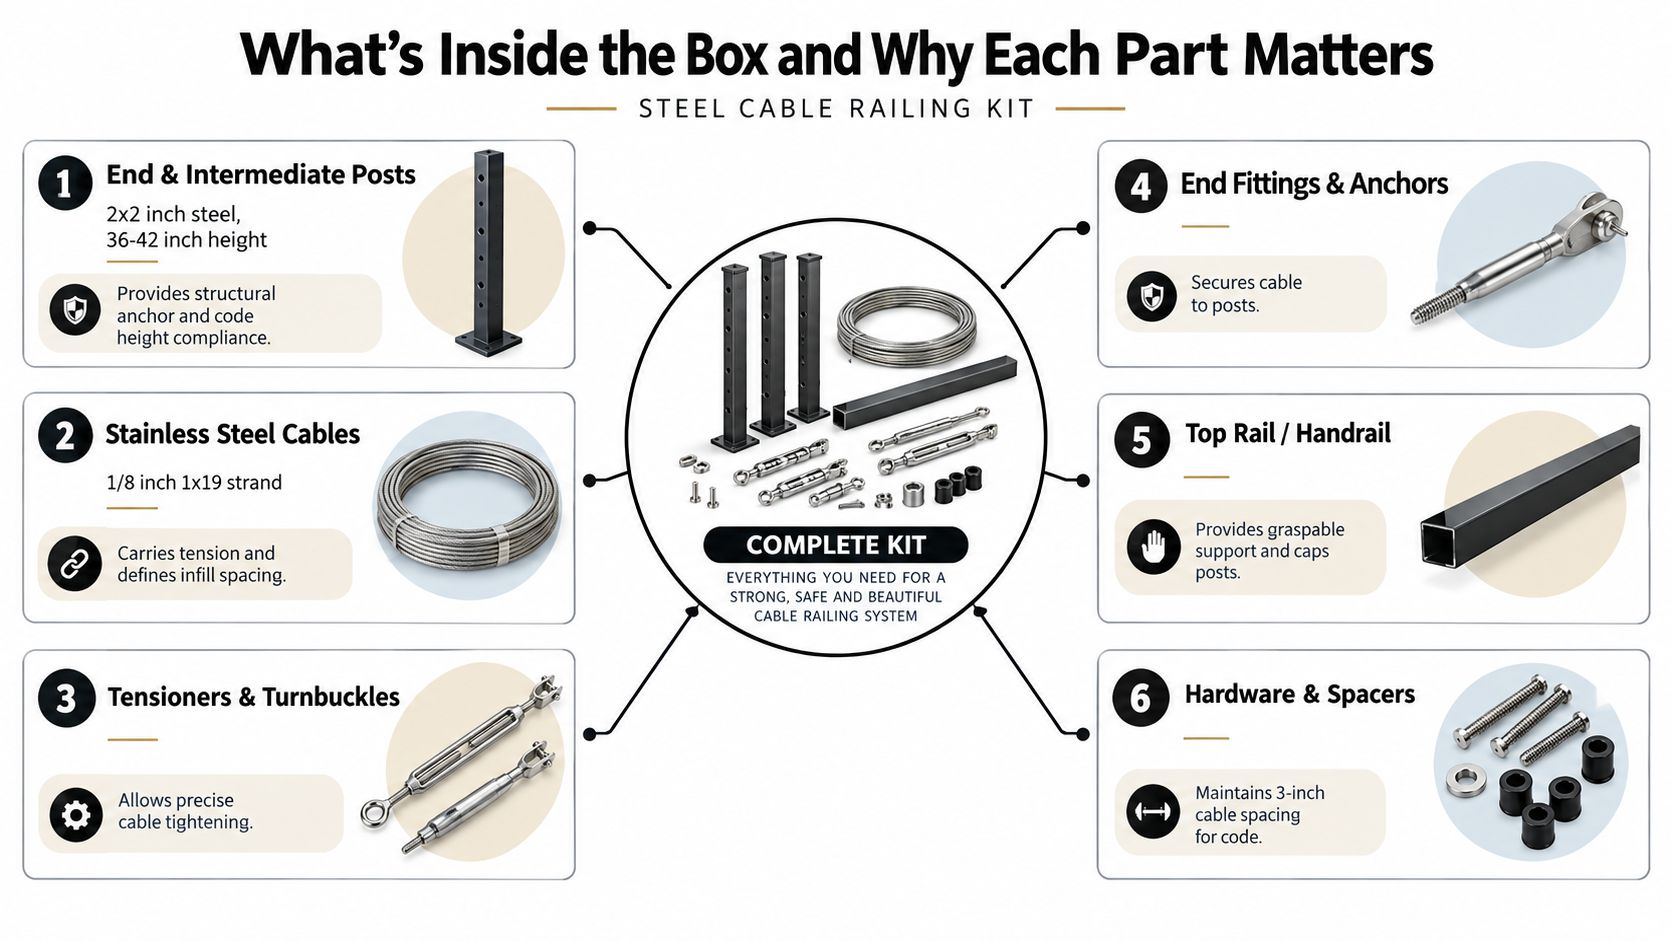
A typical kit looks straightforward when it's spread across a shop floor. The problems usually begin when one small specification doesn't match the rest of the system. Cable diameter, stainless grade, post spacing, fitting type, and mounting surface all affect the final result.
Posts and rails carry the frame
End posts anchor each cable run and absorb the accumulated tension from every cable. Intermediate posts maintain alignment and limit deflection across the run. Rigid 1x19 cable construction is commonly paired with post or brace spacing no greater than 48 inches, and engineering guidance also describes sequential tensioning to at least 225 pounds per cable for clean, parallel runs. Those requirements are detailed in this metal cable railing design guide.
The kit may include square or round posts, surface-mount plates, fascia brackets, base covers, and post caps. Don't ignore the cap. It protects the top of the post, finishes the appearance, and may support the top rail connection. A fascia bracket can be the right answer where the deck framing doesn't provide enough surface area for a conventional base plate, but it still needs structural attachment.
Top rails and handrails come in wood, aluminum, or steel. Wood feels warmer and can suit a traditional deck, while metal keeps the profile visually light and reduces refinishing work.
Cable and fittings determine serviceability
Cable is often supplied in 1/8-inch or 5/32-inch 1x19 strand, but the exact diameter must match the tensioners, terminals, washers, and drilling pattern. End fittings may be swaged, swageless, or built around a turnbuckle. Swaged fittings require the correct cable cutter and swaging tool. Swageless fittings simplify field work, but they still demand clean cuts, correct insertion depth, and careful tightening.
Cable grade matters most in exposed locations. Type 316 stainless steel is widely recommended over Type 304 for exterior and coastal use because its molybdenum content improves resistance to chloride corrosion. Specifications may reference ASTM stainless-steel grades and standards such as ASTM A492, A580, and E935/E985.
Avoid mixing 304 and 316 components in the same run. The metals may look identical when new, but the corrosion behavior and warranty requirements may not be the same. Confirm the cable, fittings, posts, and fasteners are specified as a coordinated package before ordering.
Measuring Your Space the Right Way Before You Order
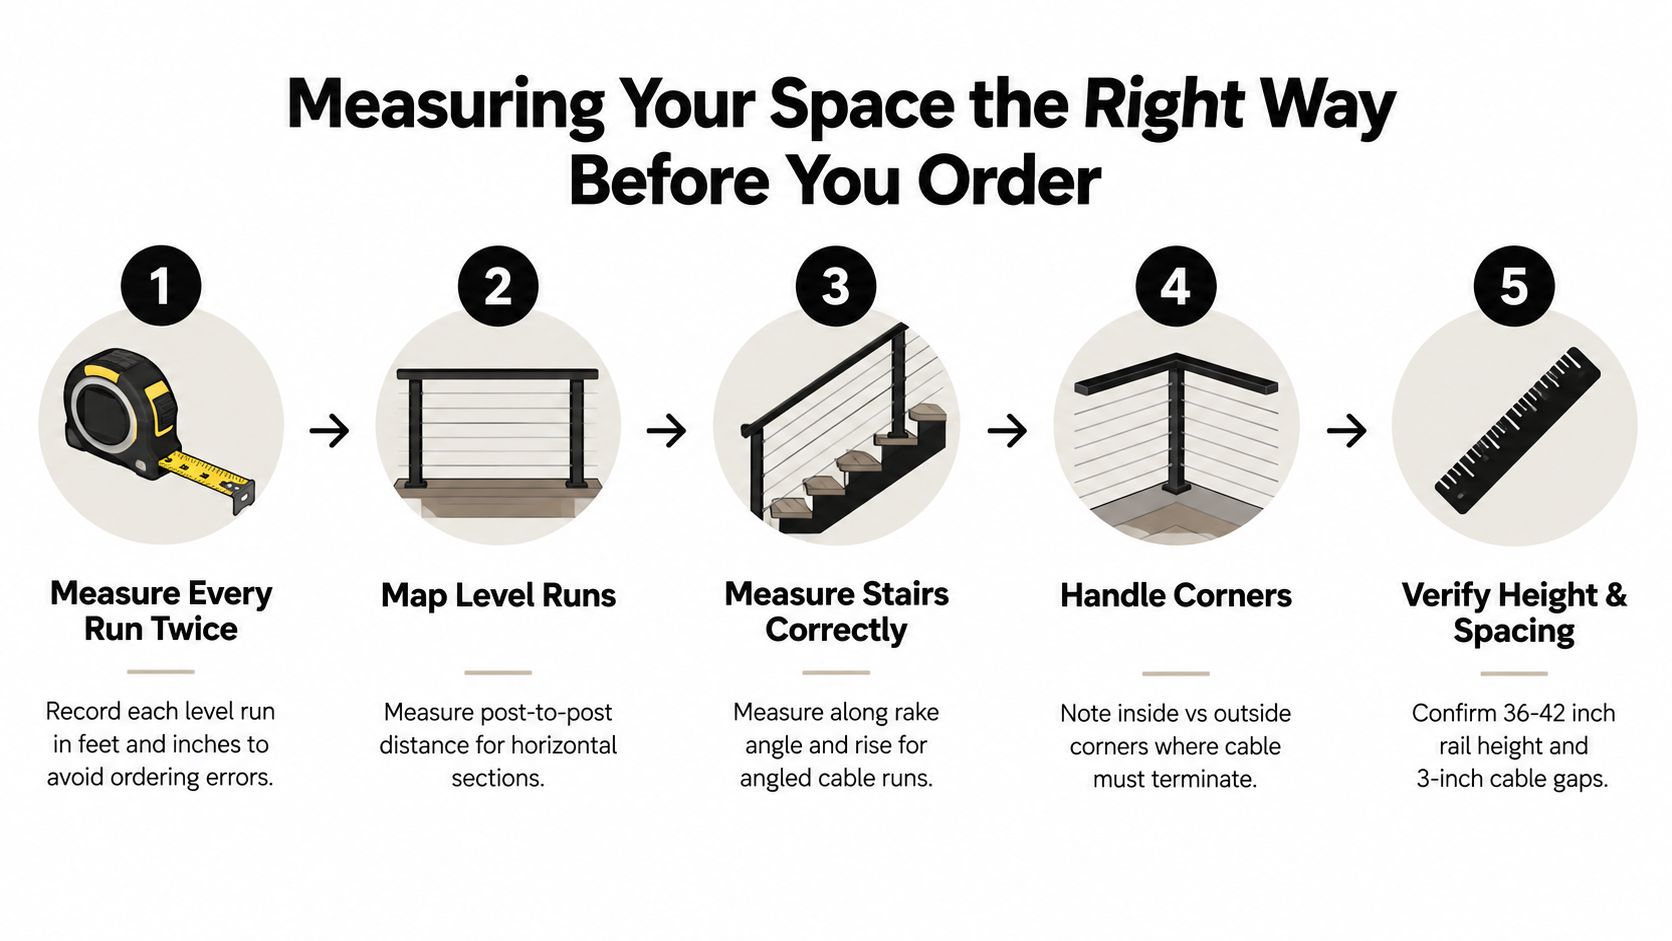
Most cable railing reorders come from rushed measuring, not difficult installation. Measure each run twice, record it in feet and inches, and keep a sketch beside the tape measure. Cable can be trimmed. A short cable can't be stretched into a missing section.
Start with a run-by-run map
Measure level sections from the planned cable termination points, not just from the outside edges of the deck. Mark where end posts, intermediate posts, and corner posts will sit. A corner post often serves two runs, but only if the kit is designed for that arrangement and the post has the necessary holes or fittings.
Use a laser line or tight string line to check that the planned post centers follow a consistent path. Don't assume the deck framing is straight. Older decks can have small shifts that become obvious when a stainless cable is tensioned across them.
For each run:
- Measure twice: Record the overall length and the intended post centers.
- Mark terminals: Note where the cable begins and ends, allowing for the thickness and shape of the end posts.
- Check spacing: Keep intermediate posts within the distance rated by the kit. Rigid 1x19 cable guidance limits post or brace spacing to 48 inches, as described in the engineering guide linked earlier.
- Add ordering allowance: Round cable lengths up to the next full foot and allow for the termination method. Extra cable can be cut away, but under-ordering creates a second delivery.
- Label corners: Call them inside corner, outside corner, stair transition, or return. Those labels help the supplier select the correct fittings.
Stairs need a different measurement
A stair cable run follows the rake, not the horizontal deck length. Measure the rise and run of the stair section, then measure the true diagonal along the planned cable path. Check the upper and lower termination heights independently. The top cable may align with the level run, while the lower cable may need a different fitting position to keep the infill consistent.
Measure stair posts at the actual angle where the cable will enter. A fitting designed for a level connection can bind or sit crooked on a stair post. If the system uses angled terminals, identify that requirement before the order is submitted.
The deck railing calculator can help organize run lengths and post quantities, but it won't replace a site sketch. Photograph every corner, stair landing, and mounting surface. Write the photo label on the sketch so nobody has to guess which measurement belongs to which run.
Order-day check: If the cable measurement feels exact, check it again. Exact measurements leave no room for the terminal body, trim allowance, or a field adjustment.
Installing the Kit From Posts to Tensioned Cable
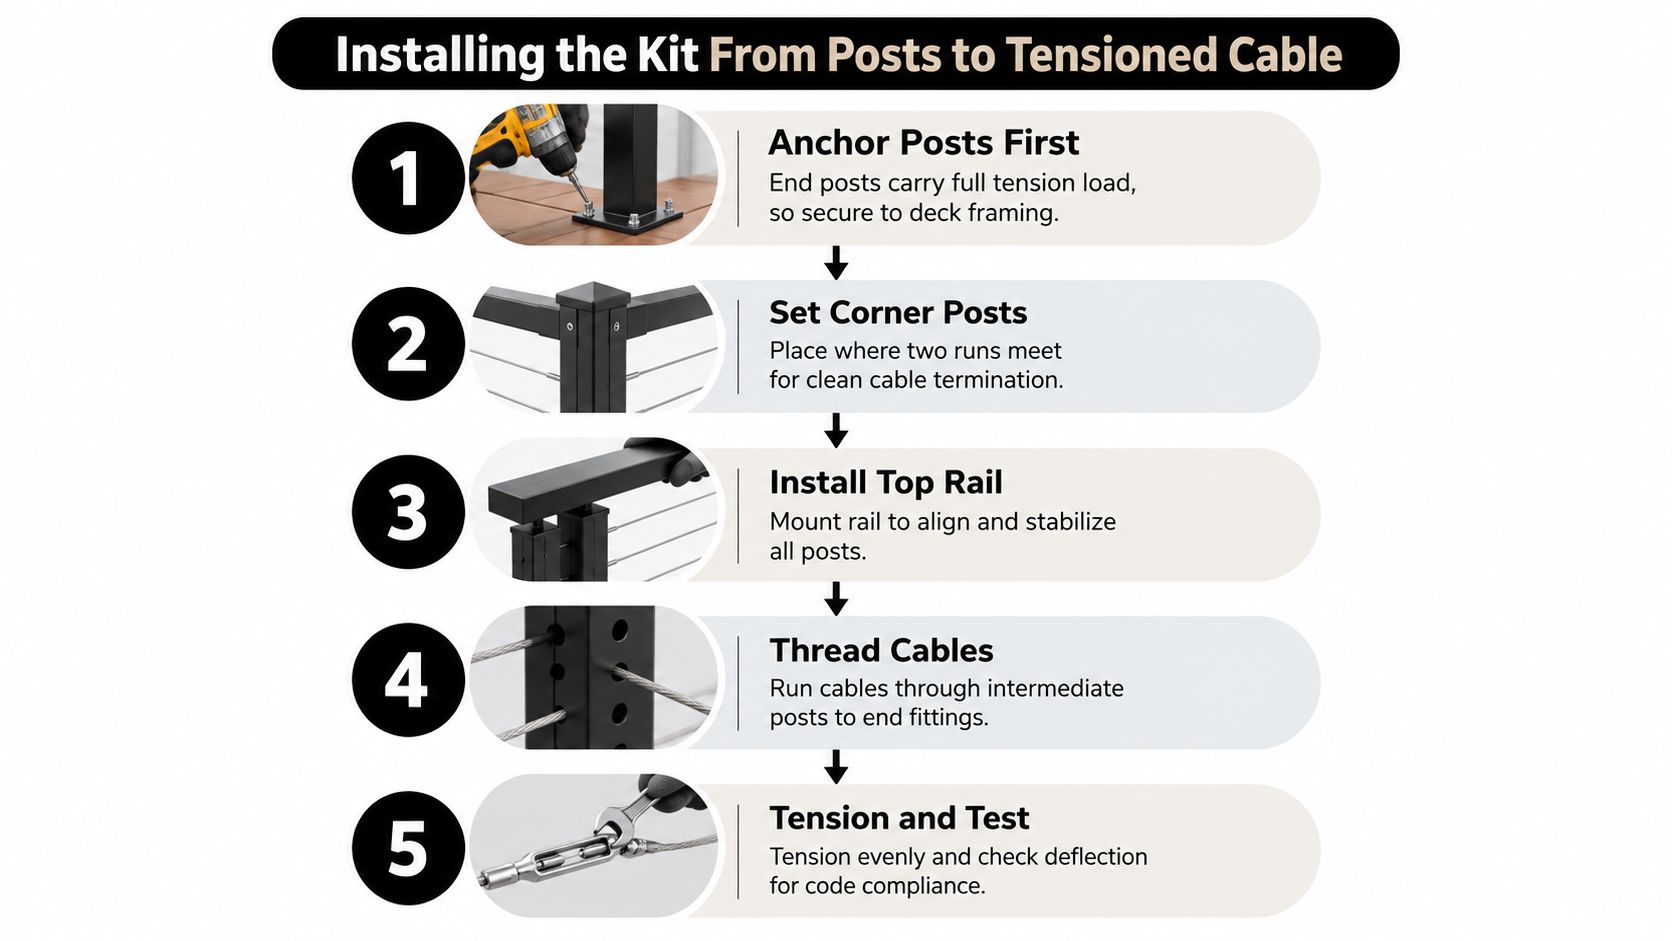
Install the frame before installing the infill. Cable tension can pull a weak or poorly aligned post out of position, and correcting that after the cables are installed wastes time.
Build the structure first
Begin with the end posts. Confirm that the deck framing, concrete, steel, or fascia structure can accept the specified mounting hardware. Surface mounts need structural screws or bolts that reach appropriate framing. Decorative fasteners won't hold a tensioned cable system.
Set corner posts where two runs meet. This gives each cable a clean termination and prevents awkward attempts to bend one cable around a corner. Check every post for plumb in both directions before installing the top rail.
Install the top rail or handrail after the posts are aligned. It helps stabilize the frame and gives you a reference for the finished guard height. On stairs, keep the rail and cable terminations parallel to the stair angle, while maintaining the required relationship between the rail, deck, and walking surface.
Thread, tension, and trim in sequence
Cut each cable longer than the finished distance so it can enter the terminal, pass through the fitting, or wrap as the manufacturer requires. A clean cut matters. Use a dedicated stainless cable cutter, not a worn side cutter that flattens the strands and makes insertion difficult.
Thread the cable through the intermediate posts and install the end fittings. For swaged systems, protect the post finish with a cloth or masking material while using the swaging tool. Make the required crimps in the specified sequence, then inspect the sleeve for complete compression. For swageless fittings, confirm that the cable has reached the internal stop before tightening.
Tension from the middle of the run outward, alternating sides so the load builds evenly. Don't tighten one cable completely while leaving the rest loose. That approach can pull posts out of plumb and make later cables difficult to align.
A properly tensioned run should look straight and parallel without kinks. Check the cable spacing at the intermediate posts and near the terminals. The 4-inch sphere rule applies to the finished guard opening, not just the empty frame before tensioning.
Use a torque wrench if the manufacturer specifies a torque value. Trim exposed threads after the fitting is secure, remove burrs, and install protective covers. On stairs, inspect every angled fitting for binding before applying final tension.
This video shows the general sequence of installing a metal post and tensioned cable system:
Matching the Kit to Your Environment and Budget
The right kit depends on exposure, substrate, appearance, and how much field fabrication the installer is prepared to do. A covered deck in a dry inland climate has different demands from a balcony exposed to salt air or a pool deck where chlorides remain on the hardware.
Type 304 stainless steel can suit protected, dry installations when the manufacturer approves it. For coastal, poolside, or de-iced salt exposure, Type 316 stainless steel is the safer specification because its molybdenum content improves chloride resistance. The trade-off is price. Independent market coverage reports that 316L marine-grade systems can carry a 40 to 60 percent premium over 304 configurations in coastal and high-humidity regions, as described in this cable rail systems market analysis.
Compare the whole system, not just the cable
| Kit Type | Cable Grade | Best Environment | Post Spacing | Approx. Cost per Linear Foot |
|---|---|---|---|---|
| Economy interior kit | 304 | Dry interior applications | Manufacturer-rated spacing | Varies by system |
| Standard exterior kit | 304 | Covered, low-salt exterior areas | Manufacturer-rated spacing | Varies by system |
| Marine-grade kit | 316 or 316L | Coastal, poolside, humid, or salt-exposed sites | Manufacturer-rated spacing | Varies by system |
| Heavy-duty commercial kit | 316 or specified structural grade | High-use commercial settings | Engineered spacing | Varies by system |
The table uses qualitative cost guidance because a reliable universal price per linear foot depends on posts, corners, stairs, top rail, mounting surface, and fittings. Ask for a complete takeoff instead of comparing cable-only prices.
Post spacing creates another trade-off. Wider spacing may reduce the number of posts, but it can increase cable deflection and demand stronger posts, bracing, or more careful tensioning. A wood top rail can lower the visual temperature of a modern system, while aluminum or steel offers a cleaner maintenance profile. Corner kits, stair fittings, extra end posts, and a required swaging tool often decide whether the initial estimate remains realistic.
Request the compliance documentation, installation instructions, warranty terms, and substrate-specific hardware before buying. A low parts price isn't a saving if the installer has to redesign the run on site.
Troubleshooting the Problems You Will Actually Hit
A cable railing can pass inspection on installation day and still need attention later. Stainless cable settles, fittings bed in, wood framing moves, and temperature changes alter tension. The owner's maintenance plan matters as much as the final wrench turn.
Tension loss and uneven sag
A single sagging cable in a long run doesn't always mean the cable is defective. It may have settled differently from neighboring cables, or the terminal may not have seated correctly. Tightening that cable aggressively can pull the end post out of plumb while leaving the problem untouched.
Start by checking both terminations, the cable path through each intermediate post, and the post alignment. Loosen tension only as much as necessary, reseat the fitting, then retension gradually. Work across the run instead of chasing one cable with excessive force.
Engineering guidance for rigid 1x19 cable commonly calls for sequential tensioning to at least 225 pounds, but the manufacturer's instructions control the finished system. Use the specified tension method and don't substitute a guess based only on how tight the cable feels.
Hardware, finish, and code checks
Cable vibration against an unprotected wood post can create a friction mark. A sleeve, bushing, or correctly sized protective insert prevents the cable from sawing into the finish. A failed swage usually shows incomplete compression, a damaged sleeve, or cable strands that weren't fully inserted. A stripped terminal, loose threads, or visible cable pullout is a termination failure, not a cosmetic issue. Stop using that section and have the fitting replaced or re-terminated by someone equipped to verify the connection.
The 4-inch sphere opening limit and residential guard height requirements should be checked against the current local code, especially during remodeling or resale. Commercial work may use a 42-inch guard height, but the authority having jurisdiction determines the applicable requirement.
For a practical tightening reference, use this cable railing tightening guide alongside the kit instructions. Schedule a re-tension inspection around the first month and another later in the service cycle. At least annually, rinse exposed stainless components, inspect every fitting, look for broken or frayed strands, and replace damaged cable rather than hiding it with extra tension.
Final Checklist Before You Buy and After You Build
Use one checklist before the order and the same checklist during handoff. The best installation problems are prevented while the parts are still on paper.
Before ordering
- Map every run: Record level, stair, corner, and return sections separately.
- Allow cable waste: Include 10 percent waste in the cable takeoff, as specified for this project checklist.
- Confirm post count: Keep intermediate posts within the kit's rated spacing and verify the guard height.
- Select the grade: Confirm 316 stainless steel for coastal, poolside, humid, or salt-exposed locations.
- Match the hardware: Make sure terminal fittings, tensioners, washers, and cable all suit the same diameter and grade.
- Specify the rail: Coordinate wood, aluminum, or steel top rails with the post finish and handrail requirements.
- Verify the substrate: Select mounting hardware for wood framing, concrete, steel, or fascia installation.
- Ask for documents: Obtain installation instructions, code-compliance information, and warranty conditions.
Before handoff
Inspect every cable from end to end. It should be taut, parallel, and free of kinks, frayed strands, sharp burrs, or unfinished cuts. The project checklist calls for tension near 250 pounds per cable and no deflection greater than 4 inches under a 50-pound lateral load at mid-span, but the approved system documentation and local code take priority.
Check that all fittings are seated and snug, posts remain plumb, the top rail is secure, and the finished openings satisfy the applicable sphere test. Don't rely on a visual pass from across the deck.
Photograph each completed run, label spare washers and tensioner parts, and write the inspection dates on the project file. Schedule re-tension checks at 30 and 90 days, then include the railing in annual exterior maintenance. That record makes future repairs easier and gives the next contractor useful information instead of forcing them to reverse-engineer the installation.
Ultra Modern Rails supplies factory-direct stainless steel and black metal cable railing systems for residential and commercial decks, balconies, stairs, patios, pools, and hospitality spaces, with custom sections, handrails, mounting styles, and wood-top options. Visit Ultra Modern Rails to request a custom quote and drawing, then compare the proposed takeoff against your measurements, substrate, environment, and code requirements before ordering.