

You're standing at a railing supplier's counter with two parts that look almost identical: a stainless cable, and a small loop at its end. The cable has a published breaking strength, the eyelet looks substantial, and the product photo suggests a simple installation. The important question is what happens between the cable and the post, because the loop isn't automatically equal to the cable's rating.
A stainless steel cable eyelet is part of a termination assembly. Its alloy, bend radius, ferrule or thimble, forming method, and attachment to the post all affect the finished load path. This guide shows how to compare those details without confusing an eyelet with a thimble, a ferrule, or a factory-swaged terminal.
Table of Contents
- What a Stainless Steel Cable Eyelet Actually Does
- Main Types of Stainless Steel Cable Eyelets
- Dimensions, Cable Sizes, and Common Measurements
- Material Grades and Corrosion Resistance
- Load Ratings and How to Read Them
- How Eyelets Are Installed and Terminated
- Environmental Exposure and Maintenance Planning
- Choosing the Right Eyelet for Your Project
- Quick Reference Tables and Specifications
What a Stainless Steel Cable Eyelet Actually Does
A cable eyelet creates an attachment point at the end of wire rope. In a railing, tension travels from the cable into the eyelet or terminal, through the fastener or tensioner, and into the post or structural support. Every component in that path has to work together.
That makes the eyelet more than a decorative loop. A ferrule is the sleeve pressed around cable strands to secure a termination. A thimble is the shaped insert inside an eye that protects the cable from tight bending and local crushing. A swaged terminal combines a fitting and a pressed connection, often with a threaded body or pin hole. The word “eyelet” may describe the visible attachment shape, but it doesn't identify how the cable is secured or how the assembly was tested.
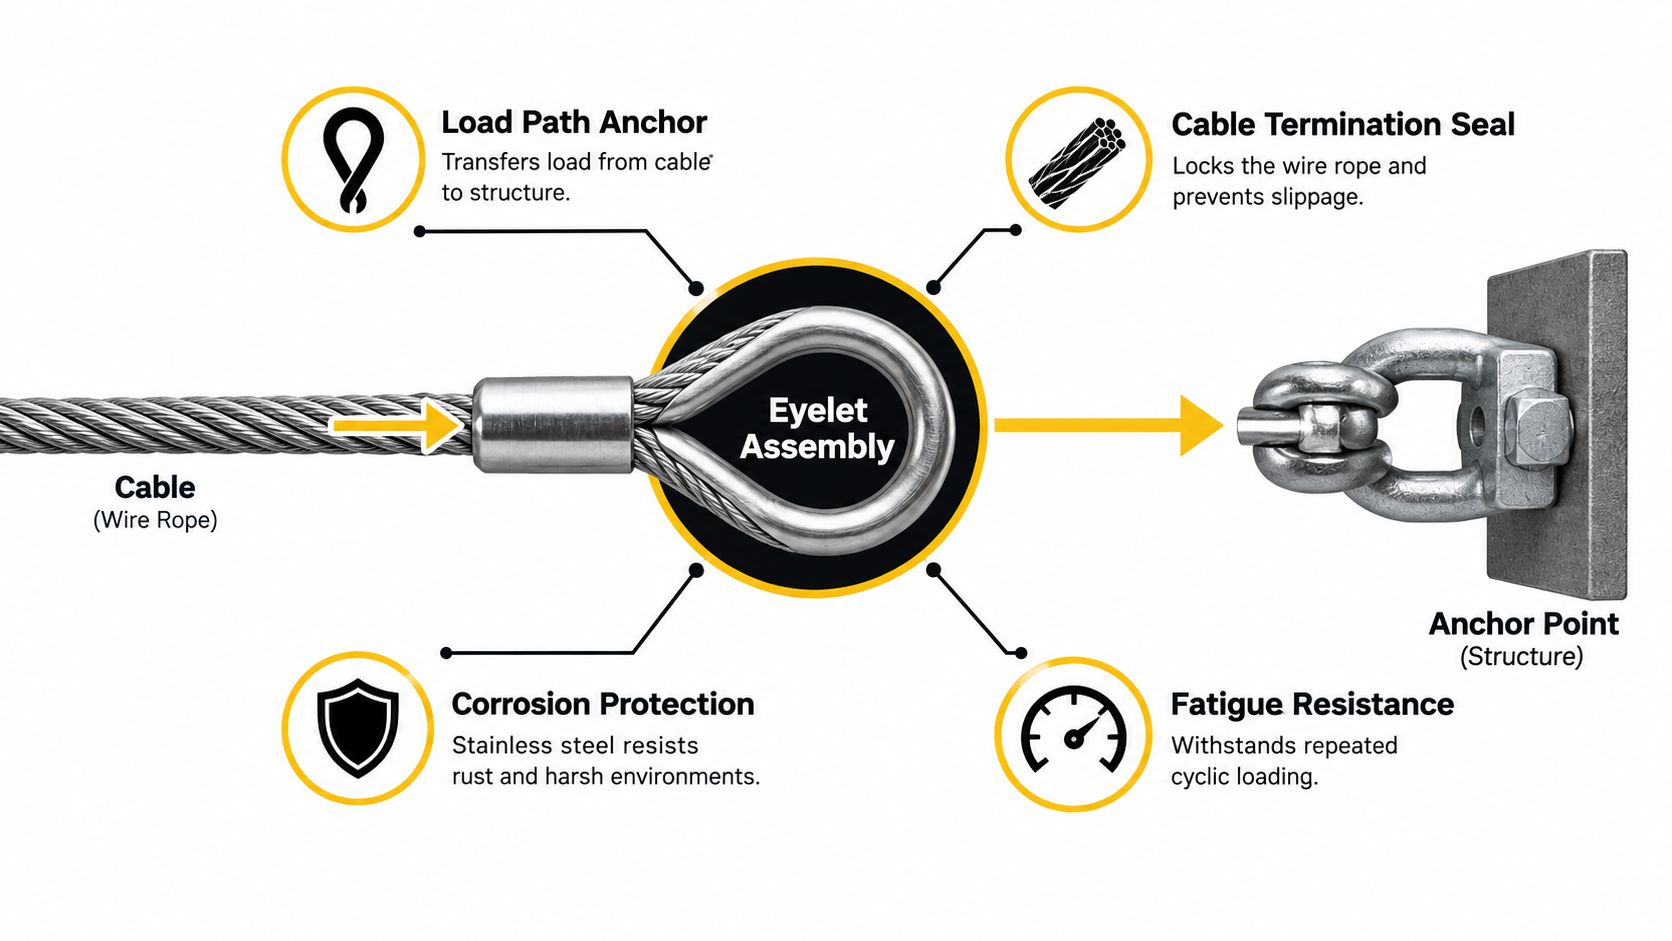
Follow the complete load path
Start at the cable and ask four questions:
- Where does the cable bend? A sharp bend concentrates stress and can crush strands.
- What holds the bend in shape? A correctly sized thimble or approved terminal should support the eye.
- How is the termination secured? Swaging, an approved splice, or correctly installed clips each has different requirements.
- How does the eye attach to the post? The pin, bolt, washer, tensioner, and post must suit the eye's dimensions and load.
OSHA's guidance on wire-rope eyes and terminations requires properly sized thimbles where applicable and approved methods for eye splices. Although that guidance addresses rigging and material handling rather than architectural guardrails, its core principles transfer well: preserve the bend radius, use approved connections, and follow the fitting manufacturer's installation instructions.
Practical rule: Never approve a cable eyelet from its appearance alone. Ask how it was formed, which cable diameter it fits, what material the mating parts use, and whether the complete termination has a documented rating.
The rest of the decision comes down to four categories: construction type, dimensions, material grade, and termination efficiency. Exposure and maintenance then determine whether the selected alloy will remain suitable after installation.
Main Types of Stainless Steel Cable Eyelets
Two eyelets can have the same polished appearance while using entirely different load paths. The construction method matters more than the label on a catalog page.
A fused-and-looped eyelet is formed by bending the cable into a loop and securing the cable with a pressed sleeve or formed fitting. It can be compact and visually clean, but its rating depends on the sleeve, tooling, cable match, and test evidence. A loop that has only been crudely crimped shouldn't be treated like a factory-tested architectural terminal.
A thimbled eyelet places a grooved metal insert inside the loop. The thimble supports the cable around the bend, protects the strands from the attachment hardware, and helps the eye retain its shape. The thimble itself doesn't secure the cable, so it must be paired with a splice, ferrule, clips, or another approved method.
A swage-terminated eyelet uses a purpose-made fitting pressed onto the cable with calibrated tooling. This is common in cable railing because it can produce a compact end with a threaded stud, fork, or eye. The fitting must match the cable diameter and alloy, and the installer must use the specified die and pressing sequence.
A turnback or Flemish eye folds the cable back through a formed eye, often around a thimble. Manufacturer data identifies properly prepared Flemish and turnback eyes as capable of approximately 90% or better of the cable's catalog breaking strength in suitable applications, as reported in the wire-rope end-fitting application document. That figure applies to the termination method and conditions described by the manufacturer, not to every stainless cable loop.
A clip-formed loop uses wire-rope clips to hold the cable's live end and turnback. It can be assembled in the field, but the clip count, spacing, turnback length, orientation, and tightening torque must follow the clip manufacturer's instructions. The same manufacturer information commonly rates clip and wedge-socket terminations around 80%, while swage and spelter sockets can reach 100% in suitable applications. Those are termination figures, not universal railing guarantees.
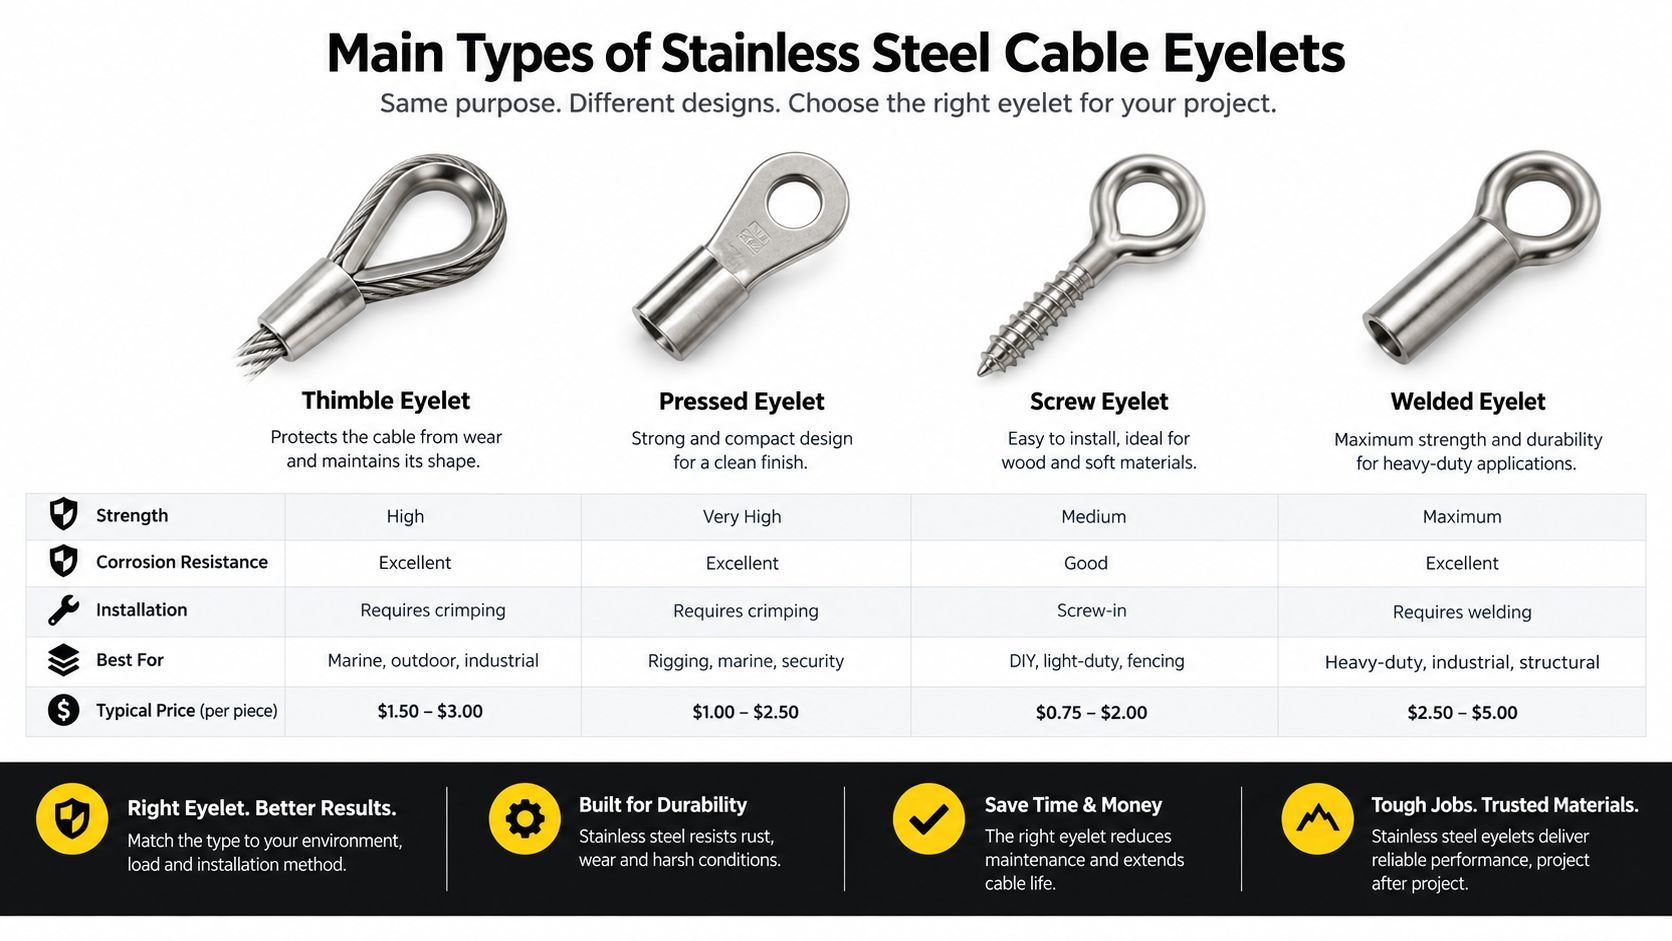
For a visual overview of compatible railing components, compare stainless steel cable railing hardware, then request the actual termination data for the assembly you're considering.
Dimensions, Cable Sizes, and Common Measurements
Product drawings often use several measurements for the same small fitting. Read them in relation to the installation, not as isolated numbers.
Cable diameter is the starting point. Common railing cable sizes range from 1/8 inch through 3/8 inch, but the eyelet, ferrule, die, drill opening, and tensioner all have to match the selected cable. A ferrule intended for one diameter can produce an unreliable connection if used with another.
Measurements that affect fit
- Eye inside width: The clear opening where a pin, bolt, or tensioner passes. It must provide enough clearance for the attachment hardware without creating side loading.
- Eye length: The distance from the cable entry to the end of the loop. This affects the position of the attachment point and may influence post-hole layout.
- Overall fitting length: The full length of a swaged terminal or eyelet. Use it when calculating how much cable extends into a post or tensioner.
- Clearance-hole diameter: The drilled opening required for the terminal body. A hole that's too small can damage the fitting during installation, while an oversized opening can reduce support.
- Thread size: Threaded eyelets and tensioners must use compatible thread forms and engagement. Don't match parts by outside appearance alone.
| Cable Diameter | Common Eye Inside Width | Typical Fitting Type |
|---|---|---|
| 1/8 inch | Verify against the manufacturer drawing | Compact swaged eye or thimble eye |
| 3/16 inch | Verify against the manufacturer drawing | Swaged terminal or thimble eye |
| 1/4 inch | Verify against the manufacturer drawing | Cable railing terminal or thimble eye |
| 5/16 inch | Verify against the manufacturer drawing | Heavy-duty swaged or formed eye |
| 3/8 inch | Verify against the manufacturer drawing | Larger terminal or engineered eye assembly |
The table is a buying prompt, not a substitute for a drawing. Manufacturers use different eye proportions and fitting bodies, so the actual inside width, overall length, thread, and hole diameter must come from the selected product.
Before drilling posts, place the eyelet, washer, tensioner, and fastener together on the workbench. That simple dry fit exposes dimensional conflicts before they become permanent installation errors.
Material Grades and Corrosion Resistance
Stainless steel resists corrosion because chromium reacts with oxygen to create a thin passive oxide film. The defining threshold for stainless steel is at least 10.5% chromium by mass, according to the British Stainless Steel Association's history of stainless steel. The film limits continued corrosion, but it doesn't make every grade suitable for every exposure.
304 stainless steel is often reasonable for sheltered indoor railing applications where chloride exposure is limited. 316 stainless steel is generally the safer choice near coastal salt air, swimming pools, de-icing salts, and other chloride sources because molybdenum improves resistance to localized pitting and crevice corrosion. Neither grade should be described as corrosion-proof.
Austenitic grades are not the only option. 2205 duplex stainless steel can earn consideration where the project demands higher resistance to chloride-related attack and the supplier can provide compatible cable, eyelet, ferrule, and fastener components. Its value depends on the complete system and documented suitability, not on choosing a stronger-sounding grade alone.
Specify the exposure, not just the finish
PREN is a useful indicator for comparing resistance to localized corrosion, especially in chloride environments. Classification guidance recommends stainless wire with a minimum PREN of 30 for marine use in the conditions covered by marine stainless-wire guidance. Treat that as an environmental specification aid, not as permission to ignore drainage, cleaning, or inspection.
The eyelet must be compatible with every mating component. Mixing stainless steel with dissimilar metals can create galvanic corrosion in wet, salty conditions, so isolating washers or approved barrier compounds may be appropriate. Carbon-steel tools and abrasive dust can also contaminate stainless surfaces and create rust staining after installation.
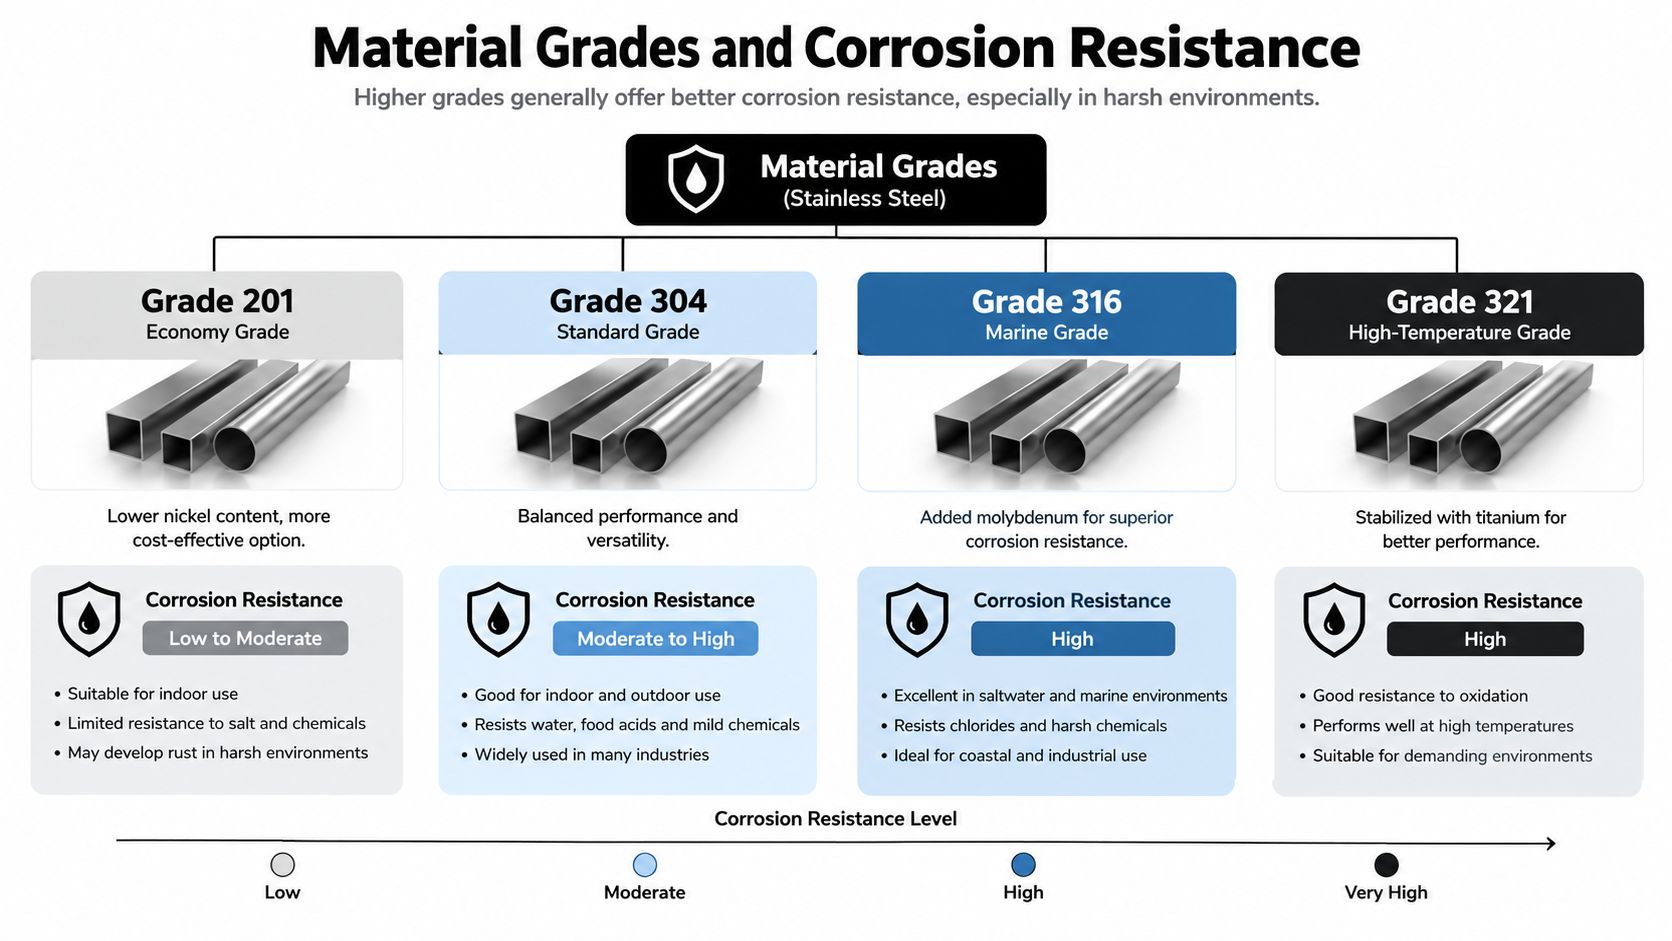
For cable specifications, ASTM A492 is a relevant reference for austenitic stainless-steel wire rope grades and construction requirements. A supplier's stainless steel wire rope information should still be checked against the exact eyelet and termination system, because cable grade alone doesn't establish finished assembly performance.
Load Ratings and How to Read Them
A railing cable may be rated for 6,400 lbf before its end is formed. Once an eyelet, ferrule, clip, or socket changes the load path, the finished termination must be assessed separately. The cable's catalog strength is therefore an input, not automatically the rating of the complete eyelet assembly.
Breaking strength is the load at which a specified cable or assembly fails under stated test conditions. Termination efficiency describes the share of the cable's reference strength retained by the end fitting. A working load limit is the permitted service load after the manufacturer's limits, safety factors, and application conditions have been applied.
Use the calculation in the correct order. If the 6,400 lbf cable is connected with a termination tested at 80% efficiency, the estimated assembly breaking strength is 5,120 lbf. Applying a 5:1 design factor gives a working load of 1,024 lbf, provided the manufacturer permits that method and the actual loading matches the test conditions. This example shows why a cable's rating cannot be carried directly onto an eyelet.
Read the termination row first
Find the row for the complete termination, not just the cable diameter. The Crosby termination table cited earlier identifies different performance levels for Flemish and turnback eyes, wire-rope clips, wedge sockets, swage sockets, and spelter sockets. Its fitting data also distinguishes clip-formed loop or thimble eyes by size, including clip sizes from 1/8 inch through 7/8 inch and larger sizes from 1 inch through 3-1/2 inches.
Those figures are reference values, not a universal rating for every stainless steel cable eyelet. Cable construction, alloy, fitting geometry, installation quality, loading direction, and the manufacturer's test method can change the result. A railing eyelet needs documented assembly data for the exact combination being purchased.
Ask the supplier for:
- Complete assembly data: Confirm that the rating covers the cable, eyelet, ferrule or thimble, and attachment method.
- Test conditions: Establish whether the stated value is breaking strength, proof load, or working load.
- Installation limits: Check required tools, dimensions, torque, insertion depth, and inspection criteria.
- Design responsibility: Have the project engineer apply guardrail code requirements and the selected safety margin.
The cable's published rating starts the calculation. The termination's documented rating determines whether the finished load path can be trusted.
How Eyelets Are Installed and Terminated
A railing can use the correct cable and still fail at its end connection. Treat the eyelet as a complete termination assembly, because the load path runs through the cable, ferrule or terminal, eye, thimble, and attachment hardware. Factory-formed or factory-swaged assemblies usually provide the clearest compatibility record, particularly when the eye must fit a concealed post or compact tensioner.
A swaging machine compresses a ferrule or terminal around the cable with a specified die and sequence. The finished connection depends on cable diameter, ferrule alloy, die geometry, press settings, and inspection. A hand tool that only squeezes a sleeve may not reproduce the manufacturer's tested connection.
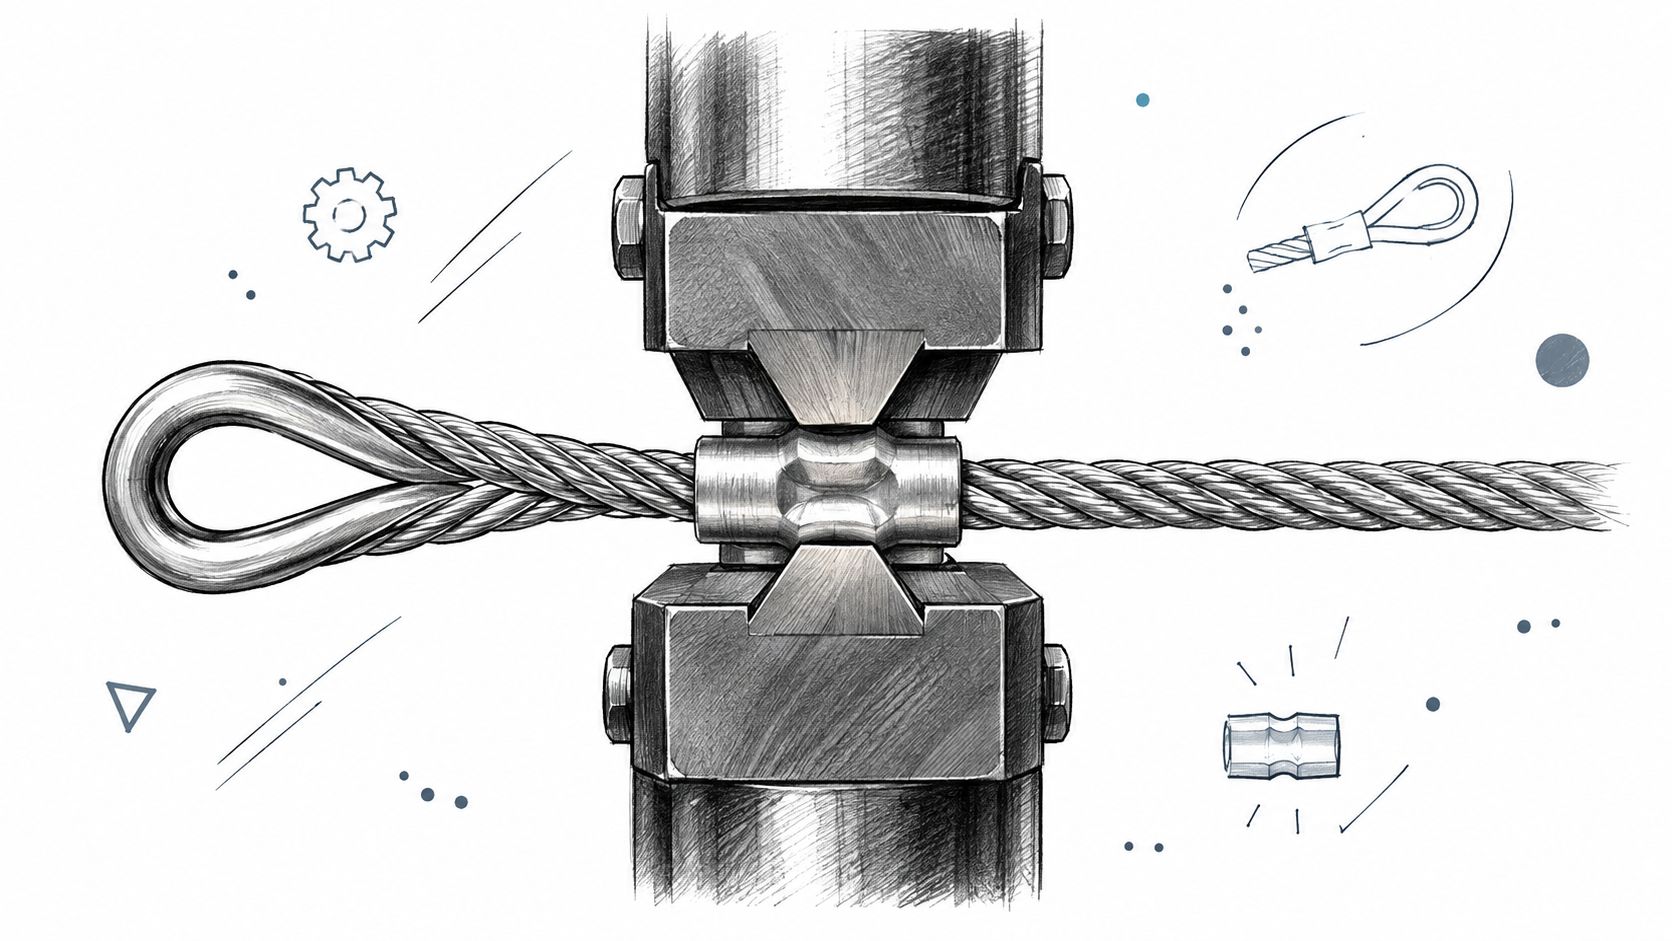
A thimble supports the cable where it bends around the eye. Its groove should match the cable and eye geometry. A loose thimble can shift, while an undersized one forces the cable through a tight bend and concentrates stress at the termination. Proper sizing and approved splicing methods are part of the assembly requirements, not optional finishing details.
Field clips require disciplined assembly
If the design allows wire-rope clips, follow the clip manufacturer's requirements for quantity, spacing, turnback length, and tightening torque. With U-bolt clips, the U-bolt belongs on the dead end of the cable, while the live end rests on the saddle. Reversing those parts weakens the connection.
Avoid knots, untested crimp sleeves, mismatched ferrules, and improvised loops. Before tensioning, confirm that the cable reaches the required insertion depth, the eye sits squarely against its washer or fitting, and no strand is cut or displaced.
For an alternative to conventional pressed connections, review swageless wire-rope fittings. Select a fitting rated and designed for the chosen cable and application.
Record the cable diameter, alloy, eyelet or terminal model, installation method, tool used, and inspection result. This documentation identifies the actual load path when a component needs adjustment or replacement.
Environmental Exposure and Maintenance Planning
A bright stainless eyelet can still be in the wrong environment. Chloride deposits from coastal air, pool splash, and de-icing salt can collect at the cable entry, inside a ferrule, beneath a washer, or where the eyelet meets a post. Those sheltered areas stay wet longer than the exposed surface and can develop pitting or crevice corrosion.
Maintenance should follow exposure rather than a generic calendar. Marine and pool installations need regular fresh-water rinsing to remove chloride deposits. Designers should also provide drainage and access so an inspector can see the eyelet, ferrule, fastener, and cable entry without dismantling the railing.
Separate staining from structural damage
Tea staining is a surface discoloration and may result from contamination, deposits, or poor cleaning. It still deserves attention because deposits can conceal more serious attack. Pitting, cracking, broken wires, deformation, cable migration, and loosening are different conditions. They indicate loss of section, altered geometry, or a compromised load path and should trigger replacement or engineering review.
Look closely at:
- Cable entry points: Search for broken strands, sharp bending, or movement inside the ferrule.
- Eyelet walls: Check for cracks, distortion, deep pits, or a widened pin opening.
- Mating interfaces: Look for staining concentrated between stainless and dissimilar metals.
- Drainage paths: Confirm that water isn't trapped behind washers, terminals, or post caps.
- Tension hardware: Check for loosening and evidence that the terminal has shifted.
A clean surface isn't proof of a healthy termination. Inspect the places where water, load, and dissimilar materials meet.
Use stainless-compatible cleaning products and avoid introducing carbon-steel dust during fabrication. If pitting has reduced the fitting, if a crack is visible, or if the eyelet has deformed under load, don't polish and reuse it. Replace the affected assembly and investigate why the damage occurred.
Choosing the Right Eyelet for Your Project
Choose the eyelet as part of a matched system. Start with the environment, then work inward toward cable diameter, termination method, post geometry, code requirements, and finish.
Use this decision sequence
Environment first. A sheltered indoor balcony may suit 304 when the rest of the system is compatible and exposure is controlled. Coastal, poolside, or salt-treated locations generally justify 316, with a project-specific review for duplex material where the exposure and documentation support it.
Match the cable and fitting. Select the cable diameter before ordering ferrules, thimbles, dies, terminals, or tensioners. The eyelet must accept the cable construction, and the ferrule must be intended for that exact cable size and material.
Study the post layout. Level runs often use a straightforward terminal at each end. Stairs introduce changing angles and may require terminals or tensioners that can accommodate the cable path without side loading. Corners need enough clearance for the cable bend and hardware movement, while end posts need adequate structure behind the attachment point.
Confirm the governing requirements. A railing must satisfy the applicable building code, guard loading, opening, height, and inspection requirements for its location. Don't substitute a rigging efficiency value for a guardrail design check.
Choose the finish last. Polished, satin, and other finishes influence appearance, but they don't replace alloy identification or termination documentation. Ask for the actual stainless grade and surface treatment rather than relying on “stainless look” in a product description.
Before purchasing, ask the supplier whether the complete assembly has pull-test documentation, which standards apply, what installation tooling is required, and how the finished eyelet should be inspected. A credible answer should identify the cable, fitting, method, and rating together.
Quick Reference Tables and Specifications
Use these tables as a purchasing checklist. Keep material, construction, and rating together, because a cable's published strength does not automatically describe the finished eyelet assembly.
| Selection item | What to confirm |
|---|---|
| Eyelet type | Factory-swaged eye, thimble eye, clip-formed eye, or socket |
| Cable match | Cable diameter, construction, and stainless grade match the fitting |
| Load path | The eye, ferrule, splice, socket, and attachment hardware are rated as an assembly |
| Installation method | Approved dies, press, clips, socket compound, or other specified tooling |
| Documentation | Drawing, installation instructions, working-load information, and test evidence |
| Inspection access | The finished termination can be checked for slippage, cracks, distortion, and corrosion |
A factory-swaged eye usually offers a controlled process, but its documentation still needs to identify the cable and fitting together. A field-formed eye depends on correct cable preparation, hardware selection, and installation. The manufacturer termination data cited above illustrates why termination efficiency belongs to the complete method, not to the cable alone. Treat published cable strength as one input, then verify the termination's own working-load information.
| Exposure class | Material and assembly check | Inspection and care |
|---|---|---|
| Indoor, dry | 304 or 316, as specified; keep cable and fittings compatible | Check for loosening, deformation, and staining |
| Outdoor, sheltered | Confirm alloy, finish, drainage, and crevice control | Inspect after installation and at regular service intervals |
| Coastal, pool, or salt exposure | 316 is generally preferred; assess duplex where justified | Rinse with fresh water and examine crevices more closely |
| Uncertain or severe exposure | Request written exposure suitability and alloy identification | Set a documented inspection frequency before purchase |
The eyelet's material story matters because chloride exposure can attack poorly chosen or poorly maintained stainless components. A polished surface may improve appearance and cleanability, yet it does not replace alloy identification, compatible hardware, or a sound load path. The historical background of common stainless grades is summarized by the British Stainless Steel Association.
Before ordering, record the cable diameter, eye dimensions, ferrule or terminal match, attachment hardware, working-load information, environmental classification, tooling, and inspection method. Missing information leaves the specification incomplete.
Ultra Modern Rails provides factory-direct cable railing systems with stainless steel cable and hardware for indoor and outdoor residential and commercial projects. Request a custom quote and drawing, then visit Ultra Modern Rails to discuss the cable diameter, eyelet style, post layout, finish, and exposure conditions before you order.