

The most common advice for buying a stair wire railing kit is to measure the run, choose a finish, and order enough cable. That gets the sequence backward. Before you choose hardware, you need to know what the railing must do and what the stair can support.
A clean cable line can conceal an awkward handhold, flexible end posts, or anchors fastened only into finish material. Start with code classification and the supporting structure. Then select a kit that fits the approved design, rather than trying to make the stair fit the kit.
Table of Contents
- Measure and Check Code Before You Order
- Pick the Kit Size and Mounting Style
- How to Install the Cable Railing Step by Step
- Troubleshoot and Maintain the Cable Railing
- Decide DIY or Professional Before You Buy
Measure and Check Code Before You Order
Classify the project as residential, generally under IRC-style rules, or workplace/commercial, where OSHA and IBC-style requirements need separate consideration. OSHA workplace requirements aren't interchangeable with commercial building-code requirements. Ask the building authority which rules govern the finished installation.
Next, identify the assembly's function. A handrail provides a graspable support; a guard protects an open edge; a stair-rail system may combine functions only when its design satisfies the applicable requirements.
Build a project-specific code matrix
The Handrail reference summarizes OSHA construction guidance with handrails at 30–37 inches, a combined stair-rail top edge and handrail at 36–37 inches, and a separate handrail when that top rail exceeds 37 inches; it also describes circular gripping profiles of 1.25–2 inches and accessibility-related wall clearance of at least 1.5 inches.
The OSHA stairway standard, as summarized for current workplace stair-rail installations, identifies a 42-inch top rail, a separate 30–38-inch handrail, and resistance to a 200-pound downward or outward force at the top rail without failure.
These references describe different configurations and rule contexts. Don't combine their dimensions into a universal residential specification.
Code and measurement values by project type
| Requirement | Workplace (OSHA) | Residential (IRC-style) | Check with |
|---|---|---|---|
| Handrail height above tread or nosing | Applicable OSHA handrail range; confirm installation category and nosing reference | Adopted residential handrail rule; confirm nosing reference | Local building department |
| Stair rail top rail | Applicable stair-rail height and separate handrail requirement | Guard height under adopted local code | Local building department |
| Graspable handrail profile | Confirm applicable gripping-profile criteria | Confirm round or approved equivalent profile | Local building department |
| Wall clearance | Confirm applicable accessibility and handrail provisions | Confirm adopted clearance requirement | Local building department |
| Opening or infill spacing | Approved opening limits for the assembly | Adopted guard-opening rule, including stair conditions | Local building department |
| Load at top rail | Applicable OSHA load requirement and engineered attachment | Local structural code | Engineer or building official |
| Dead weight on treads | Verify whether the stair's evaluation report applies | Applicable ICC evaluation report and stair design | ICC-ES report or engineer |
Use this checklist to organize the measurements and approval questions before discussing finishes.
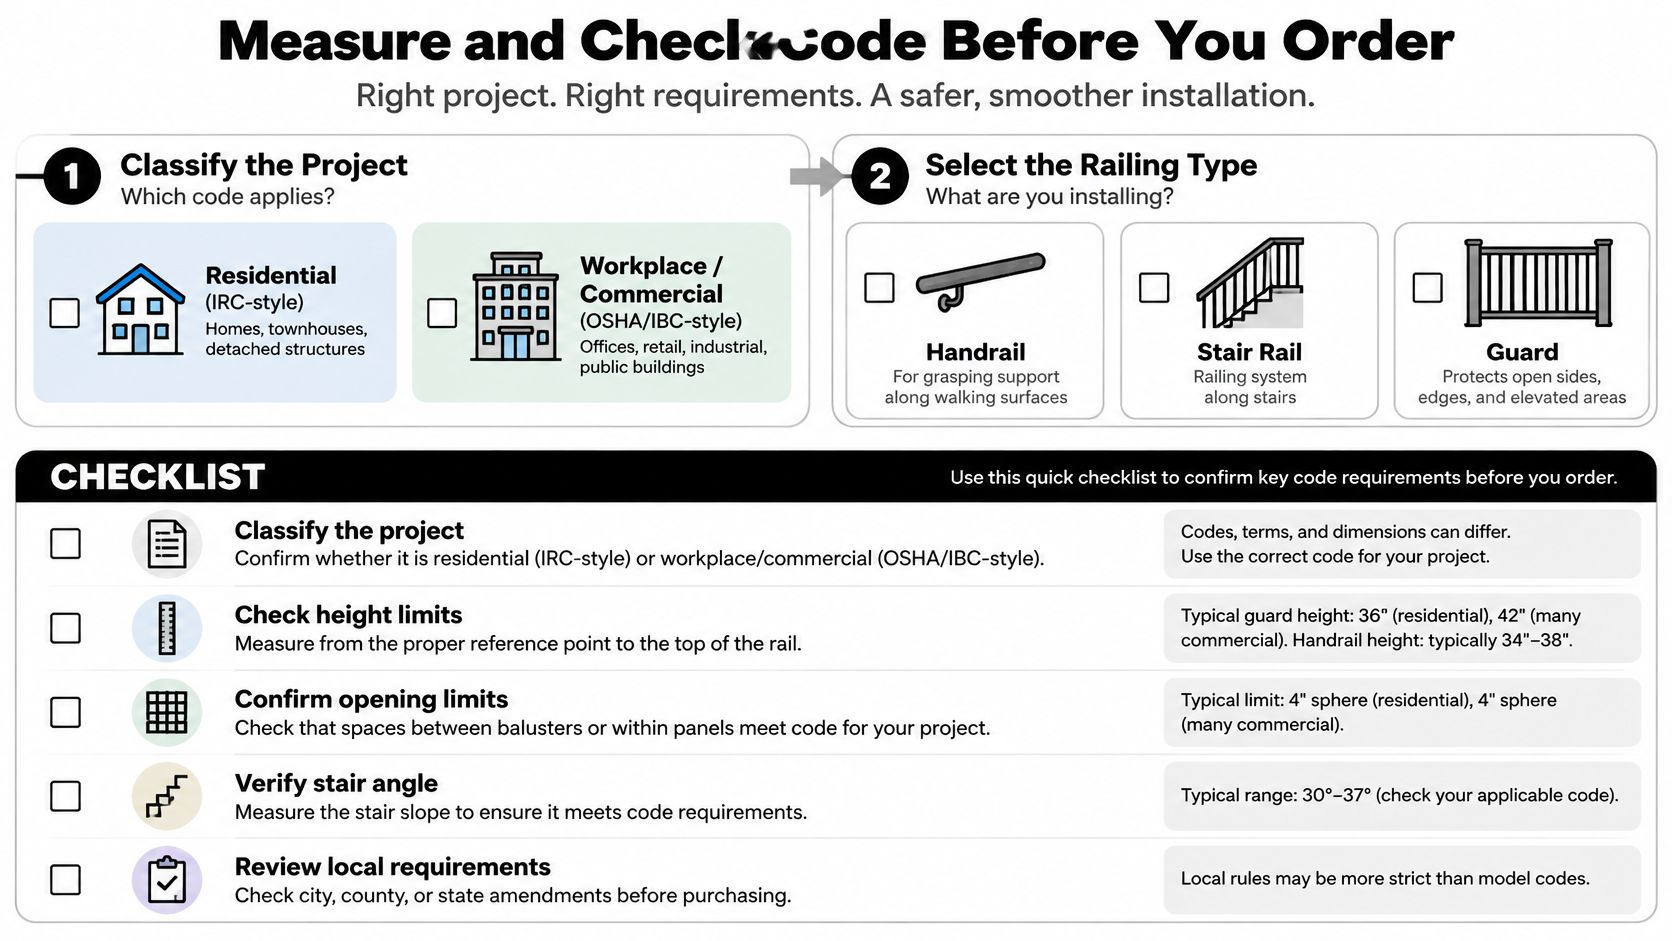
Measure the stair, not just the opening
Record every tread nosing, riser, landing, and proposed post centerline on a sketch. Measure handrail height vertically from the applicable tread-nosing reference to the rail's top surface, not perpendicular to the stair slope.
Measure cable runs along the slope, between the intended terminal locations. Record the stair angle with a digital angle finder and photograph transitions where a sloped run meets a landing.
Cable infill doesn't make a broad decorative cap graspable. A visually continuous run can still lack suitable grip, clearance, continuity, or returns.
Use the stair railing requirements guide to prepare these questions for the building authority:
- Classification: Which code and assembly category apply?
- Dimensions: Which handrail, guard, clearance, and opening rules govern?
- Documentation: Are product drawings, attachment details, engineering, or inspections required?
- Transitions: How should the landing connection and handrail termination be detailed?
Pick the Kit Size and Mounting Style
Choose the mounting arrangement before deciding how much railing to order. A surface-mounted post is convenient only when its base lands over structure capable of accepting the specified fasteners. A side-mounted post can preserve tread space, but it needs suitable access, edge distances, and a sound structural face.
Compare the available railing mounting types against the actual stair framing. Don't assume a mounting bolt supplied in a box is suitable for every wood, concrete, or steel substrate.
Size sections around the approved post layout
Treat each stair side and landing as a separate measured run. Give the supplier the sloped terminal-to-terminal distance, stair angle, proposed post positions, and landing details. Ask the supplier to identify where sections terminate and how intermediate supports fit into the layout.
For a hypothetical run longer than a standard module, round up the material allowance, but don't assume adjoining kits create an approved continuous span. The post arrangement, cable terminations, and handrail joints still need to match the system design.
Ordering rule: Buy to an approved layout, not merely to a total length.
Extra cable helps with field trimming; it doesn't compensate for an incorrectly positioned terminal post. Likewise, a longer handrail isn't automatically suitable for cutting wherever convenient, particularly near joints or angle transitions.
Check the contents and the finish
One available option is the Cable Railing - Stainless Steel With Blue Wood Top 8' Deck Mounted Stair Section, whose catalog lists pre-drilled posts, mounting bolts, a top handrail, stainless cable and fittings, installation fasteners, a hydraulic tool, and wire cutters.
Compare that contents list with other kits before pricing missing tools or hardware. Confirm whether the supplied fittings accommodate the stair angle and whether the proposed handrail profile suits the approved design.
- Stainless finish: Inspect fabrication quality and ask how to clean the surface without contaminating it with ordinary steel debris.
- Black metal finish: Check how field cuts, drilled holes, and damaged coating should be repaired.
- Wood top: The catalog describes the wood as sanded and unfinished, so plan for staining or protective finishing on site.
- Attachment hardware: Have the supplier identify fasteners for your actual substrate, not just the general mounting style.
Finish unfinished wood before inaccessible faces become trapped against brackets, following the coating manufacturer's preparation and drying instructions. Keep finish out of fitting threads and cable-gripping components.
Tread-mounted posts deserve particular scrutiny before ordering. Remove a cover or inspect from below where possible so the attachment detail is based on framing, not assumptions about what lies beneath the tread.
How to Install the Cable Railing Step by Step
Have the approved drawing, manufacturer's installation instructions, and substrate-specific anchor details beside you. Useful tools include a tape measure, digital angle finder, level, drill guide, suitable bits, torque wrench, cable cutters, and the specified crimping equipment.
The installation sequence below keeps the supporting assembly ahead of cable tension.
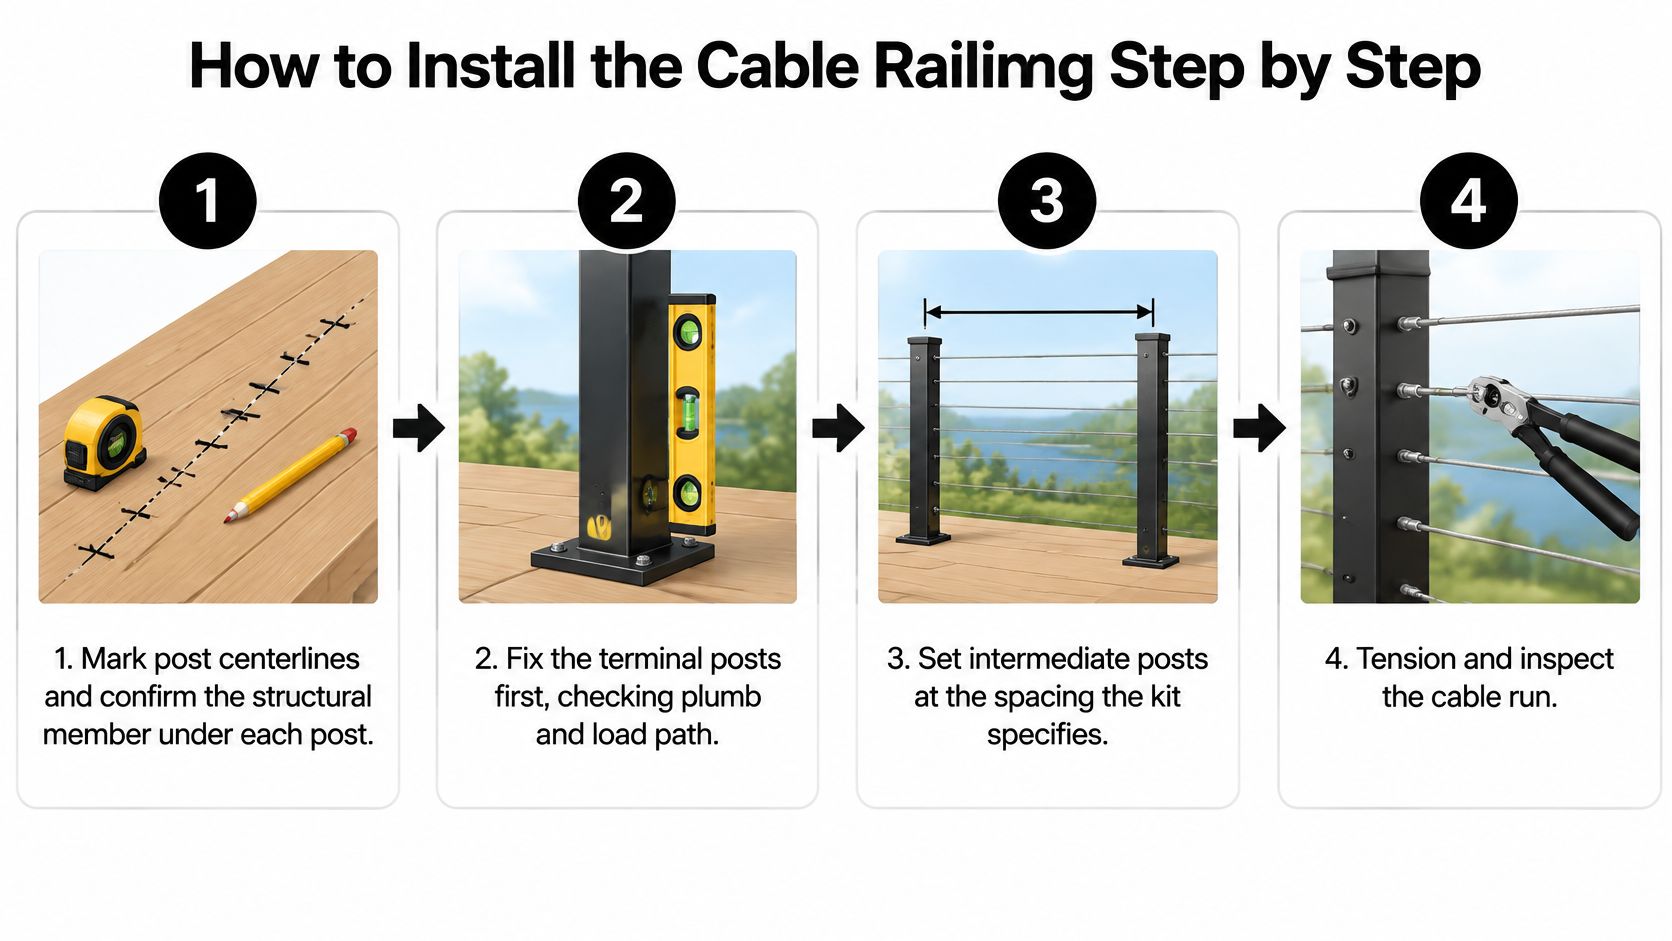
Establish the posts before handling cable
- Mark post centerlines and confirm the structural member under each post. Transfer the approved layout with a pencil and straightedge, then check underneath for framing, services, and access for washers or backing plates. A base plate that fits neatly on the tread can still place its fasteners outside the supporting member.
- Fix the terminal posts first, checking plumb and load path. Drill and install the specified anchors using the required hole preparation, embedment, and tightening procedure, then check each post in both directions. Don't use cable tension to pull a leaning terminal upright; that hides a layout or attachment problem and loads the assembly unevenly.
- Set intermediate posts at the spacing the kit specifies. Align the cable holes along the stair slope with a string line or laser, and verify the handrail connection before final tightening. Enlarging holes to rescue a poor layout can damage the finish and alter the intended support detail.
Protect the stair surface while drilling and collect metal swarf promptly. Stainless debris can scratch finishes, while ordinary steel particles left on stainless components can produce rust staining.
Fit, terminate, and inspect
- Thread cable through the correct posts and fittings. Follow the manufacturer's routing sequence and keep the cable straight, clean, and free of kinks as it follows the slope. Leave adjustment available at the tensioners rather than using up their travel before the run is seated.
- Measure the finished termination before crimping. Where the kit uses swaged fittings, mark the specified insertion depth and use the matching hydraulic tool, die, and crimp sequence. Cutting or crimping before accounting for the fitting geometry can leave a cable too short, and an incomplete swage isn't repaired by tightening harder.
- Seat the cable, then tension and inspect the assembly. Follow the system's tensioning order, recheck post alignment, and inspect openings throughout the run, including beside posts and near transitions. Finish by checking handrail height, grip access, fasteners, and tensioner engagement; cable infill can't compensate for flexible posts or weak anchorage.
Stop tightening when the post starts moving. More tension isn't a repair for an inadequate attachment.
Watch the installation demonstration for an additional view of the handling sequence, but use your kit's instructions for the actual fittings and connections.
Don't improvise a proof-load test by hanging weights from the handrail. Arrange any required verification through the installer, engineer, or building official, and retain the approved drawings and hardware instructions for future maintenance.
Troubleshoot and Maintain the Cable Railing
Cable sag after initial seating is usually the first adjustment to investigate. If the posts and fittings remain secure, re-tension the run using the manufacturer's sequence, then inspect the entire assembly rather than judging success by how straight the cable looks.
If the cable loosens again, stop treating it as routine settling. Mark the tensioner positions, photograph the terminals, and check whether a fitting is slipping, a post is rotating, or an anchor is moving.
Match the repair to the symptom
Cable railing symptoms, causes and fixes
| Symptom | Likely cause | Fix |
|---|---|---|
| Cable sags after install | Cable wasn't re-tensioned after seating | Re-tension and recheck the full run |
| Post moves under load | Weak blocking, an undersized anchor, or another attachment defect | Restrict use and arrange blocking or an engineer's attachment review |
| Top rail isn't graspable | Oversized or otherwise unsuitable profile, or obstructed grip access | Install a compliant handrail or replace the unsuitable rail |
| Opening too wide | Excessive spacing, cable deflection, or an incorrect post layout | Correct spacing and support details under the approved design |
Use the cable railing tightening guide to understand adjustment technique, but identify the tensioner type before putting a wrench on it. Hold the fitting where instructed so adjustment doesn't twist the cable or damage the termination.
A straightforward tension adjustment may be a quick task. Adding blocking isn't automatically one: access may require removing finish material, and the new blocking still needs a designed connection into the framing.
A moving post needs a structural repair, not a cosmetic one. Don't cover the movement with sealant, larger trim plates, or extra cable tension.
Know when adjustment won't solve the problem
An oversized wood cap may be comfortable to rest a palm on but difficult to grip during a misstep. Replacing the cap isn't always necessary if the approved design permits a separate graspable handrail, but that addition needs suitable brackets, clearances, and terminations.
An excessive opening also isn't always a tension problem. If the post drilling or cable layout is wrong, tightening harder can distort the posts without correcting the underlying geometry.
A maintenance adjustment restores the intended design. A modification changes it and may need fresh approval.
Anchor substitutions, relocated posts, and alterations to tread-mounted attachments deserve review before drilling new holes. Existing holes can reduce the usable attachment area, and a larger anchor may require edge distances the tread cannot provide.
Keep the maintenance routine tied to likely failures
Schedule a follow-up after the cables have seated, using the manufacturer's stated inspection interval. Don't substitute a fixed calendar reminder for inspection after noticeable movement, impact, or building work nearby.
- Cable and tensioners: Look for slack runs, backed-out adjustments, broken strands, or fittings that have shifted from their original positions.
- Posts and bases: Check for rotation, lifted base plates, cracked material, water staining, and loose fasteners. Investigate the cause before retightening.
- Metal surfaces: Wash with mild soap and water, rinse thoroughly, and use a soft cloth rather than abrasive steel wool.
- Wood handrails: Check for moisture at end grain, splitting around fasteners, coating failure, and rough areas that interfere with a comfortable grip.
- Stair alterations: Recheck the approved handrail relationship after tread replacement, resurfacing, or other changes to the walking surface.
Marine-grade stainless still needs cleaning, especially where salt deposits collect. Rinse exposed cable and fittings with fresh water, paying attention to sheltered joints that rain doesn't wash clean.
Keep aggressive cleaners, masonry chemicals, and ordinary steel grinding dust away from the assembly. If another contractor works nearby, cover the railing and remove the protection afterward so trapped moisture doesn't remain against the finish.
Record repairs and keep photographs of concealed blocking and anchors. Those records make it easier for the next installer to distinguish a loose connection from a deeper attachment problem without unnecessary demolition.
Decide DIY or Professional Before You Buy
DIY is a reasonable option when the project is residential, the supporting structure is verified, and the building authority accepts the proposed design. You also need the tools and skill to drill accurately, install the specified anchors, and make reliable cable terminations.
Choose professional installation or engineering review when the work involves workplace stairs, uncertain framing, deteriorated materials, unusual transitions, or requested stamped drawings. Thin treads and inaccessible stringers are reasons to investigate further, not reasons to select a smaller base plate.
Treat tread attachment as a design question
The ICC-ES evaluation report ESR-4797 states that handrail or guard systems attached to stair treads must be designed for applicable loads and that their dead weight must not exceed 25 pounds per linear foot along one or both sides of the staircase within that report's scope.
That isn't a blanket approval for any kit attached to any tread. The reviewer still needs to consider the evaluated stair construction, stringer arrangement, anchorage, and proposed railing assembly.
Before requesting a quote, gather:
- Geometry: Tread nosings, landings, post centerlines, stair angle, and sloped run lengths.
- Structure: Tread material and thickness, supporting-member locations, and photographs from below.
- Connections: Proposed mounting style, available anchor access, and wall-side clearance.
- Approval needs: Permit requirements, drawing expectations, and any requested engineering.
Send the measurements with a clear sketch and ask the supplier for a drawing showing the proposed sections, terminations, handrail, and attachments. Resolve the building authority's questions before fabrication and shipping, when changes are less disruptive than replacing drilled posts or finished rails.
Ultra Modern Rails offers made-to-order cable railing sections, mounting options, and wood handrail choices for stair projects. Visit Ultra Modern Rails to request a custom quote and drawing using your stair measurements, substrate details, and local approval requirements.