

You're standing on a half-finished deck, cable in one hand, a box of fittings in the other, and you've just realized the rental shop doesn't have the hydraulic swager you planned to borrow. That moment is where homeowners discover swageless cable railing hardware. It's also where a lot of projects go sideways, not because the fitting was wrong, but because the fitting was never the hard part.
Table of Contents
- Why the Hardware Choice Matters More Than Most People Think
- How Swageless and Swaged Cable Terminations Actually Work
- Side-by-Side Comparison of Swageless and Swaged Systems
- Code Compliance and What Swageless Hardware Cannot Fix
- Corrosion, Saltwater, and the Limits of 316 Stainless
- Matching Fittings to Project Type and Environment
- What to Confirm Before You Order or Install
- The Bottom Line on Choosing Swageless Cable Railing Hardware
Why the Hardware Choice Matters More Than Most People Think
A homeowner once called me after buying swageless terminals online because the listing said no special tools were required. That part was true. He terminated every cable in an afternoon with two wrenches, tensioned them until they sang, and then watched his end posts lean inward over the next week. The fittings held. The posts didn't.
That's the pattern. People treat swageless versus swaged as a shopping decision, something you settle by comparing price per fitting and whether you're comfortable running a crimper. In the field, it's a decision about the whole guard assembly, which includes the terminal, the post it pulls against, the anchorage under that post, the framing under the anchorage, and the environment slowly working on all of it.
What the Terminal Actually Controls
A termination controls three things. It grips the cable, it lets you apply and adjust tension, and it delivers that tension into the post. It doesn't control whether your post spacing allows too much deflection, whether your deck blocking can take the load, or whether salt air will attack the threads you can't see.
- Termination ease: Swageless hardware removes the swaging step, so field assembly gets simpler.
- Tension delivery: Both systems still dump the same cumulative cable force into your end and corner posts.
- Code outcome: Neither system makes a weak guard compliant on its own.
Shop rule: Buy the fitting last. Confirm the post, the anchorage, and the local code edition first, then pick hardware that matches that structure.
Once you think in that order, the swageless question changes. You're not asking whether you can avoid a swager. You're asking whether this terminal, on this cable, fixed to this post, in this climate, will hold geometry and tension for years without slipping, corroding in its crevices, or bowing the frame. That's a better question, and it's the one inspectors, engineers, and experienced installers ask.
How Swageless and Swaged Cable Terminations Actually Work
A swaged termination starts as a hollow stainless sleeve. You slide the cable in until it bottoms out, then a hydraulic tool squeezes the sleeve hard enough that the metal flows into the valleys between the cable's outer wires. That connection is permanent. If you cut long or crimp in the wrong spot, you cut the fitting off and start over.
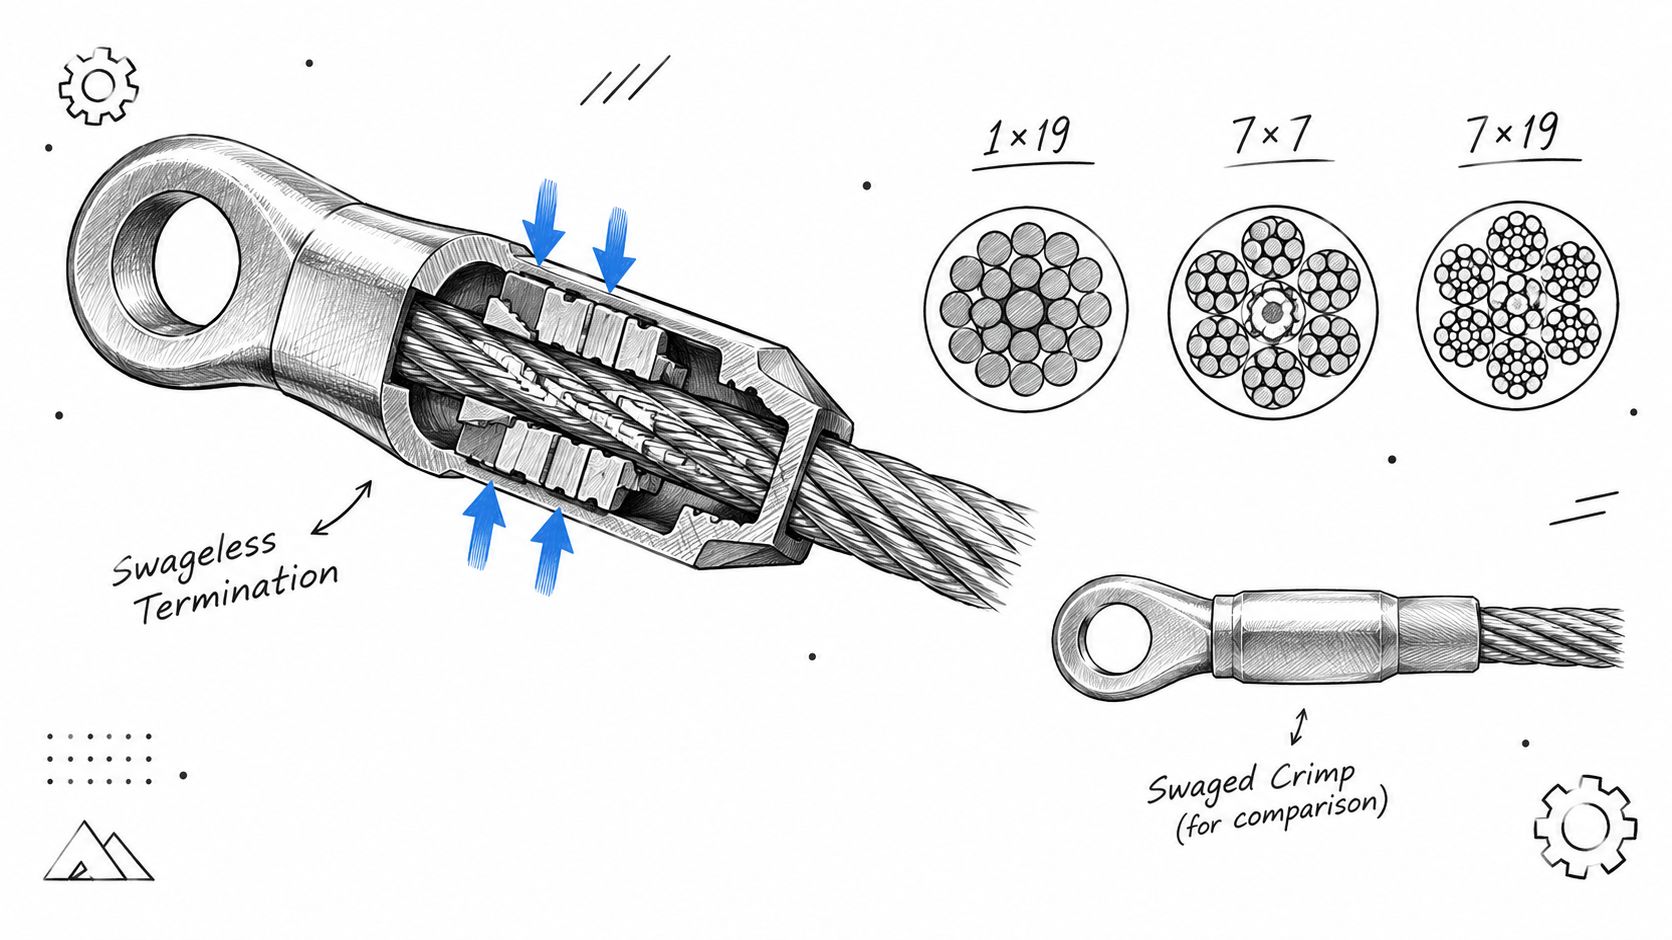
Swageless cable railing hardware works differently. It uses mechanical components, typically internal wedges, cones, jaws, receivers, and a threaded tensioning body, to grip the cable without pressing a fitting permanently onto its end. Insert the cable, tighten the body, and the internal parts bite harder as tension tries to pull the cable out. Unthread it later and many designs let you release, trim, and reassemble.
The diagram below shows that cutaway relationship between the fitting body and the rope it grips.
Cable Construction Decides Compatibility
Wire rope isn't a solid rod. It's multiple helically twisted strands, and the layout changes how flexible and grippy it feels. A documented 7×19 wire rope construction with seven strands of 19 wires each, totaling 133 individual wires bends readily, which helps on stairs and angled runs. A 1×19 construction is stiffer, stretches less, and suits straight architectural runs, but it doesn't like tight bends.
Match the fitting to the exact diameter and construction the manufacturer rates it for. A wedge set designed for one layout may seat unevenly on another, and that shows up as slip under load rather than as an obvious assembly error.
Complete systems bundle those choices for you. The Cable Railing - Indoor Stainless Steel 36" or 42" System - High End Custom Railing, for example, is supplied with pre-drilled posts, mounting bolts, a top handrail, and marine grade 316 stainless steel cable and hardware, which removes some guesswork about component matching.
Side-by-Side Comparison of Swageless and Swaged Systems
People love a pros and cons list, but fittings don't fail in the abstract. They fail on a specific stair with bad access, or on a 30-run condo job where labor hours matter, or on a DIY deck where one miscut wipes out your spare cable.
| Criterion | Swageless Hardware | Swaged Hardware |
|---|---|---|
| Tooling required | Standard wrenches, hex keys, quality cable cutter | Hydraulic swaging tool with matched dies |
| Field error tolerance | High, most designs release and retrim | Low, a bad crimp means cutting it off |
| Reusability | Often reusable after inspection | Single use, permanent |
| Tension adjustability | Built into the threaded body | Depends on the terminal style paired with it |
| Visual profile | Slightly larger body to house internals | Slimmer, can hide inside the post |
| Unit cost | Higher per fitting | Lower per fitting, tool cost on top |
| Serviceability | Easy to disassemble and inspect | Sealed, can't inspect the grip internally |
Where Each System Earns Its Keep
On a single DIY deck resurfacing, swageless usually wins. You avoid buying or renting a crimper for one job, and when your third cable comes up a fraction long, you fix it in minutes. I've watched beginners produce clean, tight work this way because the process forgives small measurement errors.
On a hotel lobby or a long commercial run, the math flips. A crew that owns a good swager and repeats the same termination dozens of times gets a slimmer, more uniform profile at a lower hardware cost per end. If you're weighing that route, it's worth reviewing how crimping stainless steel cable works in practice before committing to the tooling.
Stair runs sit in between. Angles and directional changes reward the adjustability of swageless bodies, especially where access behind the post is tight. But stairs also expose sloppy work, since a terminal that seats crooked shows against a raked handrail.
A swageless fitting that slips a little is worse than a swaged fitting done properly, and the reverse is also true. Workmanship beats category every time.
Judge long-term serviceability too. Swageless hardware can be opened, cleaned, and retensioned years later. Swaged ends ask less of you over time, but if a cable is damaged mid-run, replacement means cutting and reterminating rather than unthreading.
Code Compliance and What Swageless Hardware Cannot Fix
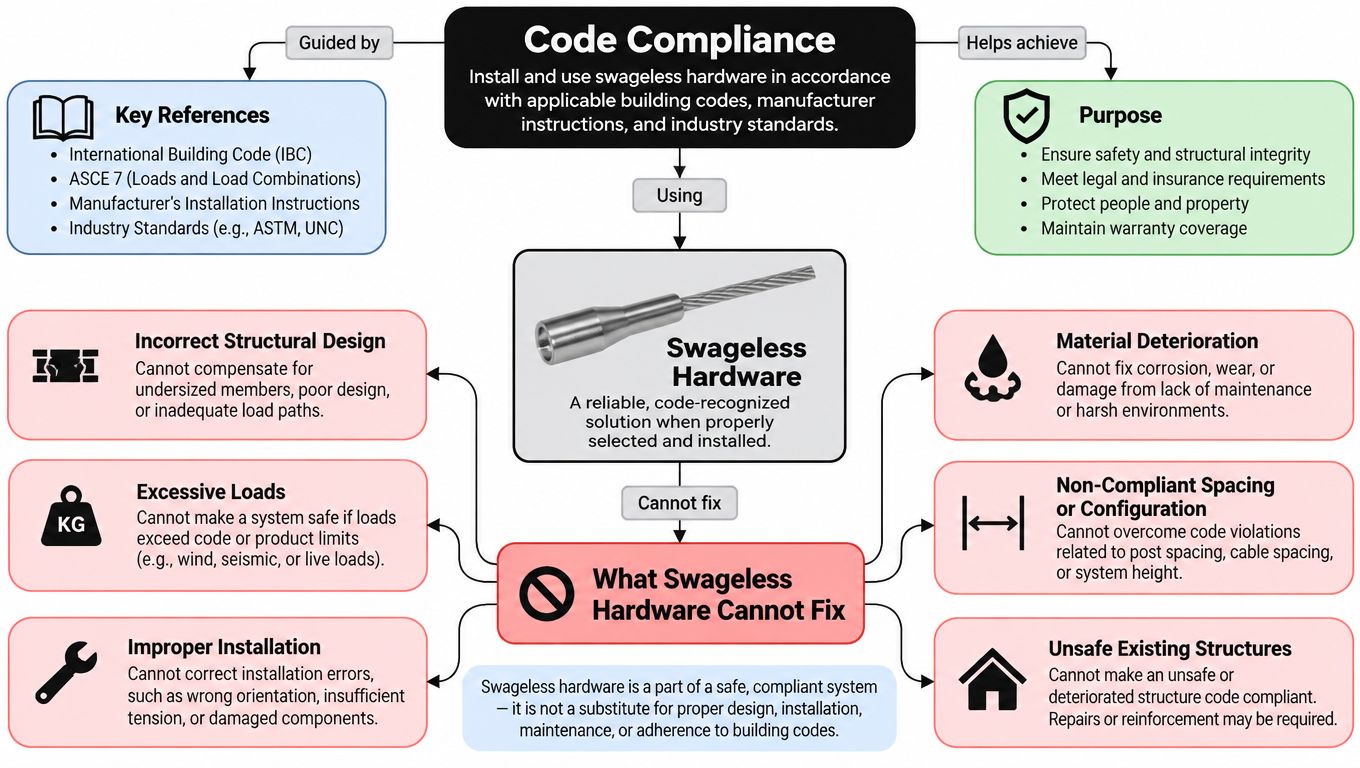
Here's the misunderstanding that causes failed inspections. A fitting can be excellent and the guard can still be illegal, because code governs the assembly, not the catalog page.
The flow below maps where compliance is decided, from geometry through load path.
The Numbers That Govern the Guard
Under the 2015 IBC and IRC 4-inch sphere rule for guard infill openings, a sphere of that diameter cannot pass through. For cable, that means spacing and tension work together. Cables spaced correctly but left slack can deflect apart under a child's weight and open a gap that wasn't there on your tape measure.
Load is the second half. Current code evaluation documents under the 2024 IBC and IRC identify a 200-pound point load for residential top rails and a 50-pound-per-linear-foot commercial load. Those forces have to travel somewhere, through the top rail, into the posts, through the base plates and anchors, and into framing or concrete that can take them.
Tension alone adds up fast. One commercial specification calls for sequential tensioning to at least 225 lb per cable, so a 36-inch guard with 11 cables imposes roughly 2,475 lb of cumulative force on an end post. That load exists before anyone leans on the rail.
What to Verify Before You Claim Compliance
- Post and anchorage capacity: Confirm the end and corner posts, plus their substrate, can carry cumulative tension without bowing.
- Cable spacing under deflection: Don't just measure static spacing, check that tensioned cables hold geometry when pushed apart.
- Local code edition: Model code language isn't automatically your jurisdiction's adopted requirement, so check the code and compliance basics for cable railing against your local amendments.
- Engineer responsibility: On commercial work, design down to the post and base plate typically sits with a professional engineer, not the hardware supplier.
Can you put swageless fittings on existing posts? Sometimes. But the fitting can't answer that question. The supporting structure and its connections have to transfer the required loads, and if your existing posts were built for wood balusters carrying almost no horizontal preload, assume they need reassessment, not just new holes.
Corrosion, Saltwater, and the Limits of 316 Stainless
Specifying 316 stainless and walking away is the most common coastal mistake I see. Grade matters, but location, crevices, and neighboring metals decide what happens to your hardware.
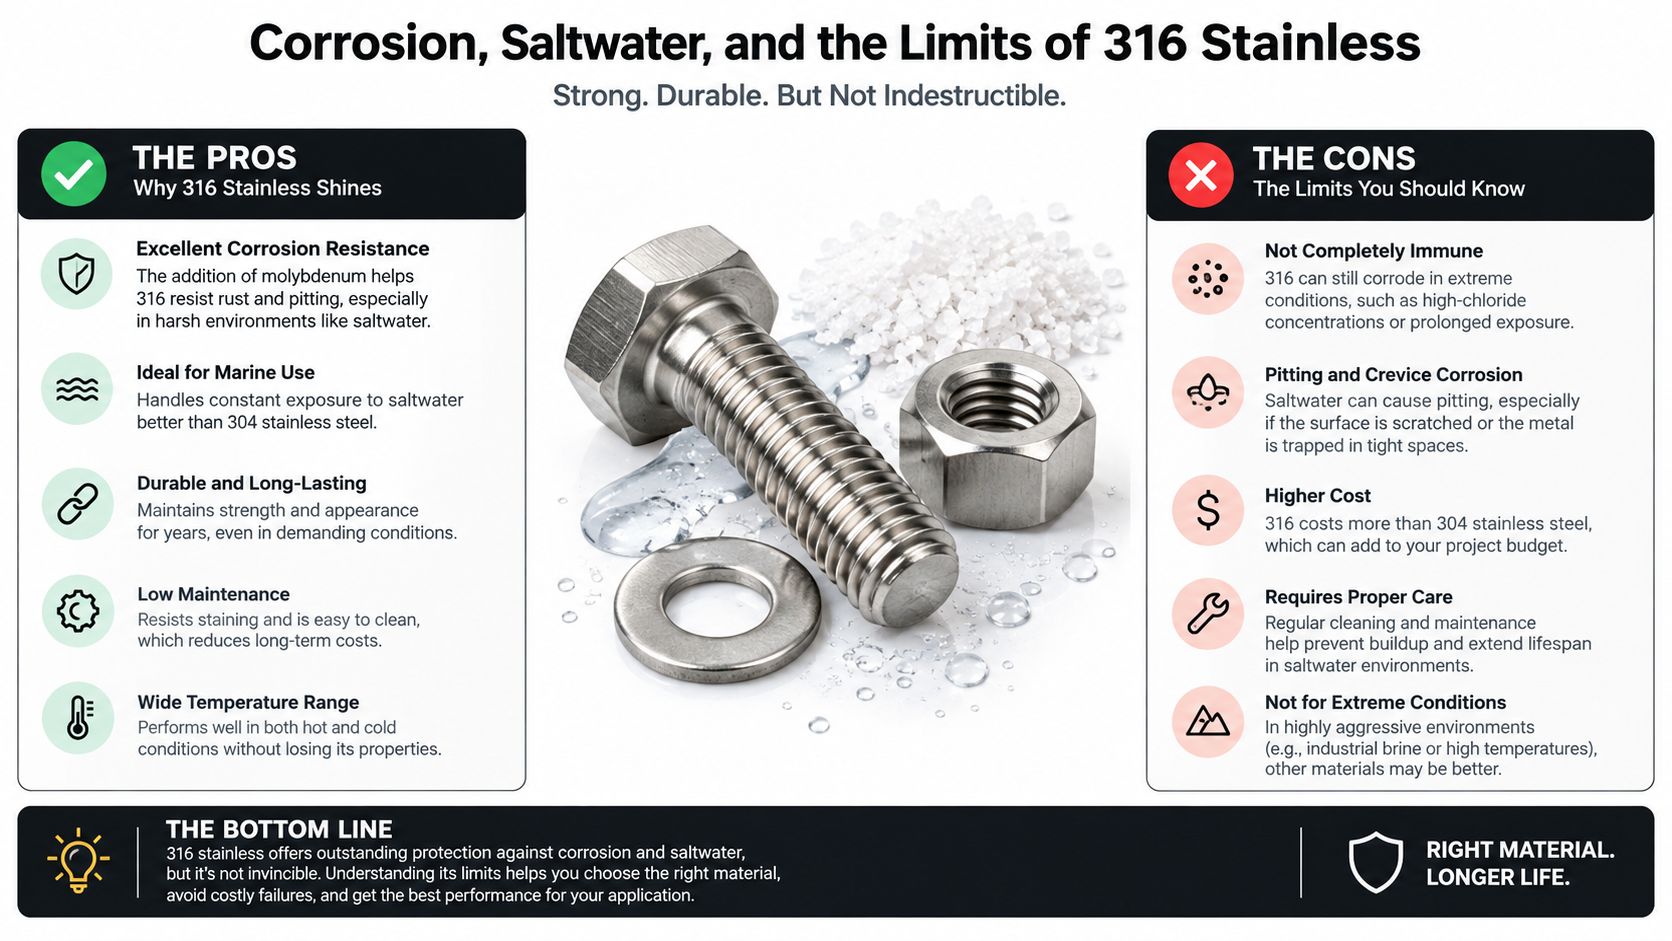
The infographic below weighs what 316 does and doesn't protect against in saltwater service.
Why Swageless Fittings Have Extra Exposure
A swageless body is a small assembly of threaded parts, and every thread root, washer face, and cable exit is a potential crevice where salty moisture sits instead of drying. Recent research summarized in a 2025 study on chloride driven corrosion found that curved geometry raised the corrosion intensity index to 2.9 times that of flat geometry when stainless was coupled with a dissimilar metal in a chloride environment. Curved, threaded, and coupled describes a swageless terminal pretty well.
Chloride concentration also aggravates pitting in 316L itself. So pools, deicing salt tracked onto a balcony, and direct marine air aren't minor variations of outdoor. They're different service conditions, and hardware that performs fine on an inland porch can pit at the cable exit near a saltwater pool.
Practical Defenses That Actually Help
- Isolate dissimilar metals: Use isolation washers or sleeves where stainless meets aluminum, galvanized steel, or copper-treated lumber.
- Rinse on a schedule: Fresh water rinsing removes chloride deposits before they concentrate in crevices, and marine installations need it more often than inland ones.
- Read the surface correctly: Light tea staining usually signals a maintenance lapse, while deep, localized pits signal active attack that cleaning won't reverse. Reviewing how stainless steel corrosion develops and spreads helps you tell the two apart.
- Inspect hidden threads: Periodically back off a sample fitting in harsh environments and look inside, since that's where damage hides longest.
Indoor dry environments forgive almost all of this. Marine and pool environments forgive almost none of it. Treat 316 as the starting point for those jobs, not the whole answer.
Matching Fittings to Project Type and Environment
Start with the project profile, not the hardware aisle. Code class, environment, post stiffness, and maintenance access point you toward a sensible fitting choice faster than any brand comparison.
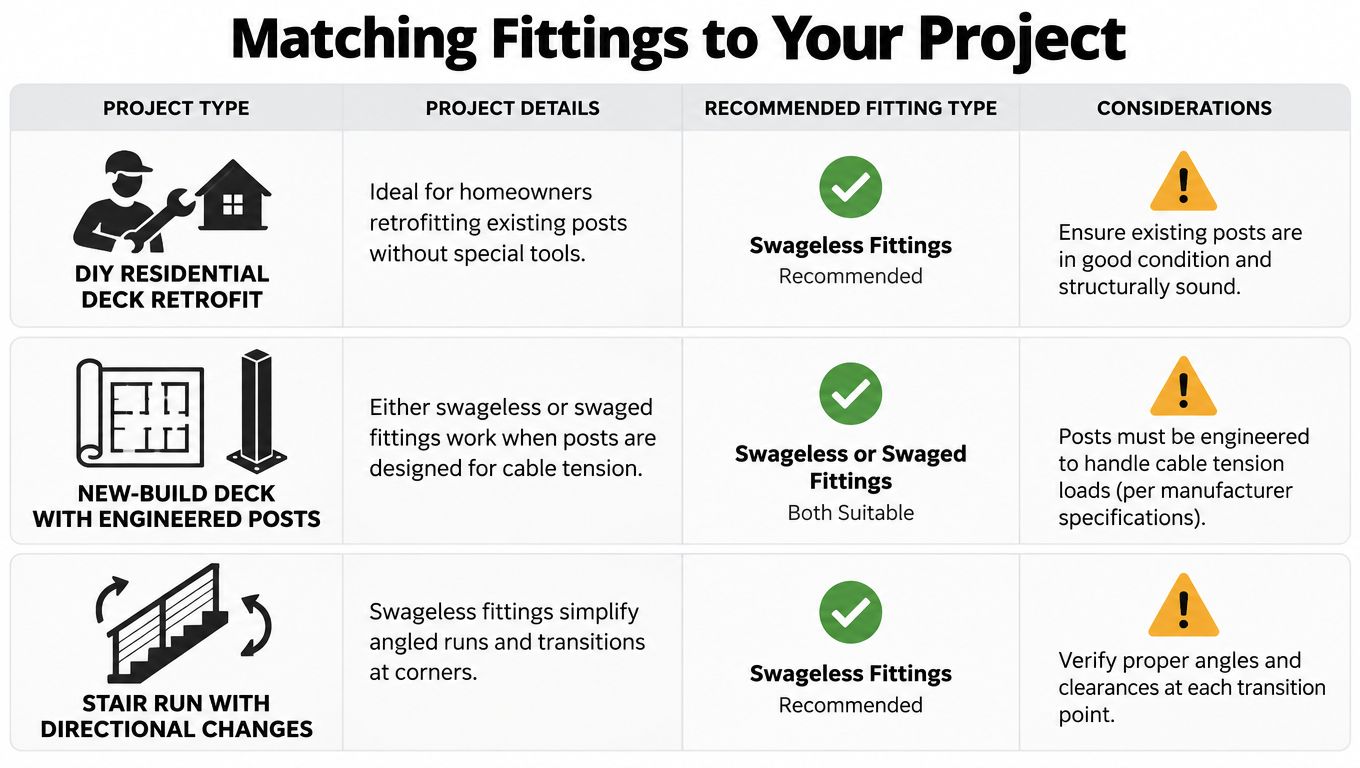
The chart below matches common project types to hardware direction and the caution that travels with each.
Reading the Scenarios
A DIY residential retrofit favors swageless fittings because you're working with existing posts, imperfect measurements, and no swager. Your real risk isn't the terminal, it's whether those existing posts and their anchorage were ever meant to carry cable preload.
A new-build deck with engineered posts is open. When posts are designed for the tension from the start, either system performs, so choose on appearance, budget structure, and whether you already own tooling. That freedom disappears the moment someone substitutes lighter posts to save money.
A stair run with directional changes rewards field adjustability. Angled terminations, corner transitions, and tight access make rework likely, and swageless hardware absorbs that rework without scrapping cable. Watch your cable construction choice here, since stiff rope fights angled entries.
Hospitality and commercial work shifts the priority to documentation and repeatability. High traffic, stricter review, and engineer involvement mean predictable approvals matter more than saving an hour of labor. Swaged or fully engineered systems often fit better there, though swageless hardware can work when the submitted assembly supports it.
The walkthrough below shows fitting handling on a real run, which is a useful gut check on access and sequence before you commit.
Environment overlays all four scenarios. Move any of them to a coastline or a pool deck and corrosion planning jumps ahead of termination style in importance.
What to Confirm Before You Order or Install
Most ordering mistakes are verification mistakes. Run this list before money changes hands and you'll avoid the returns, the leaning posts, and the awkward call to the inspector.
Pre-Purchase Checklist
- Cable match: Confirm the fitting is rated for your exact cable diameter and construction, not just a close diameter.
- Post capacity: Verify end and corner post stiffness, spacing, and anchorage against cumulative tension, and add blocking or backing where framing is questionable.
- Environment rating: State plainly whether the site is indoor, inland outdoor, coastal, or pool adjacent, then spec isolation and maintenance accordingly.
- Submittal paperwork: For permit or commercial work, gather load documentation, drawings, and the code edition you're designing to before installation starts.
Pre-Install and After
Plan your tensioning sequence rather than cranking cables randomly. Work in the manufacturer's specified order, bring cables up gradually, and check post plumb as you go instead of discovering lean at the end. Then inspect for cable slip after initial loading and again after the system has sat and acclimated, because seating movement shows up early.
Field habit: Mark each cable at the fitting mouth with a fine paint pen after final tensioning. If that mark moves later, you've found slip in seconds instead of guessing.
Know when a custom quote and drawing beats an off-the-shelf kit. Odd angles, mixed substrates, commercial loads, and retrofit posts all push you toward engineered help and pre-drilled posts made for your layout. Straight residential runs on sound framing are where kits earn their simplicity.
The Bottom Line on Choosing Swageless Cable Railing Hardware
Swageless hardware simplifies termination. It doesn't simplify engineering. That distinction settles most arguments, because the right question was never which fitting wins in isolation. It's whether the complete guard, posts, anchorage, cable, and terminations together, delivers code-level performance in the environment where it'll live.
Pick swageless when field adjustment, limited tooling, and serviceability matter and your structure is verified. Pick swaged when a slim profile, repeatability at scale, and existing tooling matter more. In both cases, spec to the weakest link in the load path, not the most convenient item in the toolbox.
If you'd rather verify the whole system than guess at the fitting, Ultra Modern Rails supplies factory-direct, custom-made stainless cable railing for decks, stairs, balconies, pools, and commercial spaces, with a free custom quote and drawing to confirm posts, sections, and hardware before you order. Send in your measurements and project conditions, and get a railing designed as a complete guard, not just a box of terminations.